Vehicle:
- 2004-2006 Toyota Sienna with 3.3-liter 3MZ-FE V6 engine (2007-2010 Toyota Siennas have a 3.5 L engine where the thermostat is located on the passenger side)
Parts Needed:
- Genuine Toyota 90916-A3003 Thermostat
, part number 90916-A3003 (note: this part replaces part number 90916-03084
- Genuine Toyota Water Inlet Gasket
, part number 16325-62010
- 12.4 US quarts of Toyota Super Long Life Coolant
- Radiator Hose Clamp
(if yours were corroded like mine–you may need from 1-4 of them depending on the condition of yours, only 2 of mine needed replaced)
- Push-Type Fastener Rivet Retainer Clips
(because some of them most likely will be broken when you take them out)
- 2 Gallon Gas Can With Spout
(for adding antifreeze since you cannot use a funnel)
- Funnel with Flexible hose (radiator cap is up under the front of the van so you cannot put a normal funnel in it)
Tools Needed:
- Socket ratchet with the following sockets: 10mm, 8mm (get a good set here
)
- 3/8″ Torque Wrench (if you want to torque your bolts when reinstalling the water inlet pipe, as requested by one reader)
- Engine Fluid Catch Pan
(for catching the antifreeze when you drain it)
- Vehicle Ramps
- Corded work light
- Bent Nose Pliers
(for removing hose clamps if you have spring clamps on them)
- A large sheet of cardboard (or better yet, a mechanic’s creeper)–cardboard much more comfortable to lay down on cardboard than a concrete floor (and warmer too!). If you’re replacing the radiator then the box of your replacement radiator should do fine.
Other (optional) Stuff Needed:
- WD-40
for soaking down locked-up and rusted bolts
- Electrical Tape
- Telescopic Magnetic Grabber
(for reaching those dropped bolts or better yet, for keeping them from dropping when you are removing them)
How to Replace the Thermostat on a 2004-2006 Toyota Sienna
Here’s a time-lapse video of me doing the complete radiator and thermostat repair, in 3 minutes and 9 seconds, from our surveillance camera (the actual repair took quite a bit longer, especially since I was documenting every step with photographs and it was my first time):
BURN WARNING: You will want your engine to be cool before you begin this repair. The cooling system is a high pressure, high temperature system and opening the radiator cap before the engine has had time to cool will cause steam and high pressure hot antifreeze to come spraying out and sever burns can occur. If your engine is hot when you start you have quite a few steps that you can do first, in removing the bumper, etc, to give your engine and the antifreeze in the radiator time to cool.
I consulted the official Toyota Repair Manual (RM1163U) in doing this repair but I their descriptions and order of steps differ from what I’m going to suggest.
Update on repairing 2007-2010 Model Toyota Siennas:
I learned from a helpful reader that this article is not fully compatible with 2007-2010 Toyota Siennas. I have since learned that Toyota switched to a 3.5 L engine with the 2007 model. This engine’s thermostat is on the opposite side of the engine than the 3.3 L engine that my 2004 Toyota Sienna had. If you have a 2007-2010 I have learned that there is some support to be found in this article.
A word of encouragement:
If you are good with your hands and can follow instructions, you can perform this repair yourself. You will feel empowered when you are done, you’ll understand your Sienna better, and will have saved a couple hundred dollars too! Here’s an example of the type of comments you can read at the end of this article from others who have successfully repaired their Sienna with my article as a guide:
These instructions are better than YouTube, Chilton’s, and the service manual COMBINED! You are an excellent technical writer. I can’t thank you enough for making this available! -Loren R.
I just replaced the thermostat on my 2004 Sienna LX, and probably would not have attempted the fix had I not found your helpful photos and instructions. You go into every detail, nut, and bolt. Thank you so much! -John R.
Amazing write-up doesn’t even come close to covering this page. Did mine last night in about 3 hours as others have said with no major issues. … Your hard work and attention to every minor detail is greatly appreciated. -Eric L.
Thanks to your very detailed instructions and thorough photo log, I was easily able to replace the thermostat on my 2004 Sienna. -James T.
Great write up! Studied the steps for a couple of days and did the repair today on my 06 Sienna – took about 2.5, maybe 3 hours with clean up. Great detailed instructions and I was well prepared going into it. Biggest problem I ran into was the spring hose clamp. Thanks for saving me big $$ with this tutorial. -Paul
Thank you so much for the excellent instructions. I had to replace my water inlet on my 05 Sienna and probably would not have attempted it without your help. I tried to do it without removing the starter or battery but couldn’t get it out. Removing the battery and starter, while taking an extra 15 minutes, made it 10x easier to get the job done. … Thank you so much for taking the time to do this, I … probably would not have attempted it without your detailed instructions. The tips, especially the duct tape on the nut was very helpful. -Scott
Repair Steps:
- Step 1: Drive your van up on ramps.
- Step 2: Remove the Air Cleaner Inlet.
- Step 3: Remove the air cleaner assembly top cover.
- Step 4: Remove the air cleaner assembly lower box.
- Step 5: Remove the battery.
- Step 6: Remove the air cleaner bracket.
- Step 7: Remove air cleaner inlet number 1.
- Step 8: Disconnect the radiator hose from the water inlet pipe.
- Step 9: Remove the starter.
- Step 10: Remove the water inlet pipe.
- Step 11: Pry the thermostat free from the engine.
- Step 12: Install the new thermostat.
- Step 13: Reinstall the water inlet pipe.
- Step 14: Reinstall the starter.
- Step 15: Reinstall the radiator hose back on the water inlet pipe.
- Step 16: Reinstall air cleaner inlet number 1.
- Step 17: Reinstall the air cleaner bracket.
- Step 18: Reinstall the air cleaner (lower) case.
- Step 19: Reinstall the upper air cleaner case.
- Step 20: Reinstall air cleaner inlet number 2.
- Step 21: Reinstall the Battery.
- Step 22: Add coolant.
- Step 23: Run your van and let it warm up and open up the thermostat so the antifreeze flows through the radiator.
Step 1: Drive your van up on ramps.
This is not necessary for a thermostat repair but I did this repair as part of a larger repair and it does make it nicer to have the van closer up to you when you are a tall guy like me. I purchased these ramps, which are a pretty good deal and they stack up for easy storage.
 |
| Toyota Sienna up on ramps |
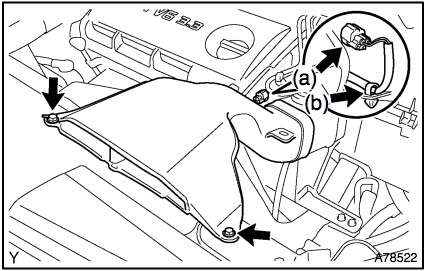
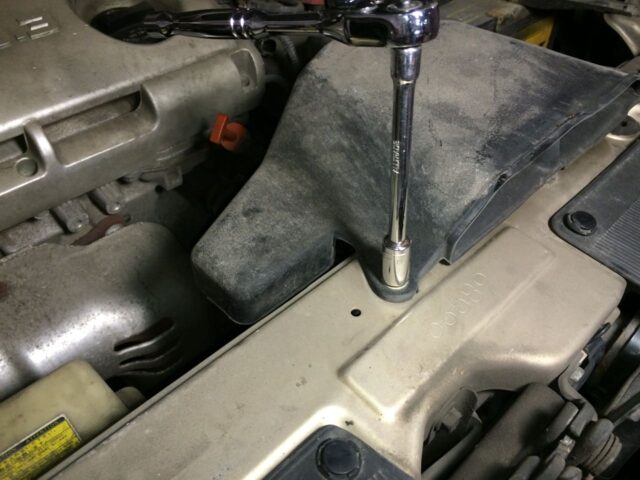
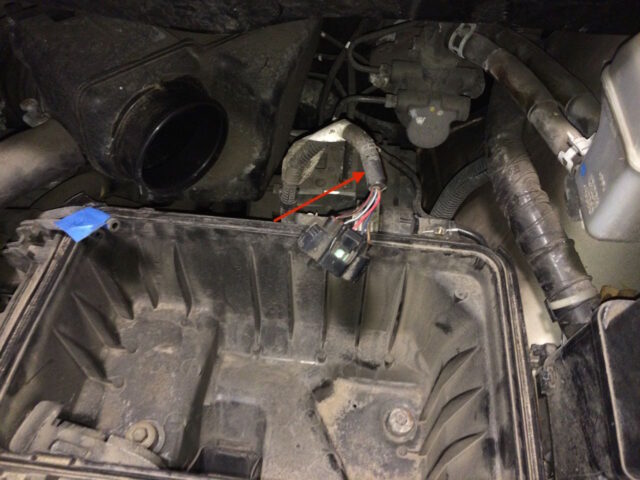
Step 2: Remove the Air Cleaner Inlet.
You will need to disconnect one wiring connector (VSV connector), free the wire harness clamp, and then remove the 2 bolts on the front edge of the inlet housing. Here’s what the air cleaner inlet looks like and the locations of the steps:
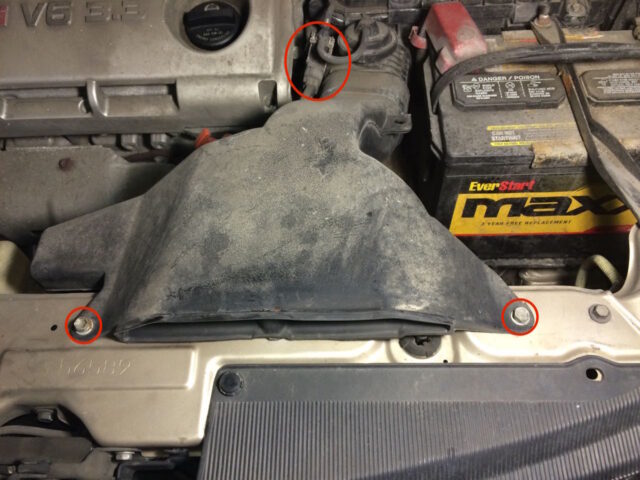 |
| Air cleaner inlet |
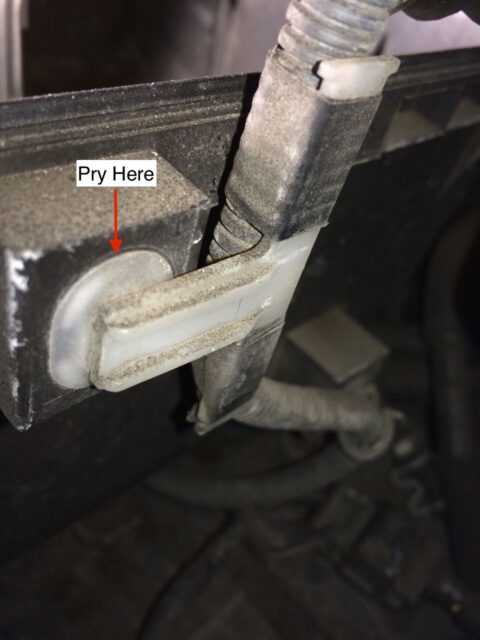
The VSV connector has a tab on the bottom of the connector that you must press in while you pull the connector free. I was not able to pull it free with my fingers so I used a screwdriver and twisted as seen below, prying the connector loose while pressing the tab:
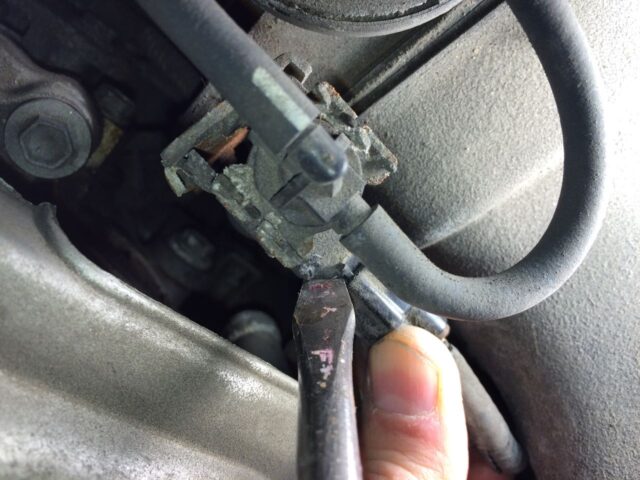 |
| Prying VSV connector free while pressing the tab with my fingers |
 |
| VSV connector and clip details |
This is what the connector looks like when you get it disconnected:
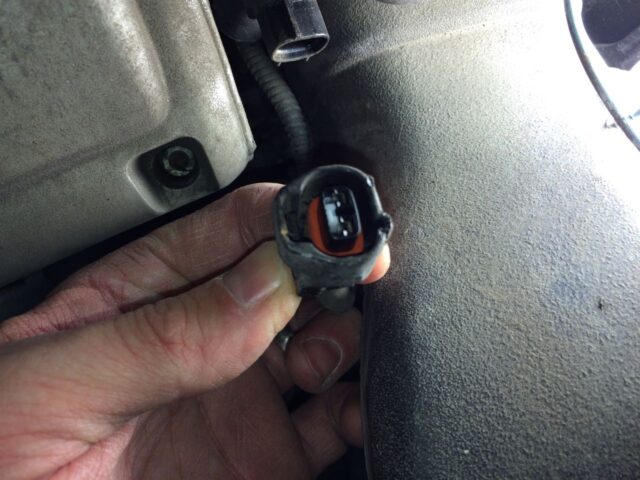 |
| VSV Connector Removed |
Pry the wire harness clamp free in the direction of the arrow with a large flat-head screwdriver:
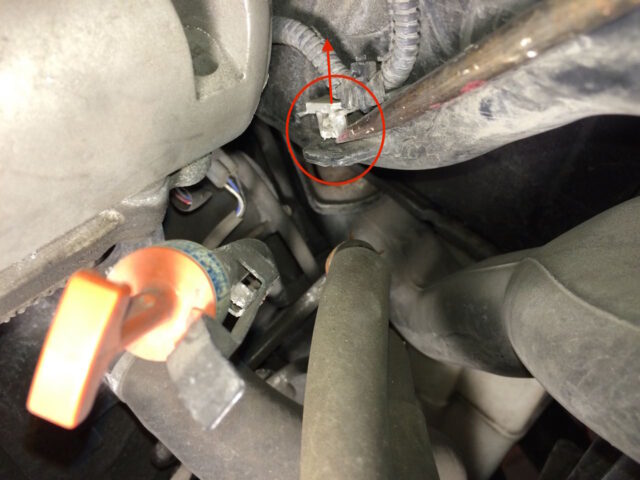 |
| Wire harness clamp on air cleaner inlet |
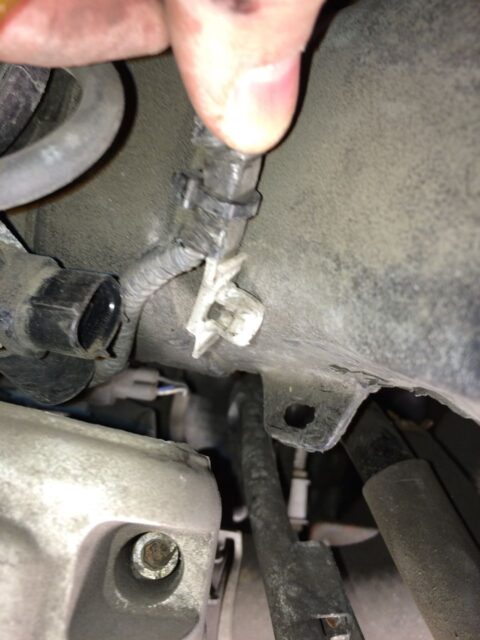 |
| Here the wire harness clamp is free |
Now remove the two 10mm bolts from the front edge of the air cleaner inlet housing:
 |
| Removing the first of 2 air cleaner inlet bolts – 10mm socket |
Now you can remove the air cleaner inlet. Lift the front edge up and pull it towards you while moving it back and forth (left/right) to disconnect it from the air cleaner assembly. This is what it will look like when you get it removed:
 |
| Air cleaner inlet removed |
Step 3: Remove the air cleaner assembly top cover.
This will involve disconnecting the mass air flow meter connector, disconnecting 3 vacuum hoses, loosening the two air cleaner cap bolts, and then removing the cover.
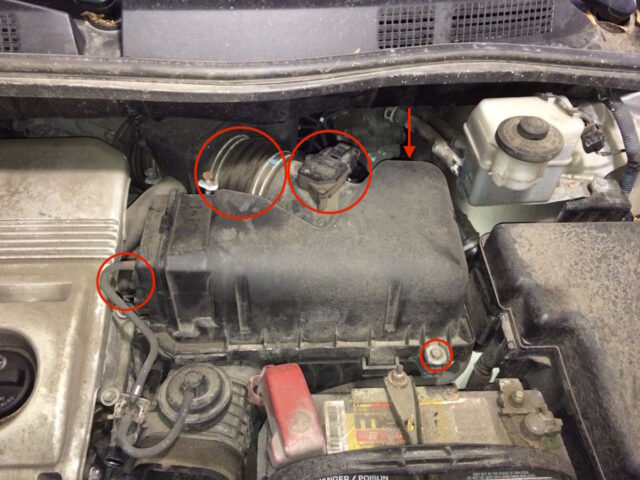 |
| Overview of all the steps to removing the air cleaner assembly top cover |
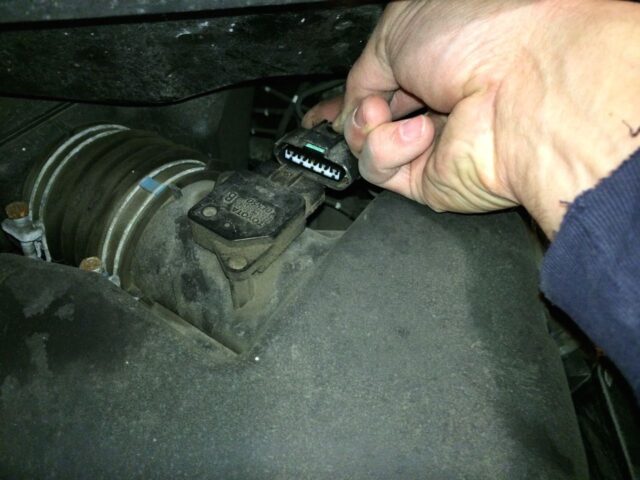
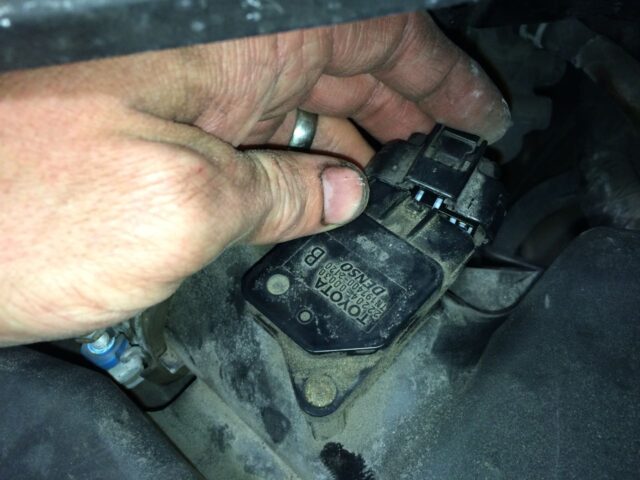
Press the tab down and pull the mass air flow meter connector out:
 |
| Disconnecting the mass air flow meter connector |
 |
| Mass air flow meter connector removed |
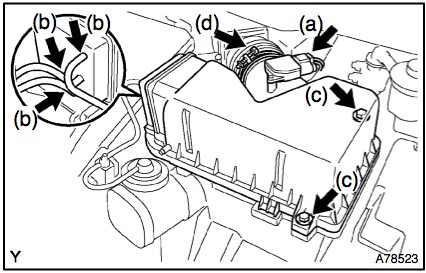 |
| Air cleaner assembly details |
Pull off the three vacuum hoses. They should come off easily by hand.
 |
| Air Cleaner vacuum hoses |
I labeled mine with tape before I removed them so that I was certain as to which one goes back on which nipple:
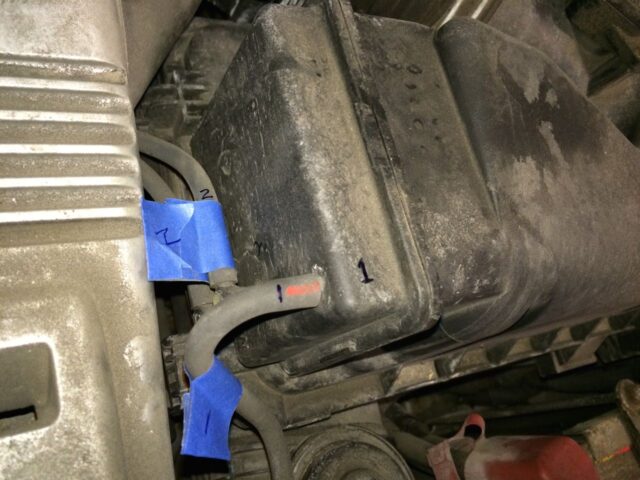 |
| Vacuum Hoses Labeled |
Loosen the two air cleaner cap bolts. They are retained by the cleaner cap so they will not come out. They are pretty long so you’ll have to ratchet for a while. They have a 10mm hex head on them. You’ll need a socket extension to reach the back one.
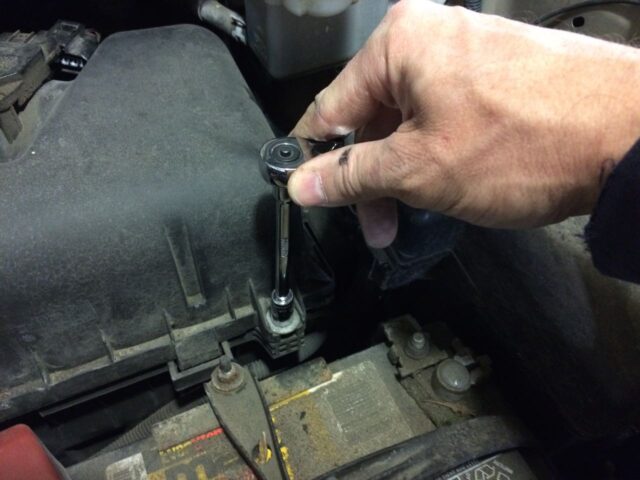 |
| Removing the front air cleaner cap bolt |
 |
| Loosening the back air cleaner cap bolt |
Loosen one or both of the air cleaner hose clamps. I tried loosening the back one and I couldn’t get the hose to come off so I loosened the closer one and then with the aid of a flat head screwdriver was able to get it to slide off:
 |
| Prying the air cleaner hose off |
Note that there is a lip on the end of the air cleaner cover pipe that wants to keep the hose on there:
 |
| The air cleaner upper assembly is freed from the hose |
Then remove the air cleaner cap:
 |
| Air cleaner cap removed with the filter in it |
Step 4: Remove the air cleaner assembly lower box.
There’s a wiring harness snapped into the back of it and then that same wire is clipped into another harness in the back. Once you have the wiring harness removed you can remove the 3 bolts and the box.
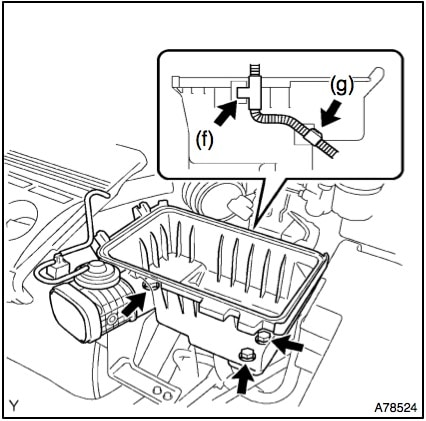 |
| Wiring clip details |
The wire harness clamp is pictured below. I was able to take a flathead screwdriver and pry it out of its place.
 |
| Air cleaner wiring harness |
This is what it looks like removed:
 |
| Air cleaner wiring harness clamp removed |
Then release the wiring cable from the clamp:
 |
| Air cleaner box wiring camp removal: Pull the wires out of the clamp in the direction of the arrow |
Remove the 3 air cleaner box bolts:
 |
| Air cleaner box bolt locations |
Remove the air cleaner box. It simply slips out of the lower air pipe it is connected to. If you didn’t completely remove the hose that was connected to the cover it will be in the way:
 |
| The upper hose is in the way of removing the air cleaner box |
Completely remove the upper hose and then take out the box. It will lift straight up and out. I was careful to put the mass air flow meter cable up and out of the way so I didn’t accidentally cover it up when I was re-assembling things later:
 |
| Put the mass air flow meter cable up and out of the way |
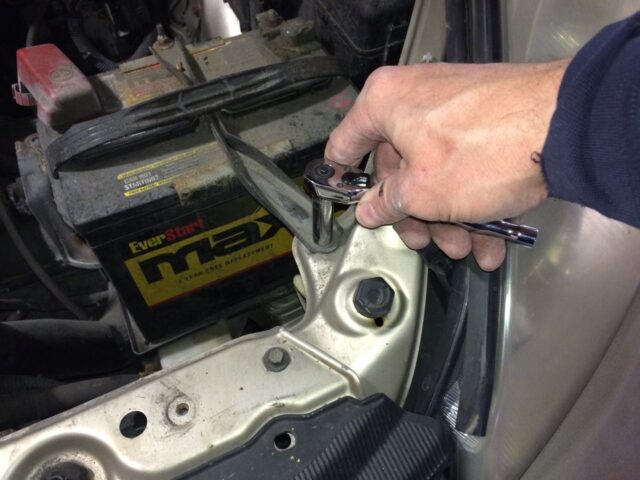
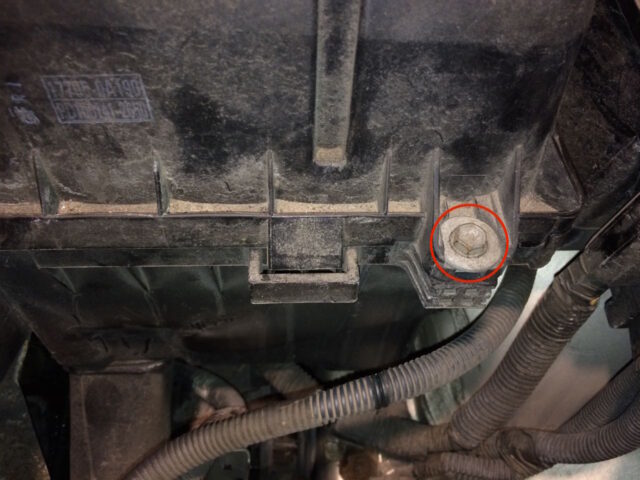
Step 5: Remove the battery.
First remove the bolt on the bracket that is closest to the front of the vehicle. It is a 10mm hex head. You shouldn’t need to loosen the back one.
 |
| Removing the front bolt of the battery bracket |
Once you have removed the front bolt put it back in its place so you don’t lose it. If you lift up on the battery bracket’s end that you just unbolted then the rod that hooks into the base of the battery pan will come out and you can remove the battery bracket:
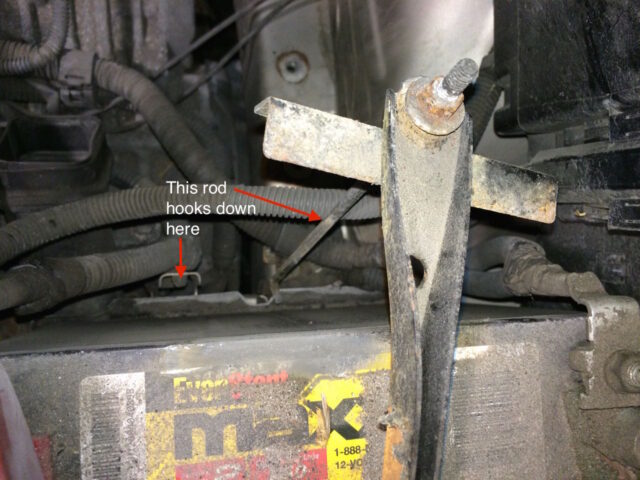 |
| Removing the battery bracket |
Loosen the bolts on the positive and negative battery terminals. Here’s the nut you loosen on the positive terminal:
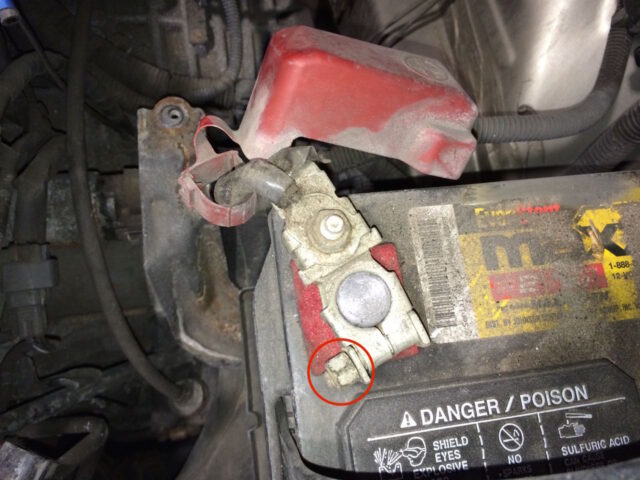 |
| Positive terminal nut location |
And the negative terminal:
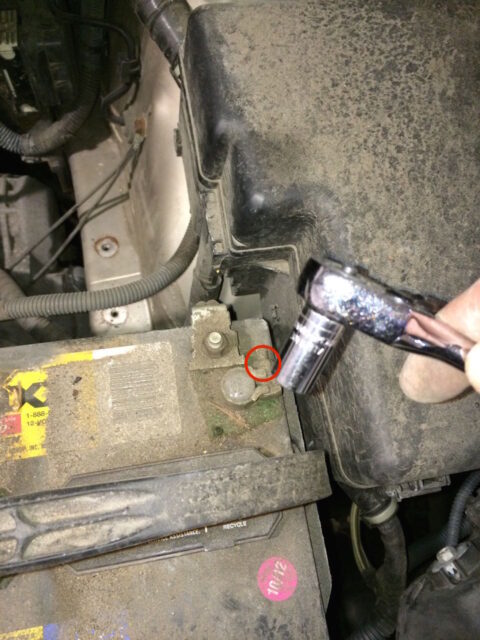 |
| Postive terminal nut location |
Lift the battery cable connectors off the posts of the battery and the lift the battery out of the van. The pan that the battery sits on will lift right out:
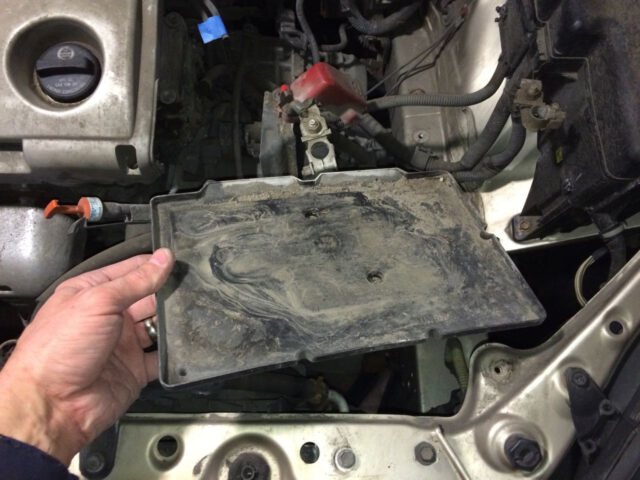 |
| Removing the battery pan–it comes right out after you remove the battery |
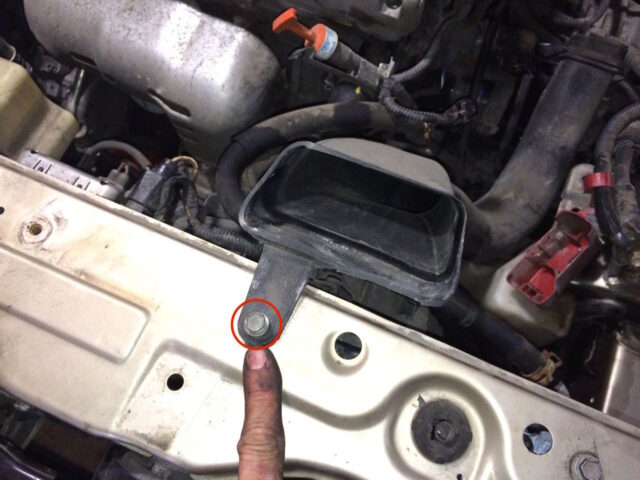
Step 6: Remove the air cleaner bracket.
Remove the two bolts from the air cleaner bracket and set it aside (put the bolts back in their holes for safe keeping):
 |
| Air cleaner bracket bolt locations |
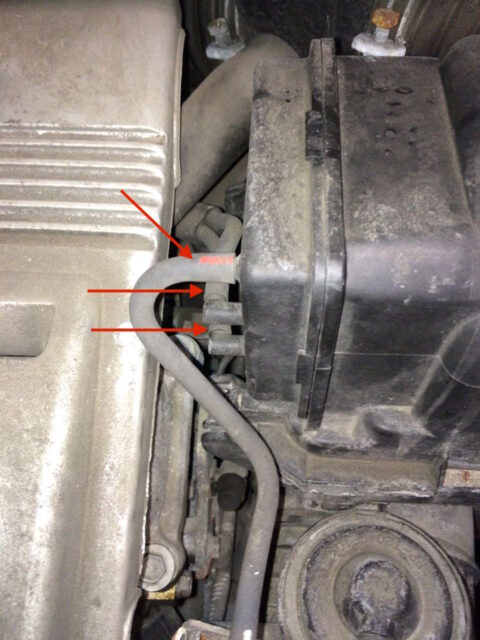
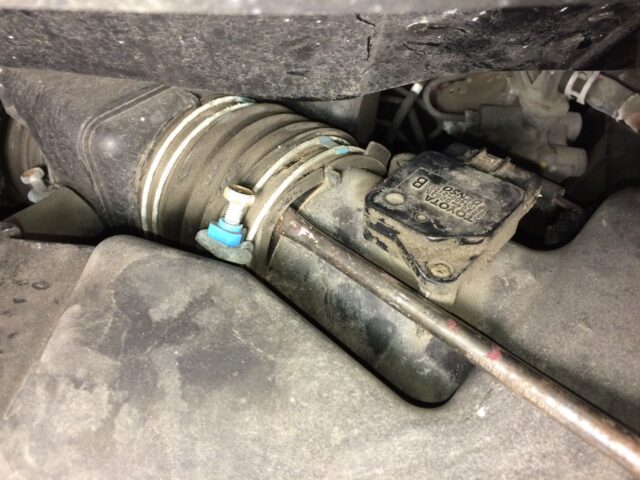
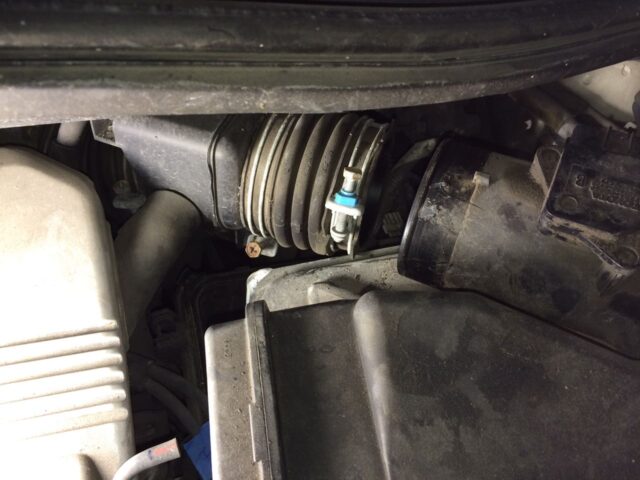
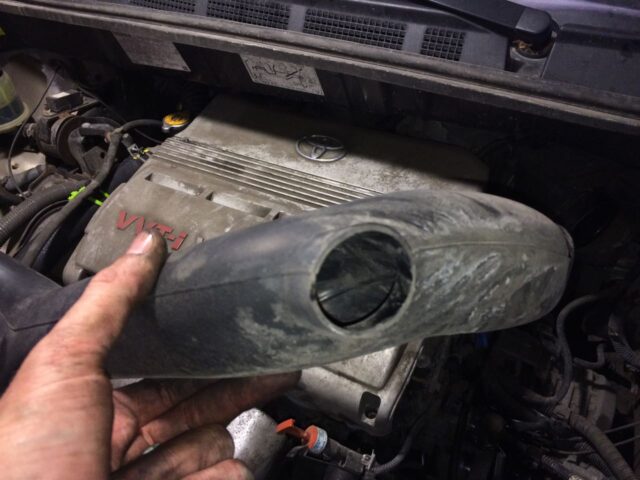
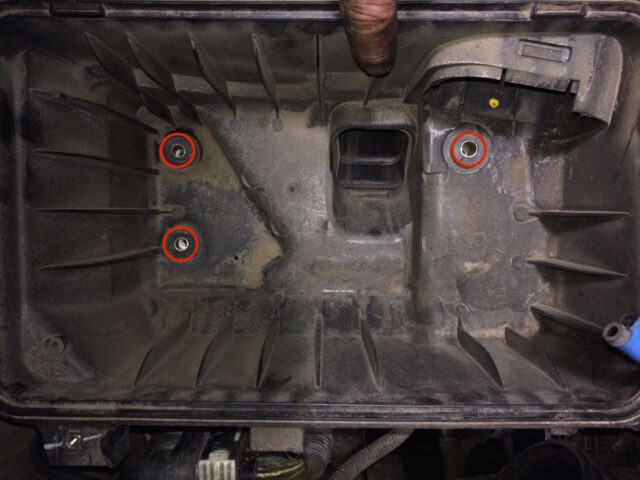
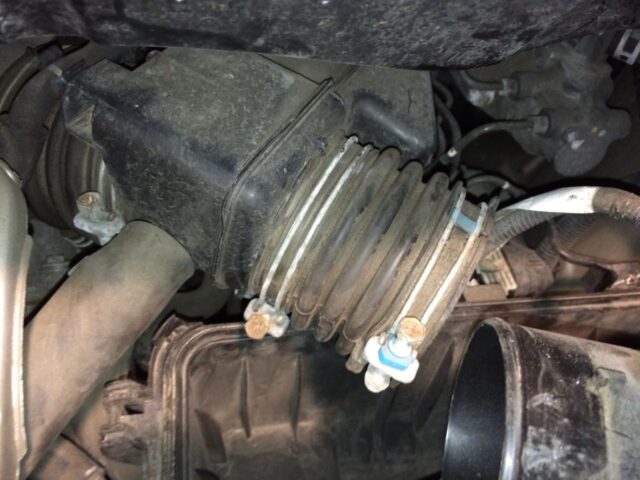
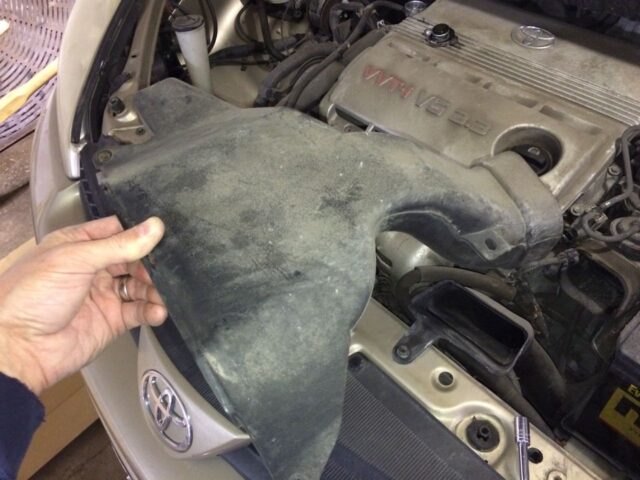
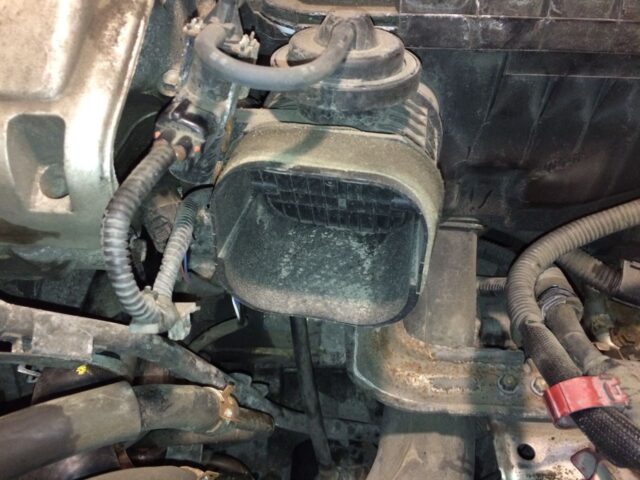
Step 7: Remove air cleaner inlet number 1.
There is one bolt on the front end of it that you must remove:
 |
| Air cleaner inlet number 1 bolt location |
After that bolt is removed you can lift the inlet right out. The inlet does slip into a white box but it comes right out easily.
 |
| Air cleaner inlet number 1 removed |
| Gaping hole in engine bay |
Step 8: Disconnect the radiator hose from the water inlet pipe.

Hose clamp for driver’s side radiator hoseSqueeze the hose clamp together and move the hose clamp onto the hose.
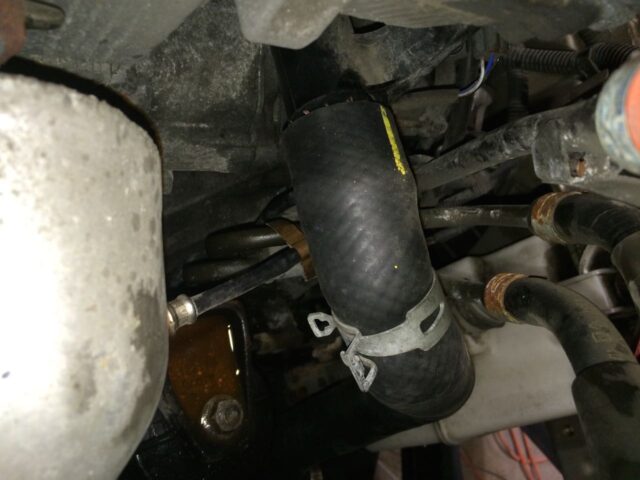 |
| Hose clamp moved off the inlet pipe for removal |
Put a catch pan under this area because you are going to leak some coolant when you remove this hose. Twist and pull to remove the radiator hose from the water inlet. Keep the hose pointing up high so that you lose the least amount of coolant as necessary.
 |
| Driver’s side radiator hose removed from water inlet pipe |
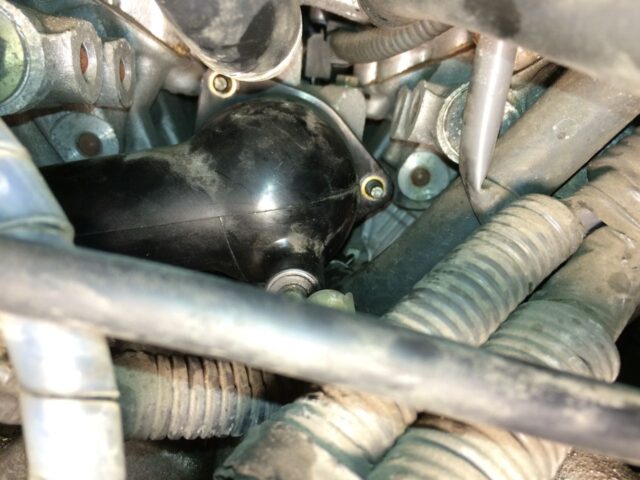
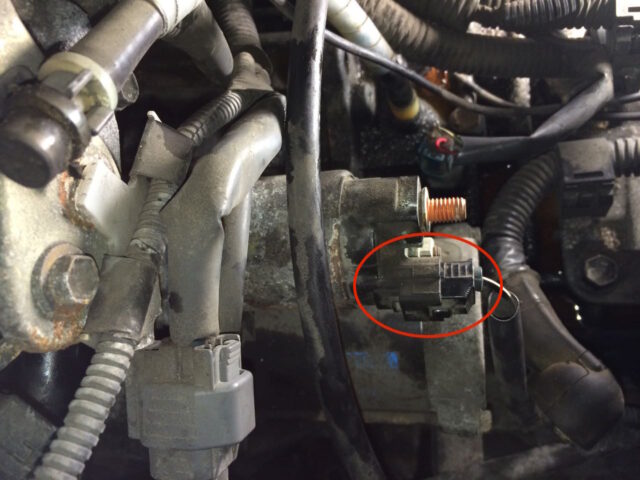
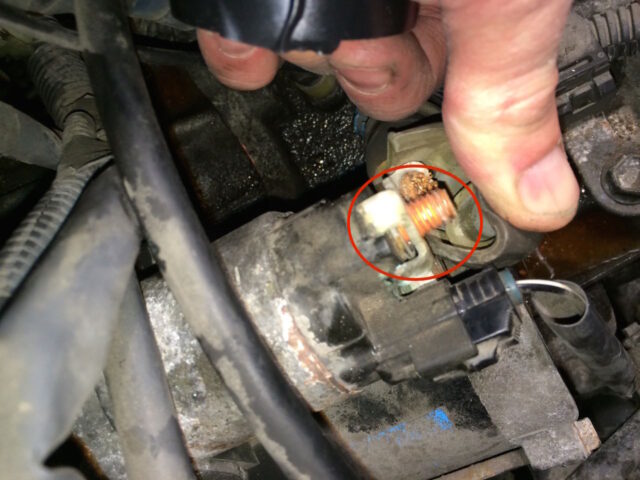
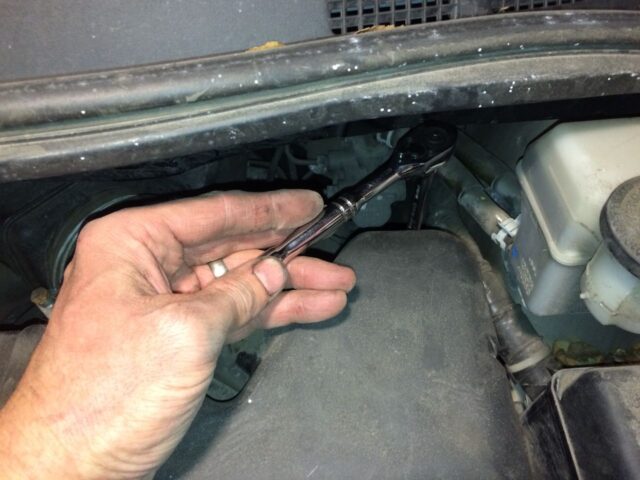
Step 9: Remove the starter.
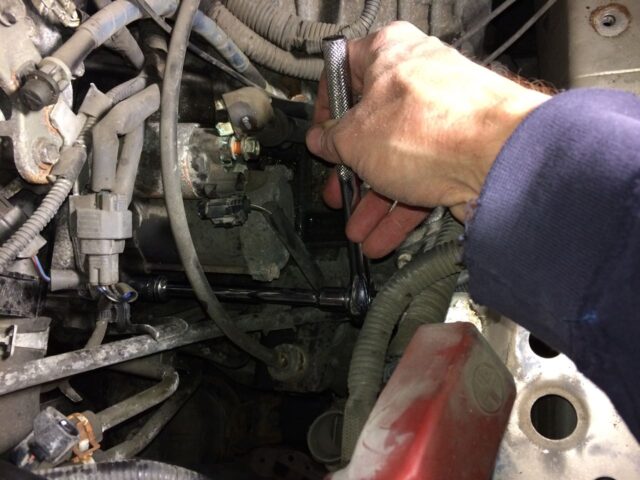
The starter is in the way of you getting the water inlet pipe off. Here’s a view of the starter, looking over the driver’s side quarter panel:
Disconnect the starter wiring connector (circled on left below) and pull back the rubber shielding from the positive wire to reveal the bolt holding it on (like I’m doing below) and remove the 12mm hex-head nut, remove the positive wire, and then put the nut back on the terminal after you remove the wire:
 |
| Starter wiring connector and positive wire (I apologize for the blurry picture but it does the job) |
Remove the two 14mm hex-head starter bolts. You will need an extension on your socket to reach them. There is one in the front:
 |
| Front Starter Bolt |
 |
| Back Starter Bolt |
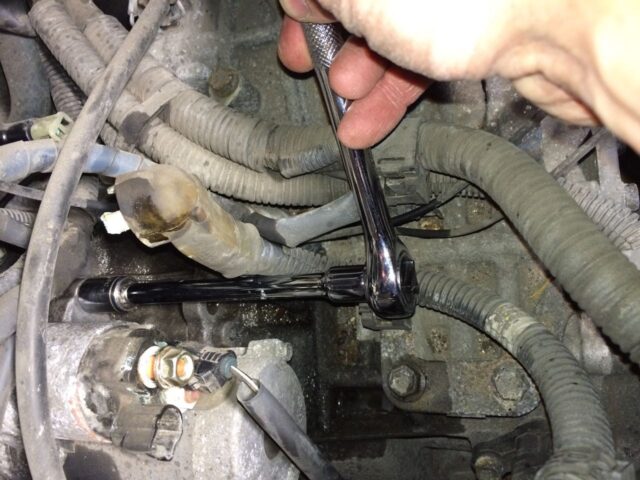 |
| Removing the back starter bolt |
 |
| Removing the front starter bolt |
The starter removed:
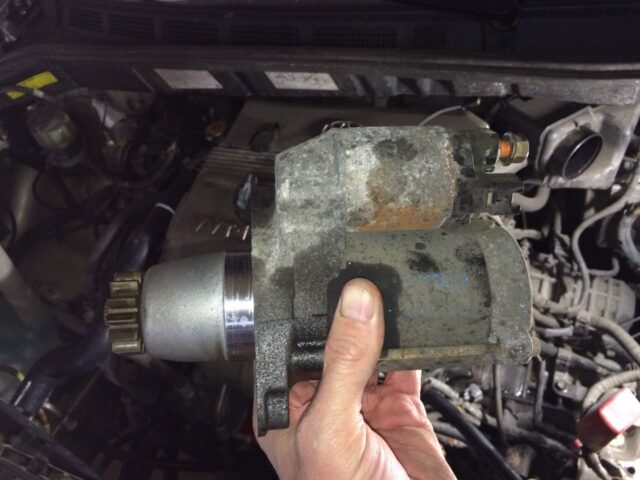 |
| Starter Removed |
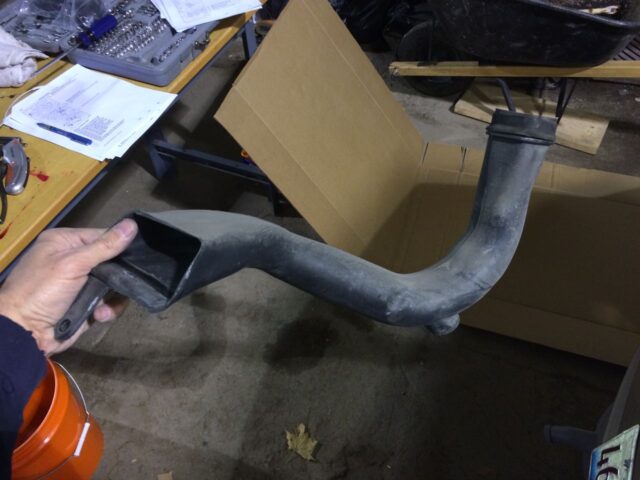
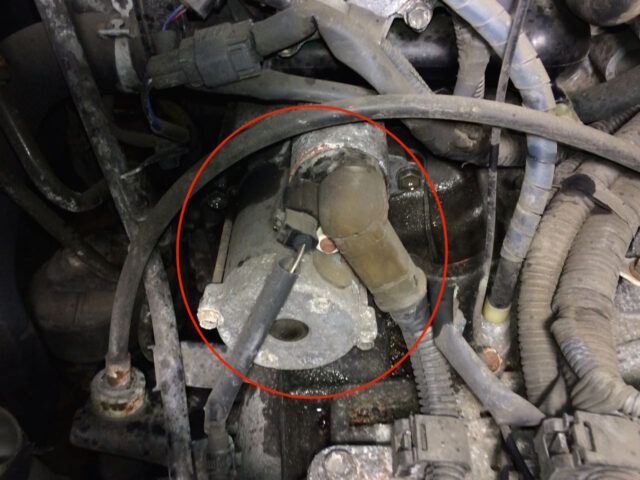
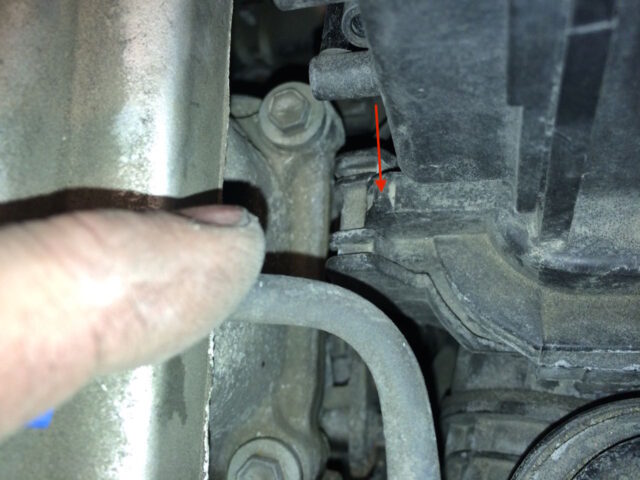
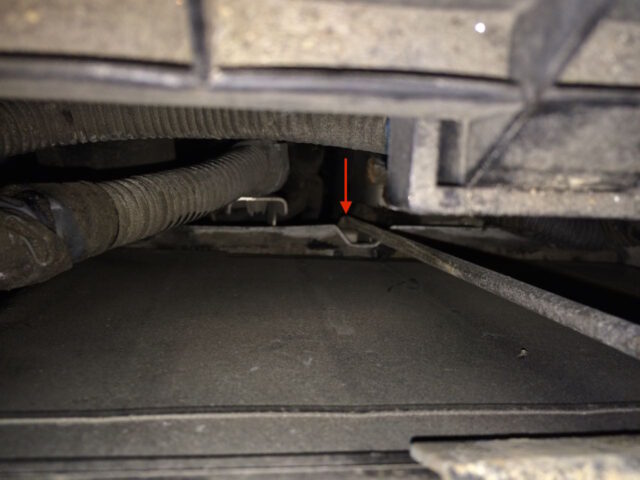
Step 10: Remove the water inlet pipe.
The thermostat is held in place on the right side of it.
 |
| Water Inlet Pipe bolt locations |
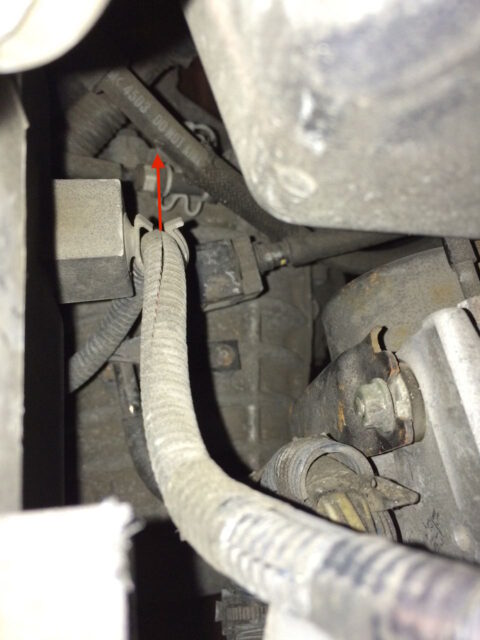
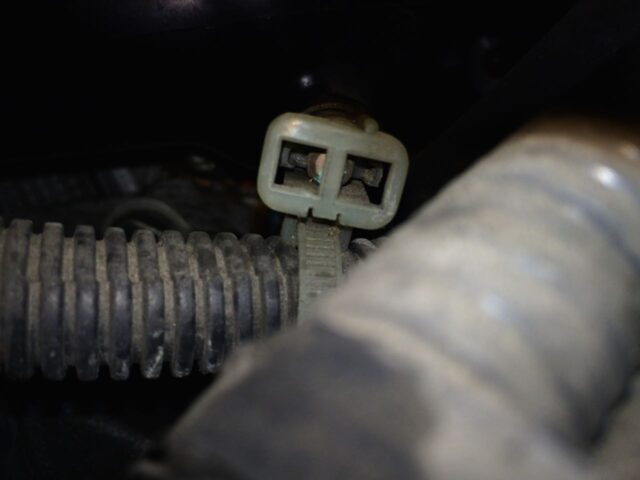
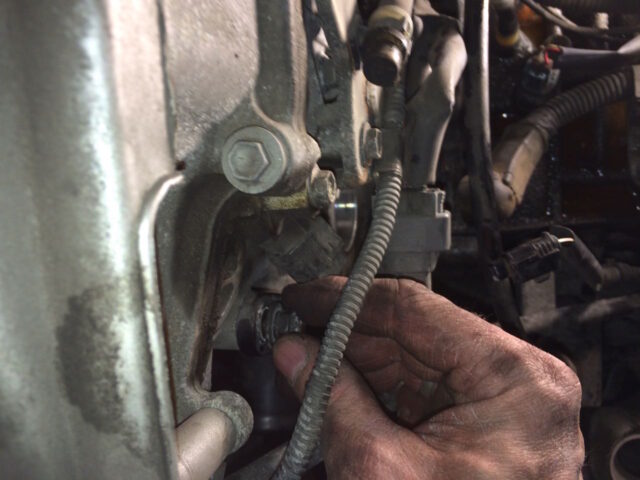
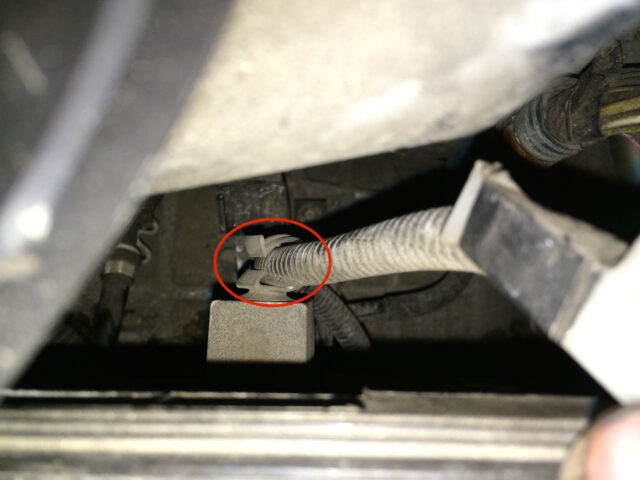
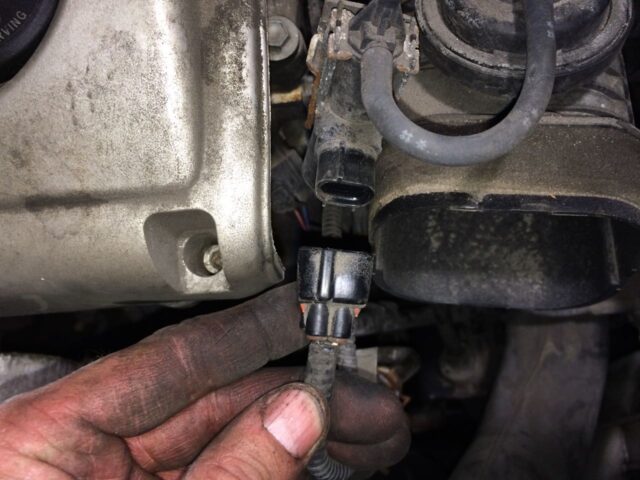
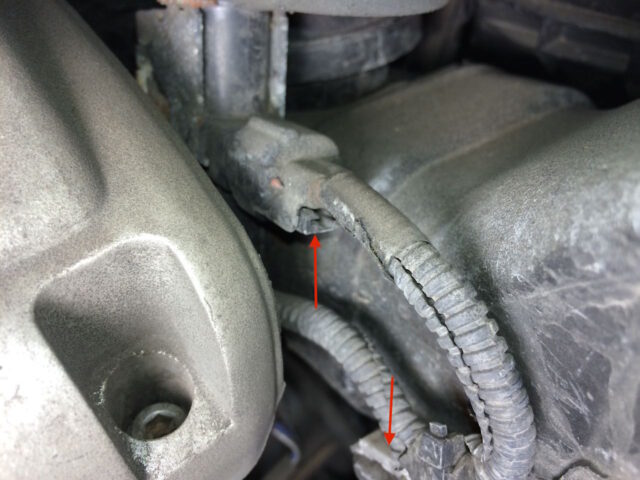
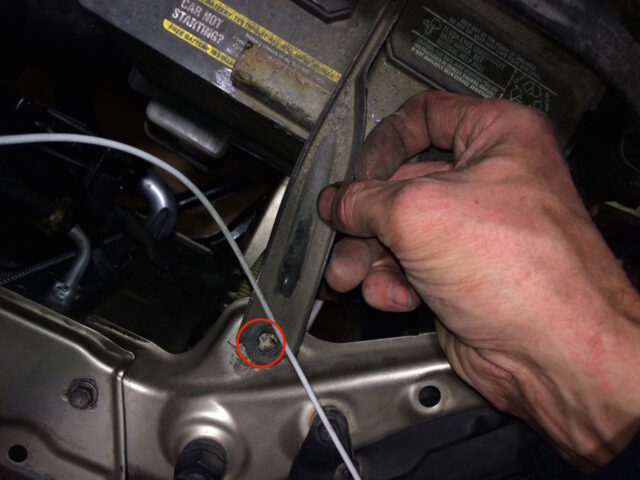
Step 10a: Disconnect the wiring harness from the back end of it.
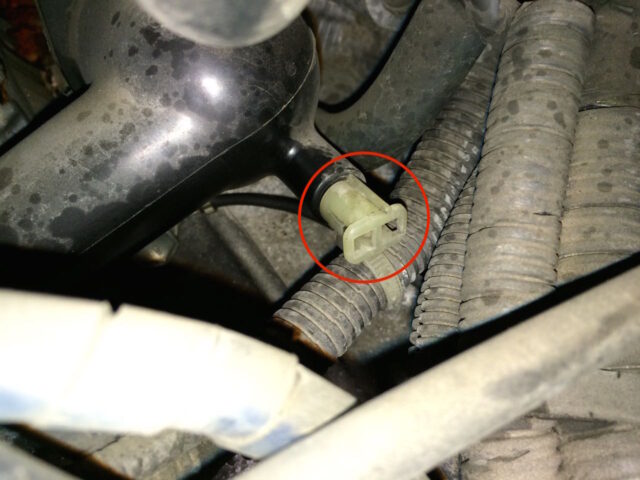 |
| Water inlet pipe wiring harness connector |
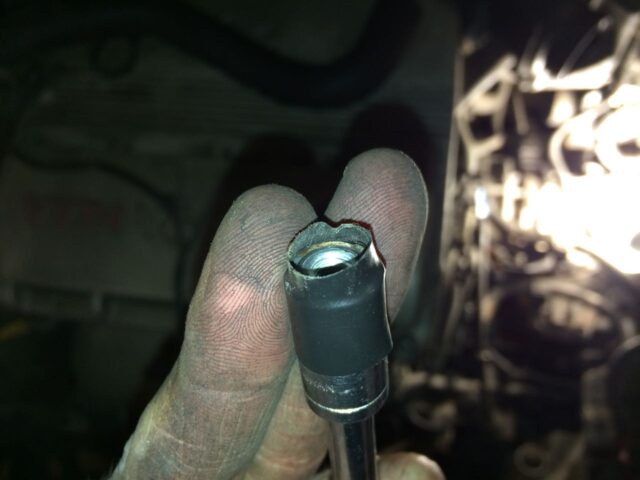
How to release this clip was a mystery to me at first but I figured it out and I’ll share… Stick a needle nose pliers with one end of the needle nose in each of the holes, as close together as possible, and then open the jaws of the needle nose pilers and pull off the connector:
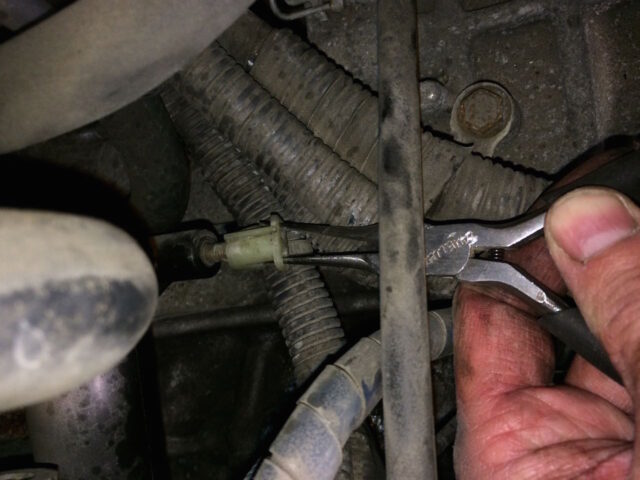 |
| Releasing the wiring connector on the water inlet pipe |
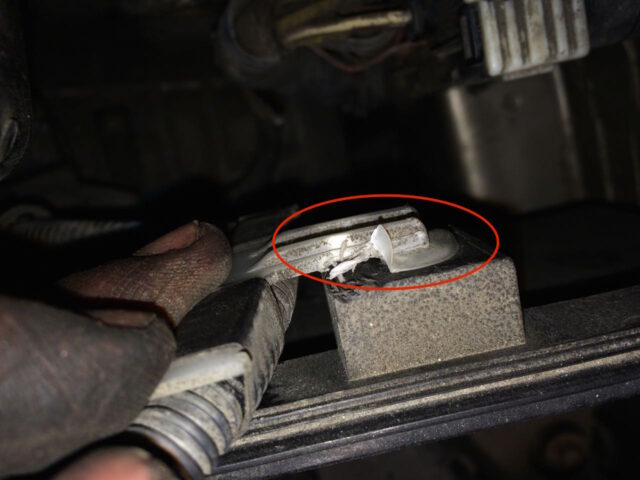
For your curiosity sake, here’s what it looks like in the end of the wiring harness connector clip:
 |
| Wiring harness connector clip |
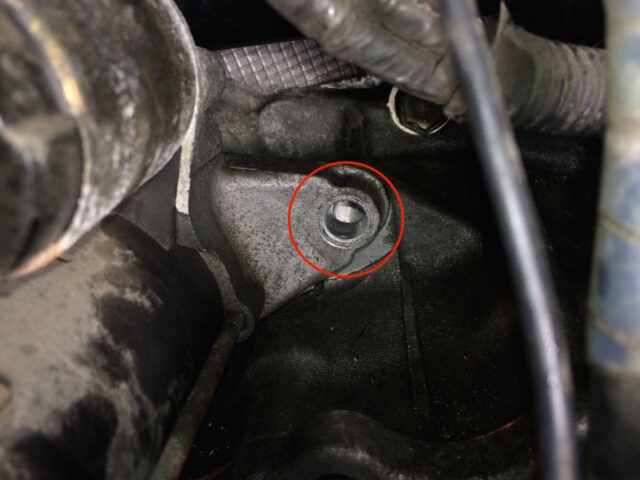
Step 10b: Remove the 12mm head bolt on the water inlet pipe tab.
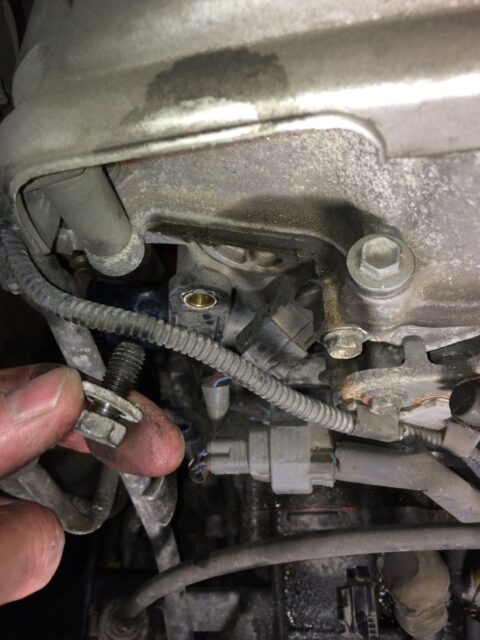 |
| Bolt removed from tab of water inlet pipe |
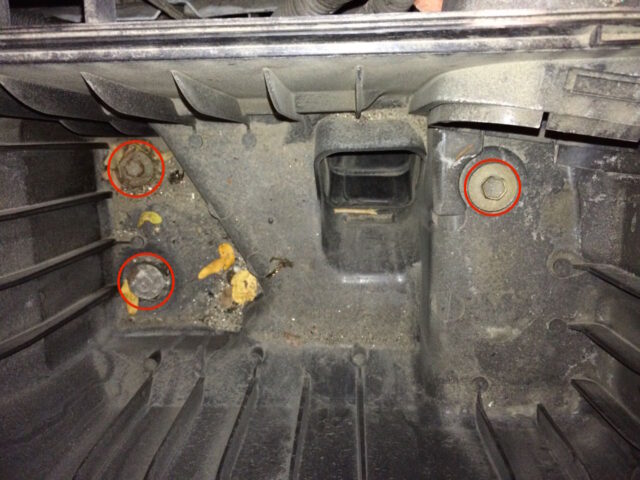
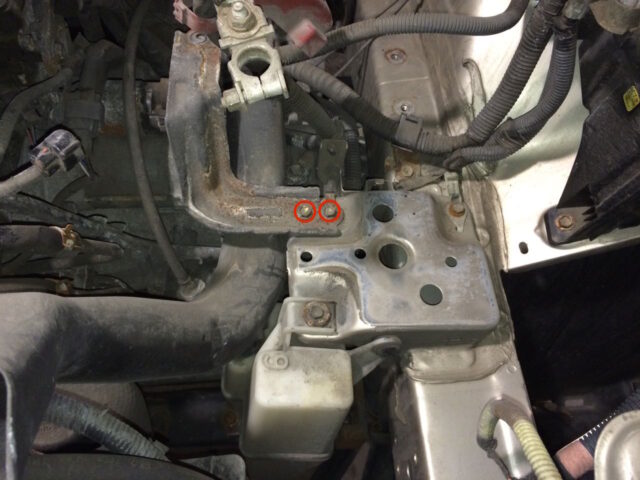
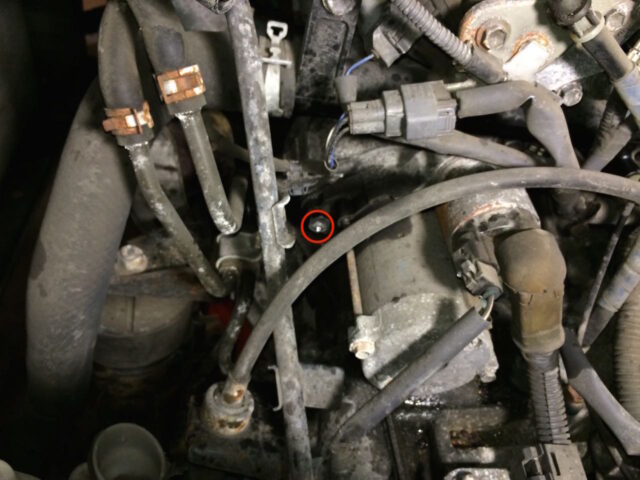
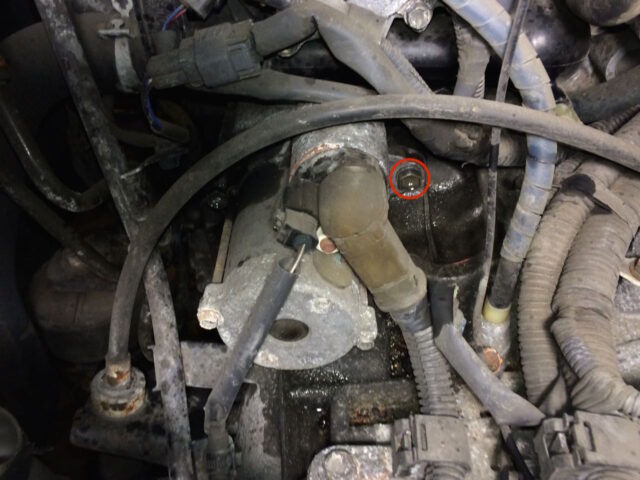
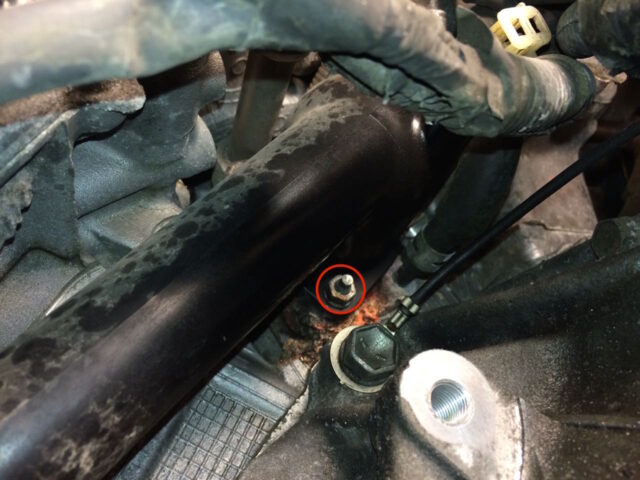
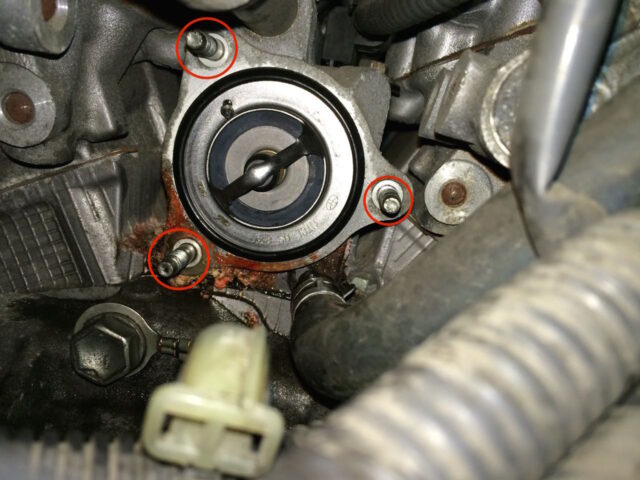
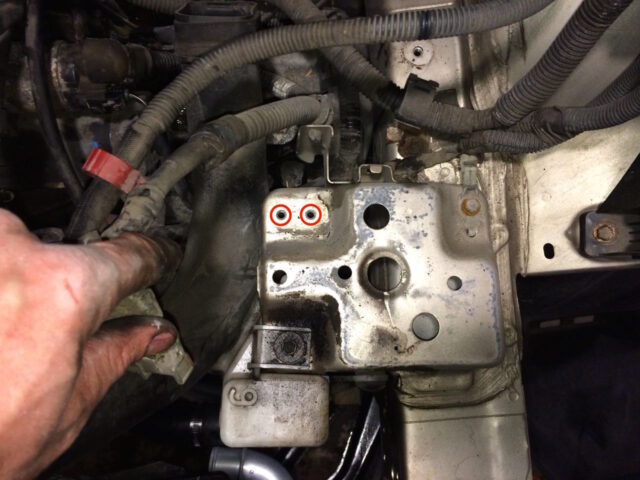
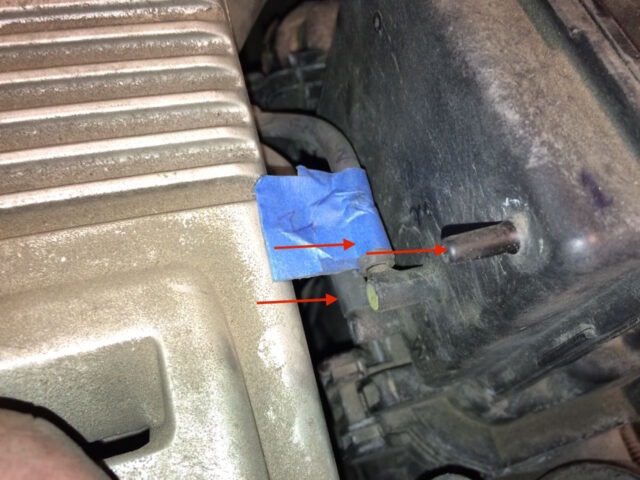
Step 10c: Remove the 3 nuts from the other end of the water inlet pipe.
You will need a socket extension and 10mm socket to remove these. For a couple of these the stud came out too. I tried to be very careful not to drop one of the nuts just so I didn’t need to go searching for it. I used my telescopic magnetic grabber to keep a handle on the nuts when they were getting close to coming off and so I didn’t drop them. Here’s the location of 2 of the nuts:
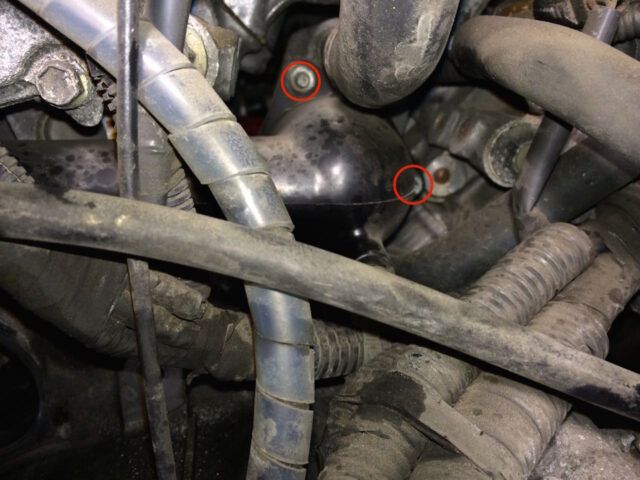 |
| Top and right nuts on water inlet pipe |
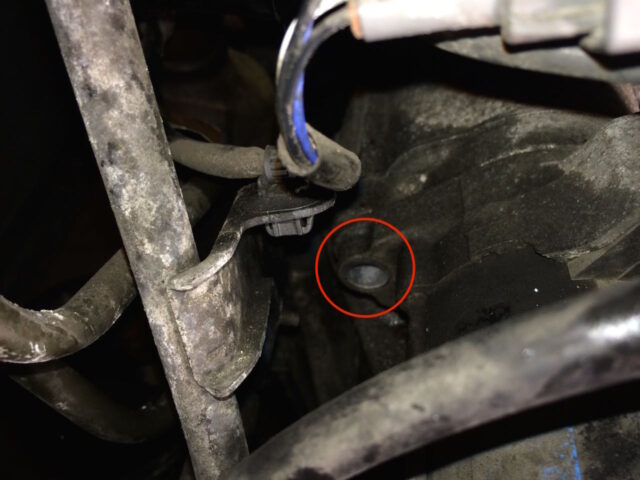
Here’s an angled picture of the third and final (lower) nut:
 |
| Lower nut on water inlet pipe |
 |
| My handy telescopic magnetic grabber |
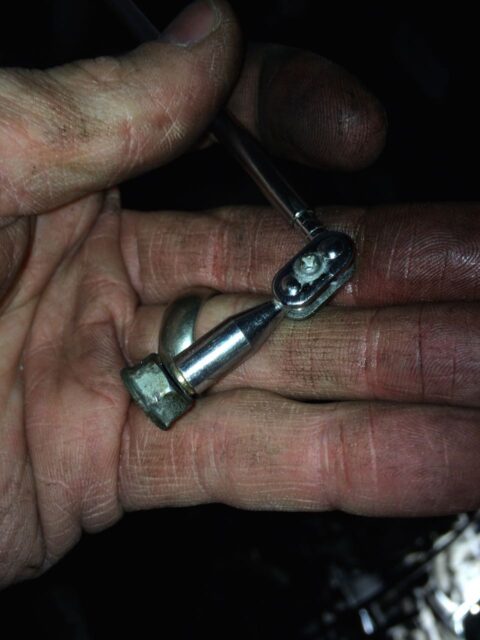
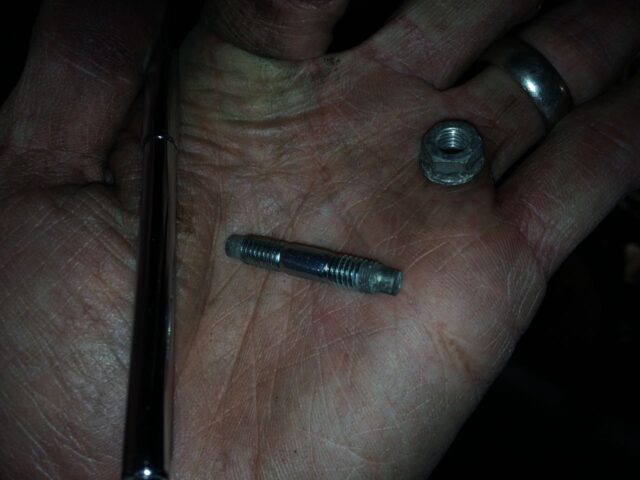 |
| Stud and nut from water inlet pipe |
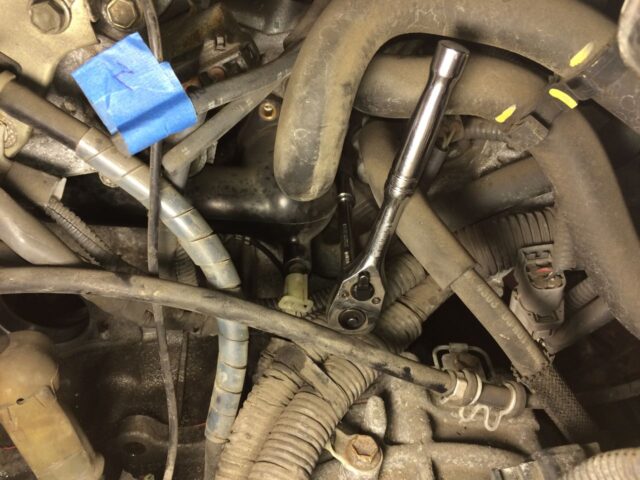 |
| Here I have my socket and extension on the lower right bolt |
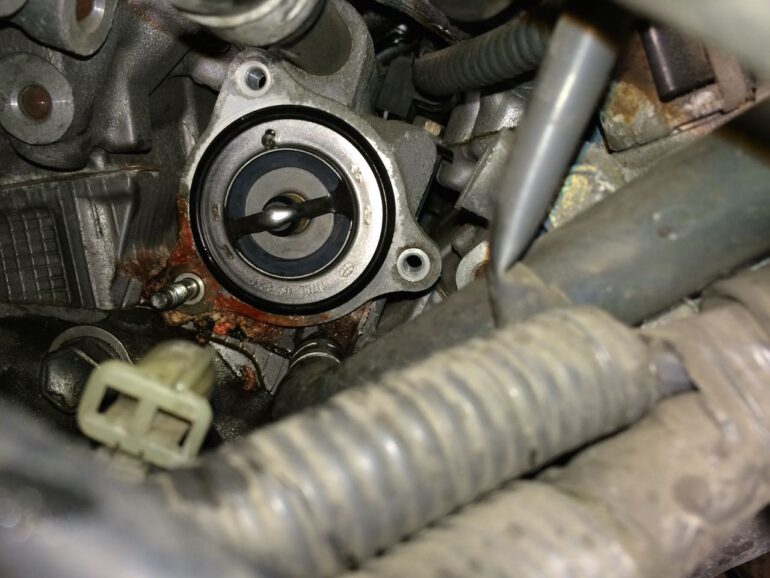
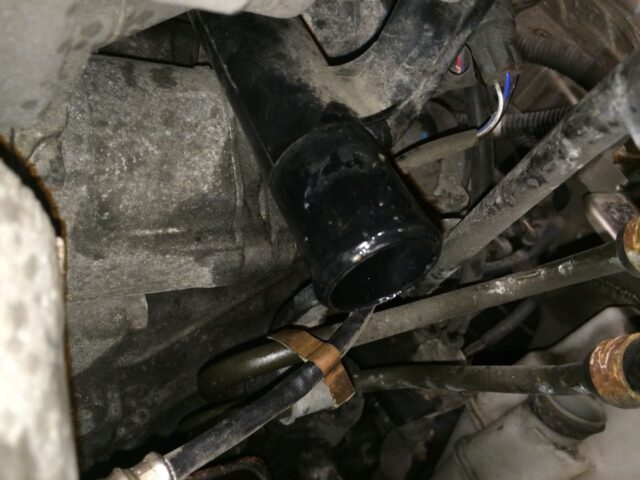
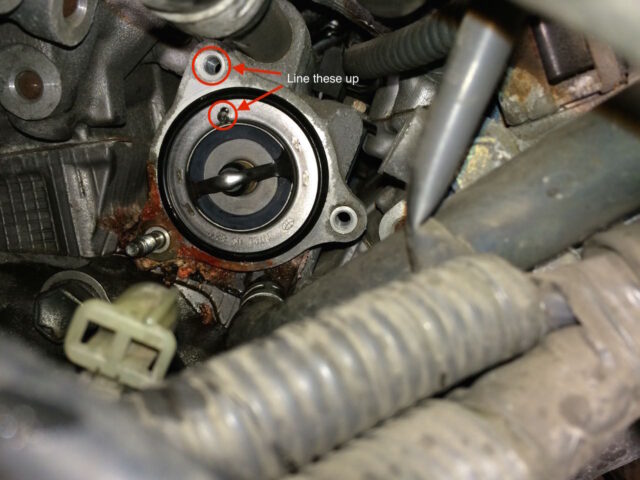
Once you have the bolt and three nuts removed from the water inlet you can remove it, revealing the thermostat (which you can see from below that it was leaking!):
 |
| Thermostat |
Step 11: Pry the thermostat free from the engine.
You’ll want to move your fluid catch pan underneath the area where the thermostat is, because you will leak some coolant once you pull it out (it’s in the off position when cool). Mine didn’t come right out so I had to pry it out.
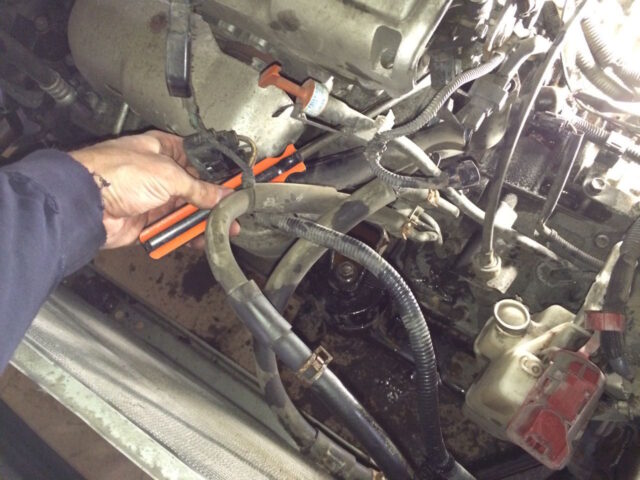 |
| Prying the thermostat free with the largest flat screwdriver I own |
It’s out:
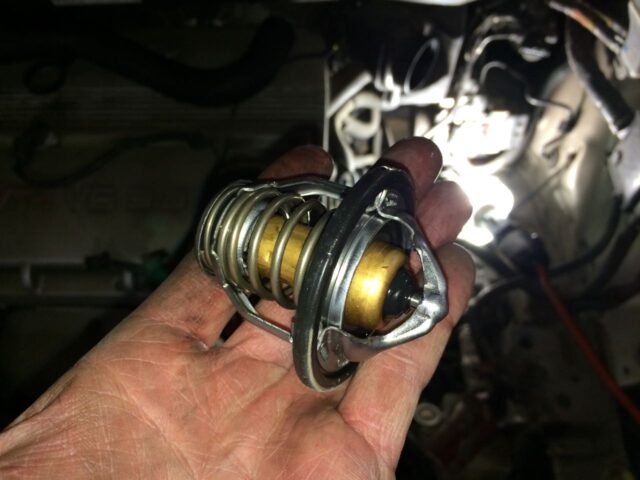 |
| Old Thermostat |
Step 12: Install the new thermostat.
First install the rubber gasket that wraps around the outside edge of the thermostat:
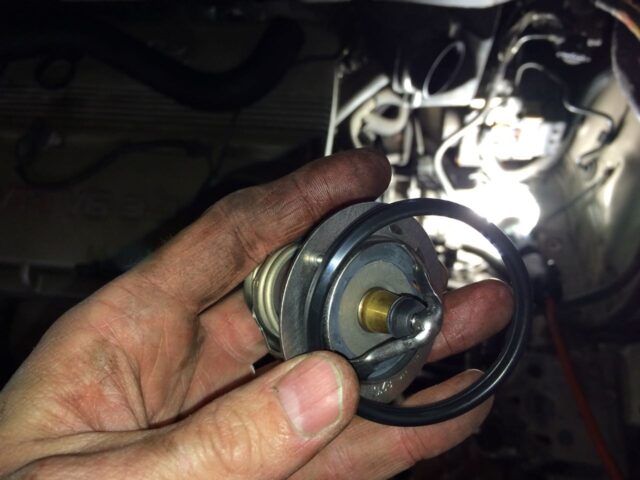 |
| New thermostat and new gasket |
 |
| New thermostat with gasket installed |
Look for the “jiggle valve” and line it up with the top stud bolt:
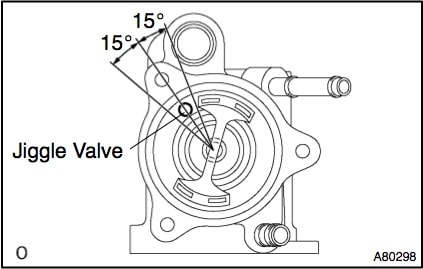 |
| Thermostat installation instructions–line up the jiggle valve with the top stud bolt |
 |
| The new thermostat installed |
Step 13: Reinstall the water inlet pipe.
I first installed the studs that came out for me and tightened them as hard as I could by hand. I first tried to put the studs in after I put the inlet pipe on but that turned out to be too difficult. I suggest doing it first and there is plenty of room to put the water pipe onto the studs with them in place:
 |
| I reinstalled the studs that had come out |
 |
| Water inlet pipe installed back on studs |
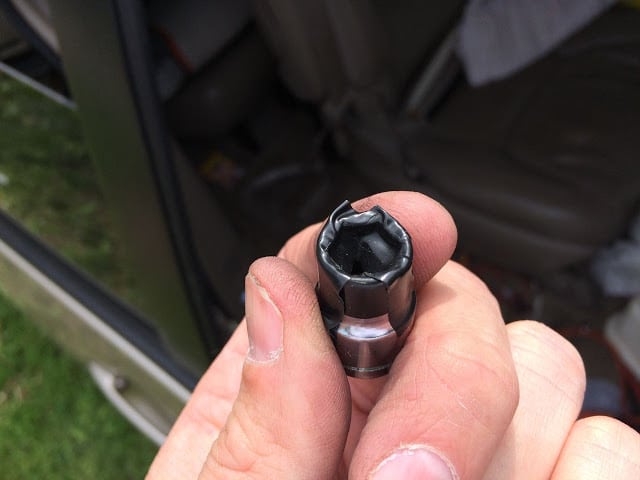
To aid in getting the nuts back on the bolts without dropping them I actually taped the nut to the socket with electrical tape. I turned the nut backwards first, when installing them, to make sure not to cross-thread them.
 |
| Nut taped onto socket |
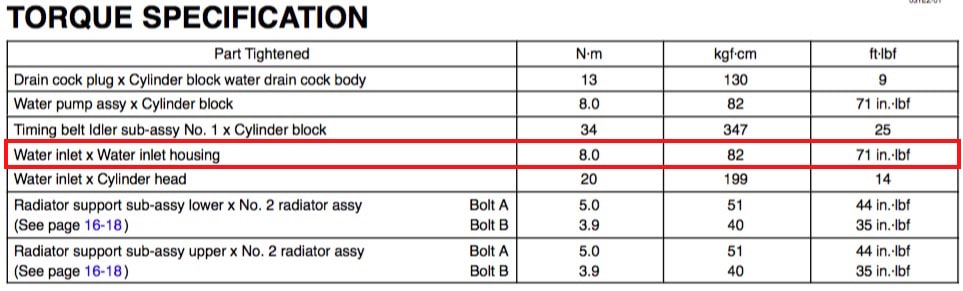
You would not want to overtighten, I looked up the torque rating for these bolts and it is 8.0 N⋅m or 71 in.⋅lbf:

Reinstalling the bolt on the water inlet flange:
 |
| Starting by hand the bolt on the water inlet pipe flange |
Reinstall the wire connector on the water inlet pipe. It just pushes on the threaded stud:
 |
| Reinstall the electrical connector onto the stud on the water inlet pipe |
Step 14: Reinstall the starter.
Put the starter in place, line up the holes, and reinstall the two 12mm hex-head bolts.
 |
| Back starter bolt hole lined up |
 |
| Front starter bolt hole |
Reconnect the starter wiring connector:
 |
| Starter wiring connector reinstalled |
Reinstall the positive wire to the bolt and reinstall the 12mm nut on it:
 |
| Reinstalling the positive wire connection to the starter |
Don’t forget to move the rubber shielding back over the bolt once you have the nut back on there.
Step 15: Reinstall the radiator hose back on the water inlet pipe.
Wet the opening of the hose, push the hose on so that the painted line on the end of the hose goes all the way on the pipe:
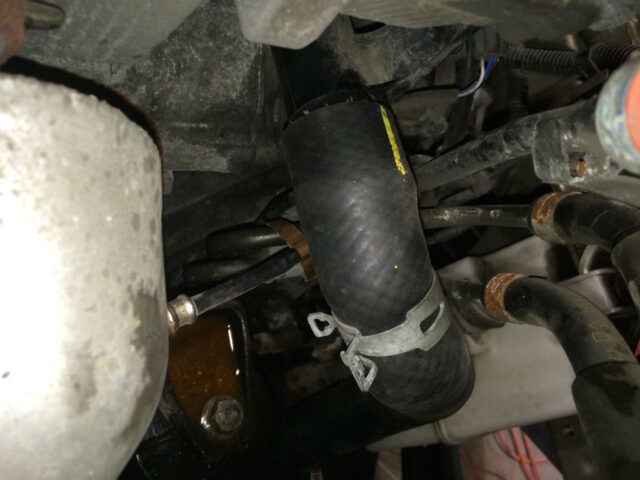 |
| Radiator hose reinstalled on water inlet pipe |
Then put the hose clamp back in place:
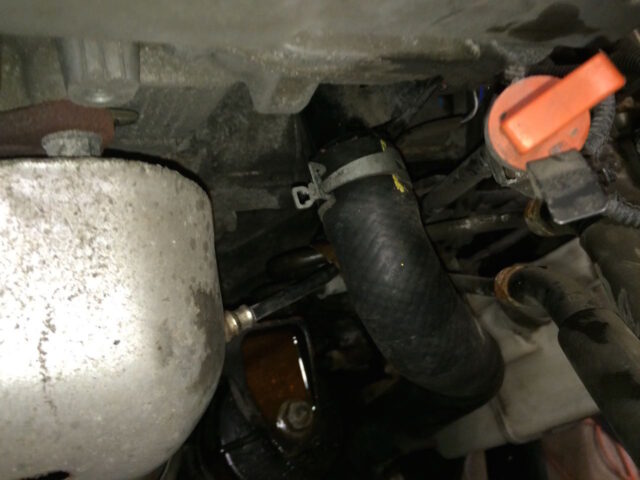 |
| Hose clamp back in place on water inlet hose |
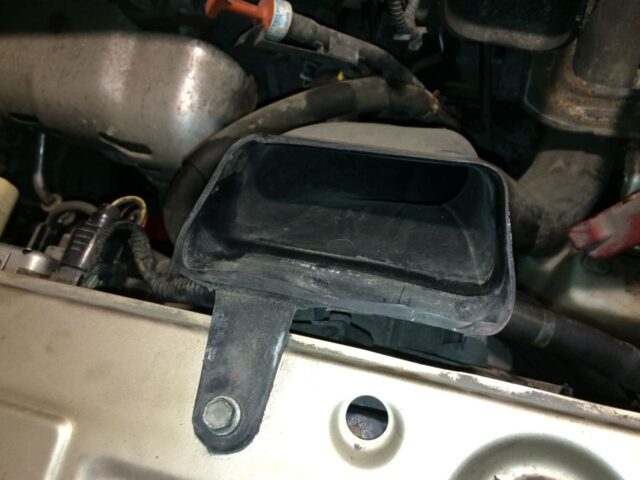
Step 16: Reinstall air cleaner inlet number 1.
This is what that looks like:
 |
| Reinstalling air cleaner inlet number 1 |
There is an opening in the bottom of the air cleaner inlet number 1:
 |
| Opening on the bottom of air cleaner inlet 1, which fits onto the tank shown below |
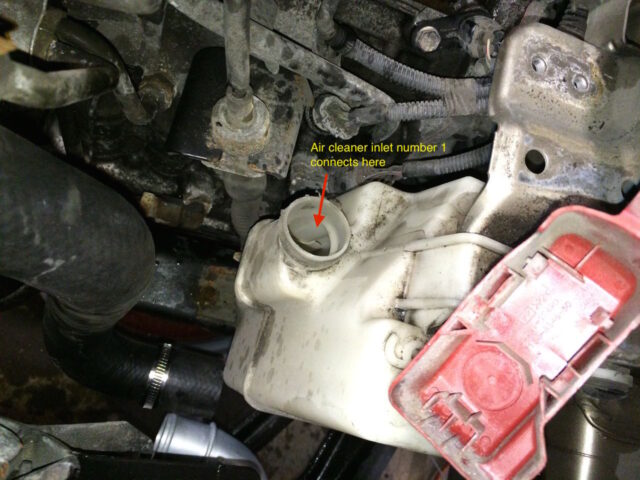 |
| Tank that air cleaner inlet number 1 connects to |
Reinstall the one bolt on the flange of air cleaner inlet number 1:
 |
| Bolt location on air cleaner inlet number 1 |
Step 17: Reinstall the air cleaner bracket.
This is what that looks like:
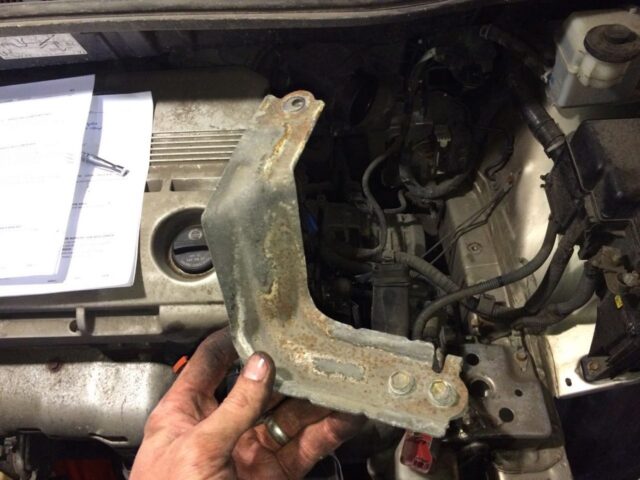 |
| Air cleaner bracket |
It bolts to the holes circled below, right where the battery mounting pan sits:
 |
| Air cleaner bracket bolt hole locations |
Here it is reinstalled:
 |
| Air cleaner bracket reinstalled |
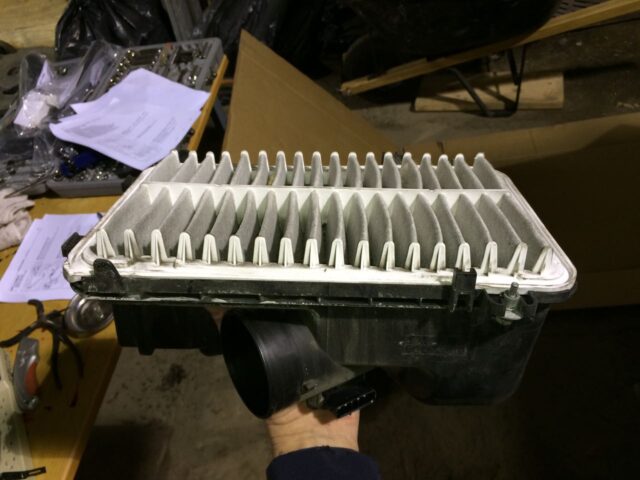
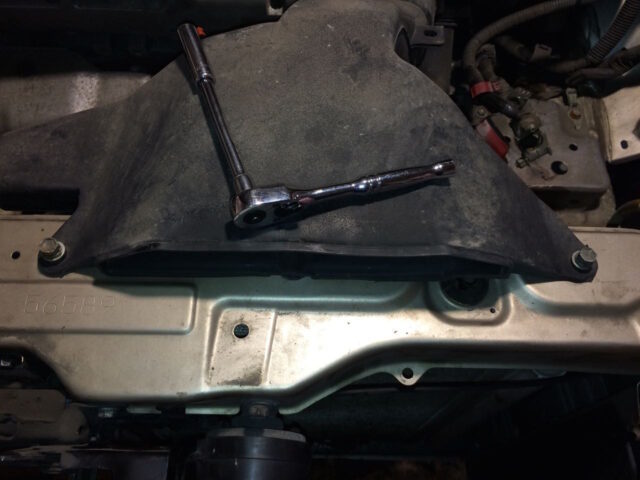
Step 18: Reinstall the air cleaner (lower) case.
If there was any sand or leaves in it, make sure to clean it out while you have it out of the vehicle and before you reinstall it:
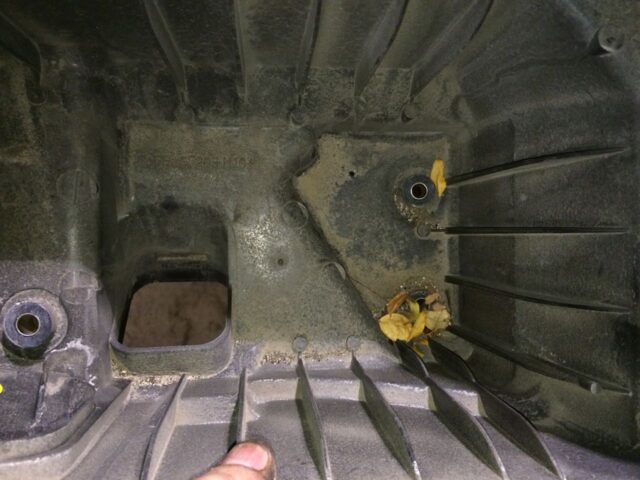 |
| Clean out your air cleaner lower box before reinstalling |
The square hole in the air cleaner case sits down over the end of the air cleaner inlet number one:
 |
| End of air cleaner inlet number 1, where the air cleaner box connects |
Before setting the box down on the inlet make sure your 3 vacuum hoses and the wiring bracket for the VSV connector are out of the way (and you don’t trap them down below). There are three 10mm head bolts you will need to reinstall:
 |
| Bolt locations of the lower air cleaner box |
Clip the wiring harness on the back of the box:
 |
| Slip wiring harness into the clip on the back of the air cleaner box |
Then connect the clip up higher on the air cleaner box:
 |
| Snap clip into the upper edge of the air cleaner box |
This is what the wiring harness should look like then:
 |
| Wiring harness in place on back of air cleaner box |
Reconnect the wiring harness on the front left corner of the air cleaner box:
 |
| Reconnecting wiring connector on front left corner of air cleaner box inlet |
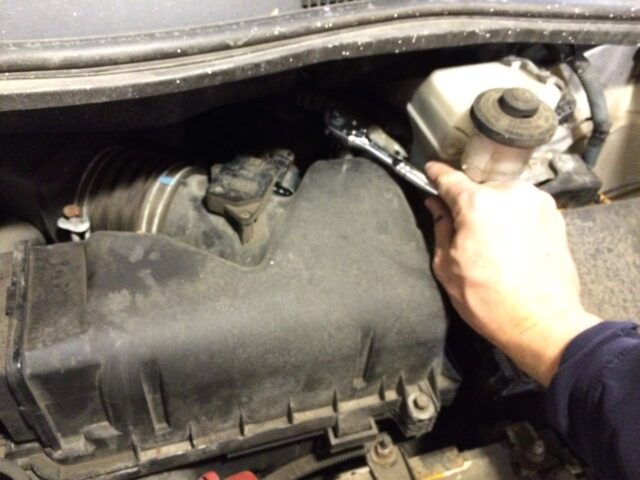
Step 19 Reinstall the upper air cleaner case.
First reinstall the hose if you removed it like I did:
 |
| Air cleaner inlet hose reinstalled |
Make sure to tighten up the hose clamp. Now reinstall the air cleaner cap. First you’ll want to connect it to the hose pictured above, then you’ll want to install your new air filter. To reinstall the cap you’ll tuck the two fingers that stick out of the left side of the cap into their slots on the lower case:
 |
| One of the two fingers that stick out of the cap and tuck into the “catches” on the bottom |
I have written a specific post on: How to Change the Engine Air Filter on a 2004-2010 Toyota Sienna.
Reconnect the mass air flow sensor wiring connector:
 |
| Reconnecting the mass air flow sensor wiring connector |
Reconnect the three vacuum hoses on the left side of the cap:
 |
| Here I have 2 of 3 of the vacuum hoses reconnected |
Tighten the front and rear bolts of the air cleaner cap (10mm socket):
 |
| Front bolt of air cleaner cap |
Tightening the back bolt:
 |
| Tightening the back bolt of the air cleaner cap |
Step 20: Reinstall air cleaner inlet number 2.
This is what it looks like (from when I removed it):
 |
| Air cleaner inlet number 2 for reinstallation |
It slips over the opening on the front of the air cleaner box:
 |
| This is where the air cleaner number 2 connects to the air cleaner assembly |
The the bottom of air cleaner inlet number 2 connects here:
 |
| Air cleaner number 2 sits down over the end of air cleaner inlet number 1 |
Reinstall the two 10mm bolts:
 |
| Air cleaner inlet number 2 ready to be bolted down |
Reconnect the VSV connector and also reinstall the VSV wiring clip:
 |
| VSV connector (upper left arrow) and the wiring harness clip |
Step 21: Reinstall the Battery.
First locate the plastic battery pan. Note that it has some “buttons” that protrude down.
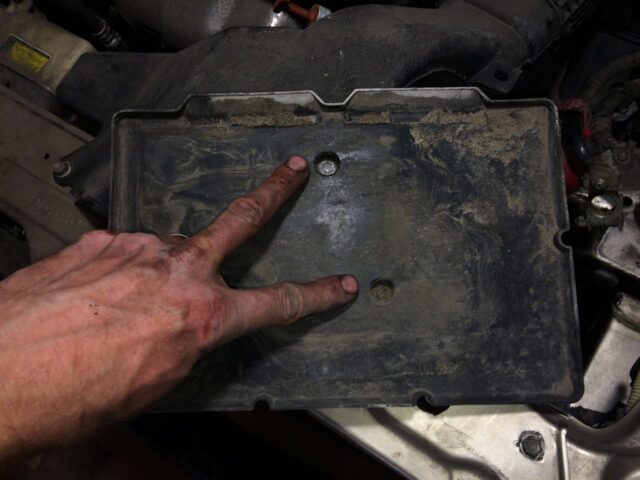 |
| Battery Pan “buttons” |
These buttons fit into the following location:
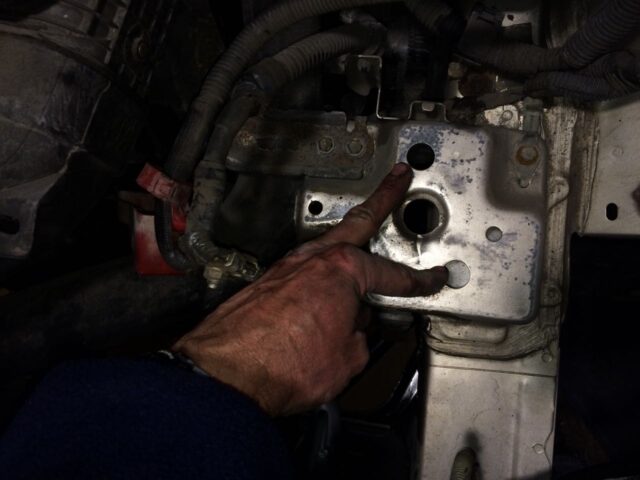 |
| Location of where the battery pan sits, down into those holes |
One thing to note is that at the back of the battery pan there is a “hook” where the rod hooks on that clamps the battery down in place. The hole where the rod hooks into is located here:
 |
| Battery mounting hook on the back of the battery pan |
Put the battery back in the van. You’ll need to hold the battery cables out of the way to be able to put it in place. Note that the positive goes on the passenger side and the negative on the driver side:
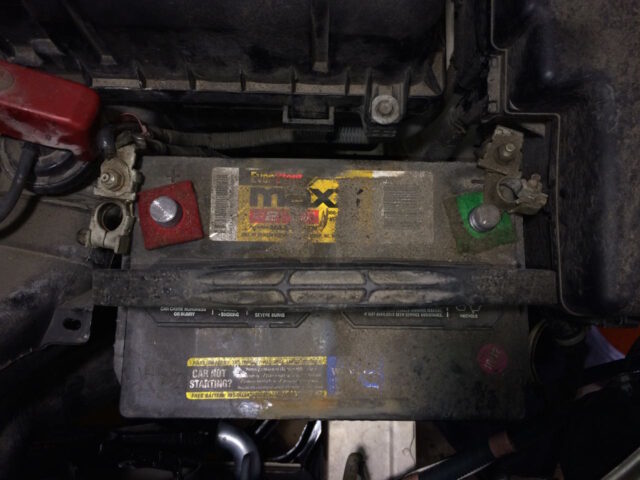 |
| Battery back in place |
Now bolt the battery down. First slip the rod through the top bracket:
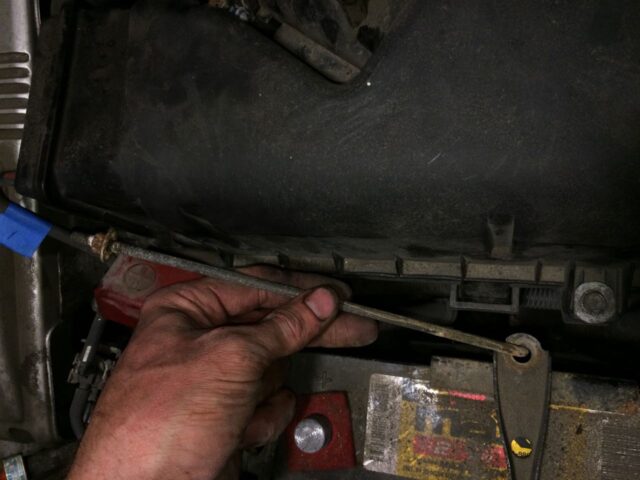 |
| Slip the hook end of the rod through the top bracket and push it all the way on |
Now hook the end of the rod on the hook I pointed out above on the back of the battery pan:
 |
| Battery rod “hooked” on the back of the pan |
Keeping pressure “up” on the rod that is hooked on the battery pan, stretch the mounting bracket across the battery and bolt in place (10mm hex head):
 |
| Bolting down the battery bracket |
Reconnect the terminals of the battery. If you made it this far I think you can do that on your own 🙂
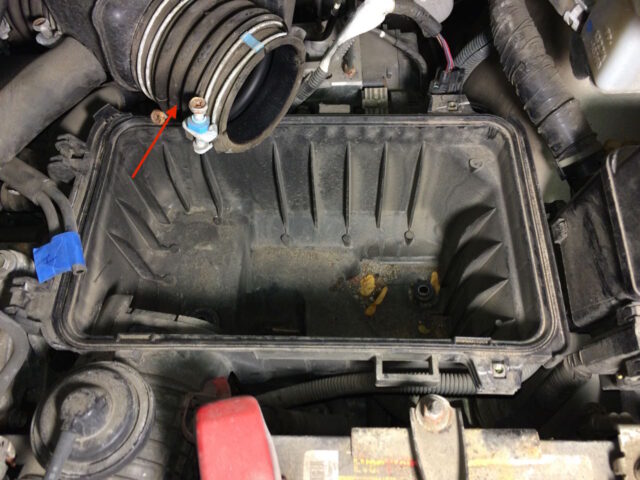
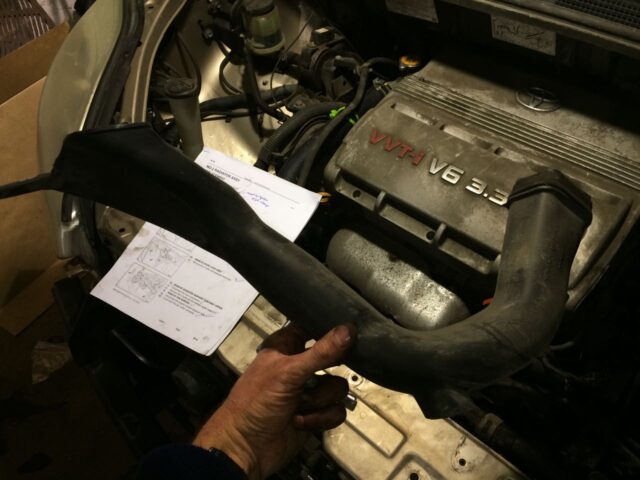
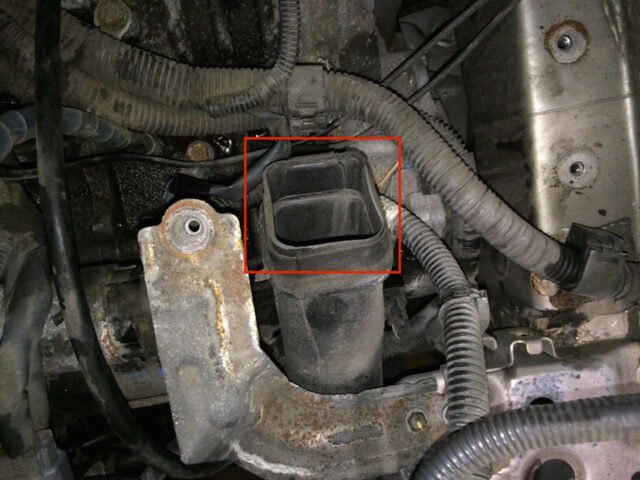
Step 22: Add coolant.
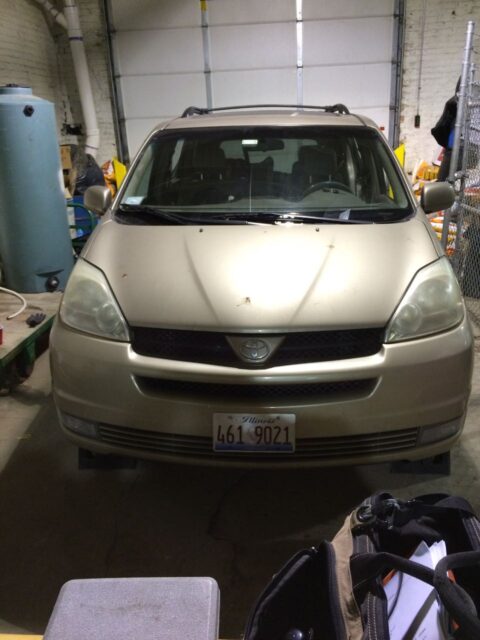
One thing you must note is that you cannot use a funnel to put coolant into a 2004-2010 Toyota Sienna because of the location of the radiator cap, which is not even close to the radiator:
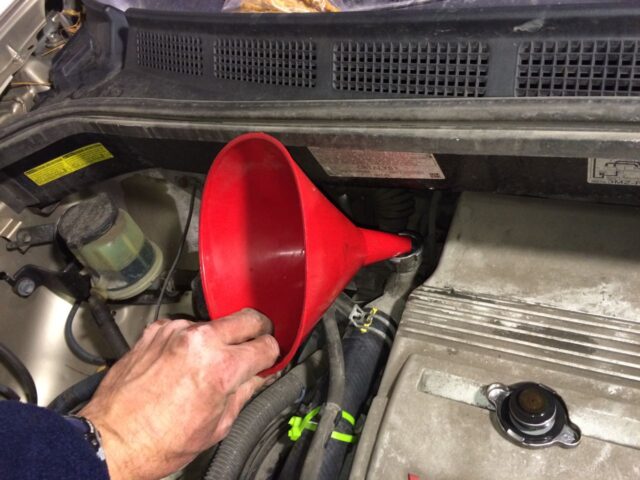 |
| Cannot use funnel to add coolant to a 2004-2010 Toyota Sienna 🙁 |
I purchased a 2 Gallon Gas Can With Spout because you cannot add antifreeze to this fan without a hose or something special because of where those Toyota engineers located the radiator cap:
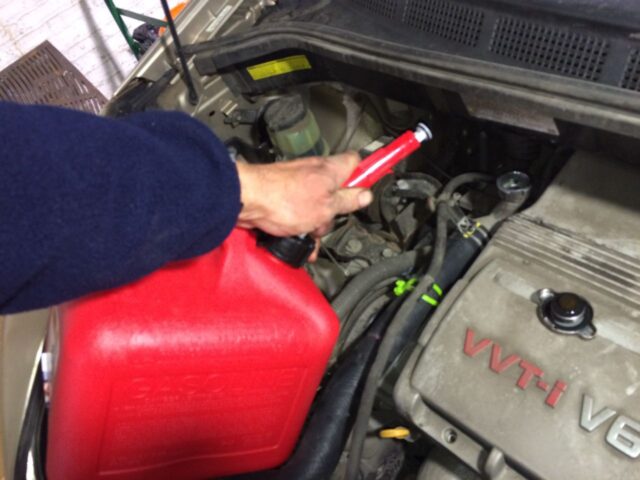 |
| Using a (clean) gas can to add antifreeze |
You must really take your time when filling this thing up because air must escape up out the same path you are filling it from and it will “burp” up antifreeze from time to time as you fill and you must stop pouring real fast. I was only able to get in about 2 gallons even though the factory’s numbers on the coolant capacity is 12.4 US quarts. I ran it, let the van heat up and added antifreeze to the overflow reservoir over the next few days to get it filled back up. The new gas can was nice to keep in the back of the van to add as necessary each time after the van cooled off. Anyway, start adding and keep adding until it won’t take any more. You won’t get the 12.4 quarts into it if you didn’t drain it out of the engine block too.
Step 23: Run your van and let it warm up and open up the thermostat so the antifreeze flows through the radiator.
There are air bubbles in the system that will work their way out and once the van cools back down you can see from the overflow tank whether you need to add antifreeze. Make sure to check for leaks. Add coolant until the overflow tank shows full when it has cooled off:
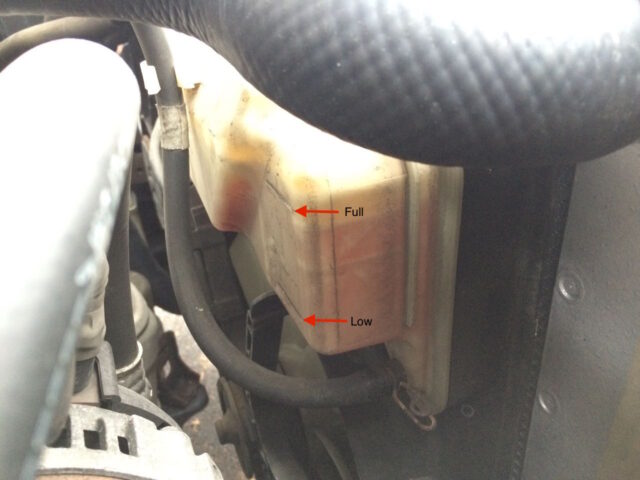 |
| Coolant overflow tank level markers |
Hey, if you were able to replace your thermostat with this tutorial’s help will you please leave a comment and share with the other readers your success and any tips that might help others? Please leave any questions you have in the comments and I’ll get right back with you. Please note that if you have not had an approved comment on this website in the past, your comment will not show up until I approve it. I look at all the comments so thank you for taking the time to share! Thanks, John.
Check out Some of My Other Toyota Sienna Posts:
- How to Change the Air Conditioner Display on a 2004 Toyota Sienna From Metric to English
- How to Replace the Front Struts on a FWD 2004 Toyota Sienna
- How to Change the Air Filter on a 2004 Toyota Sienna
- 2004 Toyota Sienna XLE DVD Entertainment System Does Not Display Video After Turning Vehicle Back On
- How to Fix Sienna Dome Lights Randomly Coming On And Alarm Going Off
- How to Replace the Rear Liftgate Shocks on a 2004 Toyota Sienna
- How to Change the Cabin Air Filter on a 2004 Toyota Sienna
- How to Program the Door Lock Transmitter on a 2003 Toyota Sienna
- How to Replace the Power Sliding Door Cables on a 2004-2010 Toyota Sienna XLE
- How to Prolong the Life of Your Toyota Sienna Sliding Door Cables
- How to Replace the Stereo on a 2004-2010 Toyota Sienna
- How to Fix The Spring on the Cassette Door on a 2004-2010 Toyota Sienna Stereo
- How to Program a Keyless Entry Remote for a 2004-2010 Toyota Sienna
- How to set the Time/Clock on a 2004-2010 Toyota Sienna
- Horn Won’t Work-How to Troubleshoot The Horn on a 2004-2010 Toyota Sienna
- How to Remove the Front Bumper on a 2004-2010 Toyota Sienna
- How to Replace the Starter on a 2004-2010 Toyota Sienna
- How to Replace the Thermostat on a 2004-2010 Toyota Sienna
- How to Replace the Radiator on a 2004-2010 Toyota Sienna
Amazon Associate Disclosure: As an Amazon Associate I earn from qualifying purchases. This means if you click on an affiliate link and purchase the item, I will receive an affiliate commission. The price of the item is the same whether it is an affiliate link or not. Regardless, I only recommend products or services I believe will add value to Share Your Repair readers. By using the affiliate links, you are helping support Share Your Repair, and I genuinely appreciate your support.
Thank you
Thank you. I just followed your instruction to replace my Thermoset on my 05 Sienna due to p0128 code. Hope this can fix that problem.
During the process, I detour and clean my throttle body. I also did coolant flush by hose two directions of water and use leaf blower to blow two directions to get as many water out as I can. I then did heater circle flush, blew out water and fill with coolant.
I used coolant funnel to burp the air. However, I can only pour 2 gallon of coolant into the system.
Does anyone know why? If there is still a gallon of water inside, will that be a problem. I do still have two brand new bottle of 1 gallon coolant left.
John use this tutorial today to replace the thermostat in my grandson’s van. Took my iPad out to the shop a followed each step, finished the job like a pro 😊. Thanks for making van repair easy for us dummies. Hope you have a blessed week!!
Great instructions and much easier to follow than a video. My 05 Sienna had 154K on it when I did this. The water inlet pipe had completely failed, which is the reason for the repair. A few notes from my project:
I recommend draining some coolant from the radiator before disconnecting the hose from the water inlet. Much easier to catch the water out of the radiator drain than just letting it run all over from a disconnected hose.
I left the battery in-I just didn’t see any good reason to remove it. It really wasn’t in the way and made for less work at the end. I was still able to maneuver the lower air box tube out and back in without any problem.
I really didn’t want to remove the starter, and couldn’t (more on that later), so I moved all of the wiring out of the way. Removed the wire-holding bracket attached to the block with a 10mm bolt, removed the nearby ground wire, also a 10mm bolt. I also pulled off the lower heater hose. All of these steps gave me a lot of room to work the old water pipe out.
I could not remove my starter. Seemed like it was frozen in place. After lots of whacking with a sledge hammer and a 2 X 3 on the back of the starter, a small gap-about 1/8″-opened by the front bolt, but it wasn’t enough to get a pry bar in. Finally, in frustration, I manhandled the old water pipe out the back way (pulling it toward the firewall), damaging it even more in the processs, but it was trash anyway, so I didn’t care.
Also in frustration I decided to try getting the new water pipe in with the starter where it was. It was a bit of a puzzle, but after a couple of minutes I actually got it in place, so it can be done. Again, I started from the “rear” of the engine compartment, meaning nearest the firewall, working the tube end toward me, twisting it, and moving wires out of the way.
Anyone replacing their thermostat should replace the water inlet pipe no matter how good it looks. It’s plastic. It will fail eventually. It’s a lot of work to get to. Not changing it is like replacing the water pump and using the old timing belt. Why would you do that? I bought mine from the dealer for about $60. You might be able to save a few bucks by going aftermarket, but you won’t find anything better than the Toyota version, so spend the extra bucks. It is part # 16321-0A040 and called “water inlet pipe”. If you can find a metal one somewhere, that would be the best, but good luck finding one.
Thanks for leaving all the details on how your repair went. I created this post from when I replaced the radiator, water inlet pipe, hoses, and thermostat. My radiator was leaking and so I opted to do it all while I was in there. I then tried to back out and write the individual repair articles but it appears that I may have some unnecessary steps in this one. I’m glad you were able to get it done.
i feel confident I did everything correct except I used this part which Amazon, Autozone, and Advanced Auto ALL said would fit… https://www.amazon.com/gp/product/B000CB547G/ref=ppx_yo_dt_b_asin_title_o00_s00?ie=UTF8&psc=1
Thermostat still leaks
Are you positive it’s coming from the thermostat? You mentioned it “still leaks” — did you have a leak before replacing it? The water inlet pipe (which is plastic) could be cracked, the surface of the engine could be dirty where the thermostat mates up, the gasket could be damaged or bad (did you replace the gasket?), and the nuts could be loose. Be very careful not to over tighten those nuts. I recommend the OEM thermostat which is only $26.
So have been following this, I have a 2007 and am the idiot who over tightened and snapped the bolts. Still researching on how to remove them. Any suggestions?
Josh, I’m sorry to hear that. I’m guessing they broke off flush. Mechanics have their ways of getting out broken bolts but you could quickly create a much bigger problem for yourself if you foul up your attempt to remove them and subsequently damage the aluminum casting of the engine. You might consider having a mechanic shop get those out for you.
Super instructions. Wish I could find this detail on all my repair projects. I have a 2000 Sienna XLE. Wonder how it differs from your year. I think I need to replace the thermostat on it.
Sorry Jim, I can’t tell you how similar the two will be, I haven’t worked on the previous model.
John,
Your pictures and detailed instructions were priceless to me! I just completed replacing the (cracked) water inlet pipe, lower radiator hose, and thermostat on my 2005 Sienna. I pretty much just followed all the steps you laid out. I bought bent-nose pliers and a telescoping magnet before starting and had to use them both
Strangely enough the hardest part of the repair for me was getting the upper air cleaner box back in place. Everything else was not too hard. I would not have even attempted it without your outstanding pictures and instructions. Thanks a million!!
Keith Spurlock
Duncanville, TX
Oh good, thanks for sharing Keith. Good work on fixing your van and saving a lot of money.
Hi, my fiance just replaced the thermostat on my 2006 toyota sienna. He went to start it afterwards.and it will not shift out if park. Di you have any idea if or what maybe would have caused ? I believbe there might be a few more issues that seem to do with the fuses but I was wondering if you knew possibly where we should be looking or has to narrow narrow it down or pin piint?
Thank you rebecca
You’re a life saver, John! I am NOT a mechanic, but for $14.07 for a new thermostat and gasket and with your help, by golly, I got the thing done. WAY better than the quote the Toyota dealership gave me. Thank you!
Kevin
I’m not a mechanic either Kevin but with help we can get the job done. Good work on fixing your van. Thanks for sharing.
Worked great and way less expensive than the repair shop was quoting. I didn’t end up removing the starter. It was a little tight but not that bad. I ended up using some painters tape and just stuck it over the front of the socket and it worked great when removing and putting the nuts back on for the water inlet pipe. In and out in less than 90 minutes.
Thanks for leaving a note Kenyon, if I ever have to get in there I’ll try doing it without going to all the work of removing the starter like the manual says. I bet there’s plenty of tricks like that which the mechanics use all the time to save time.
There’s been no problems on changing the thermostat until the starter bolt. I can’t get it to budge. It doesn’t look rusty, but can’t loosen or tighten it. Tried heating and WD 40, and now I am stuck. Is there a trick anybody can share?
I was feeling pretty good about doing this job, until I saw the torque specs. I just have a few simple tools. Never really learned how to follow torque specks for other smaller jobs. Any advice on how to tighten with basic tools?
John, to be honest I never torqued those bolts when I did the repair. I was careful to not over-tighten them though since that pipe is plastic. You gotta feel comfortable going forward with the repair so let your conscience be your guide.
Thank you for this great video! It is by far, the best I’ve ever seen. Your breakdown of tools needed is fantastic.
Can you comment on the best way to make sure not to over-tighten the studs on the water intake valve/pipe?
Good question John. I looked up the torque ratings of those bolts and added it to the article in step 11:
One of the ways people do this is to place a chewing gum aluminum foil into the socket and then place the bolt inside the socket, Seran Wrap , thin paper works too, Even a piece of an old Thin Surgical Rubber glove works. The idea is the same – enough to cause the nut to stay in the socket. I have been doing work on ‘engineered to never require maintenance’ stuff for many years and there are tricks to learn in order to do it.
I just wish the engineers would be taught in school that they aren’t so good that the stuff they build will never need maintenance.
What I recommend now in my other articles is to use electrical tape, taped over the edge of the socket:

Those Stud Bolts have a spline pattern on them (like an inside out torx) typically they are referred to as E-Torx , if you use that tool – you can (and should) tighten the studs properly. Your article with pictures for removal and installation is well documented. I will see it looks like you have been driving that thing through a dirt storm with the hood up. One thing that ensures you can maintain your car properly – Keep the Engine clean – it is not just for looks. If you get an Oil Leak , Coolant Leak etc.. you can identify that you have a leak very quickly and second you can identify where the leak is coming from at the same time. If I have not done a particular repair for a vehicle before; I like to double check before I start – so I can see the gotchas.
Thanks for the details on the studs. As for the cleanliness of the engine bay–welcome to Chicago winters. At the time we did not have a garage and I lived in the pot-hole capital of the world, so cleaning my engine was not something easy for me to do and keeping it clean wasn’t something I prioritized. I do agree that keeping something clean allows you to see problems sooner–5S!
Wow, nice write up. I did this job in about 2 1/2 hours thanks to your detail.
Thanks Steve and good job on fixing it yourself!
Taping the water inlet nut to the socket was really helpful. Thanks for the clear instructions
You are welcome! Glad to hear you were able to repair your Sienna.
Wow, marvelous guide. I think it went particularly well because I had just replaced the radiator using your guide for that as well. I had visible leaks at the top of both sides of my radiator and I could see the thermostat so I thought I’d skip replacing the thermostat. So as soon as I put it back together it started overheating. When I read through the thermostat was hiding behind the starter. The starter and everything else was a cinch following your detailed instructions. Thank you so much for all effort you put into them.
Thanks for the feedback John. Glad to hear you were able to fix your Sienna.
First, big thanks to Mr. Mueller for this excellent post. Without it, I can’t see how I would’ve done the repair.had to do it myself no money to pay the shop.
Symptoms: burning smell of antifreeze.150k/miles no maintenance of coolant system infrequent addition of more coolant.
2nd; if you need to replace the water inlet/thermostat housing pipe DO NOT buy the cheaper plastic OEM replacement. get the metal one! and, always buy screw type hose clamps for replacement.
upon removal of the hose from this pipe, I was careful not to put too much pressure on the pipe on removing the old hose. but it cracked off anyway! (flinging tools and letting loose a string of foul invectives). I found the interior of the pipe to be degrading as much of it flaked off easily just using my fingernail.
3rd; when replacing the thermostat finger pressure isn’t enough. use a large flathead screwdriver to apply pressure just inside the gasket from top and bottom then side to side to seat the thermostat. otherwise it will always pop out when you try to seat the inlet pipe, and then it will never seat properly until you do this. take care not to warp the thermostat; apply enough pressure evenly and firmly until it seats in the block.bolting down the pipe will do the rest of the seating.(in the machine shop we used to tap in bearings evenly and gently all around until they seated.no, not in an auto shop).
4th; BUY EXTRA 10MM NUTS AND USE ELECTRICAL TAPE TO SECURE THE NUTS IN THE SOCKET WHEN TRYING TO ATTACH THE 3 NUTS TO THE PIPE THAT SURROUNDS THE THERMOSTAT.IF YOU ARE USING AN EXTENSION SOCKET, SECURE THAT WITH TAPE ALSO.
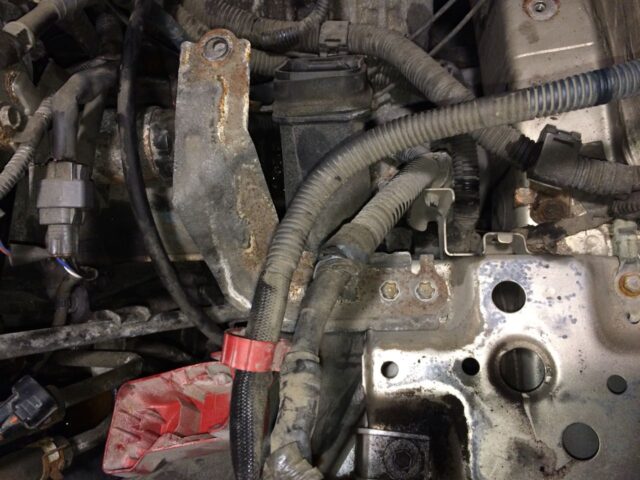
5th; step 7 image 3: look just above the starter. the connector with the metal prong must be removed along with the ground wire otherwise you’ll never be able to access a thermostat nut with your socket extension.
for the stud you can’t see below the round part of the pipe when trying to re-install the nut; use a mirror to locate the stud. i used a ladies compact mirror I got from a dollar store.
when reinstalling hoses, wet the nozzle and inside of hose with antifreeze.even air hoses.
only screw around with this repair if you HAVE to do it, or like working on cars. I do not like working on cars. this design is insane. there is no logical reason to place the thermostat in that position where it is so difficult to replace.
I have been working on japanese machinery for years.. this is par for the course. ridiculous.
Thanks for the feedback and for sharing the things you learned from your repair Vince. Knowing what to expect and having all the parts you need, make a repair go so much smoother (and more enjoyable).
09/11/2017
Thank you!!! What a great instructional. Got it done!
Thanks for the feedback Kevin and good work on repairing your Sienna!
Just below the thermostat housing there is a small hose. Mine appears to be leaking a tiny amount of coolent. Do you have any idea where it goes and what PN I’d need to replace it
Mike, Are you sure it is not dripping coolant because the thermostat housing is leaking onto it? Is it the hose you are referring to pictured in the second picture shown in Step 8c? I don’t know all the hoses on this engine so you may need to have a mechanic look at it. Have you replaced your thermostat already? If so, I’m guessing you just dripped some antifreeze on that house. I need a little more context of your situation.
John,I can’t thank you enough for this fantastic write up.i’m sure it took you a lot of time. everything went perfect,thanks to all of your tips. Saved me $200. You the man.
Thanks for taking time to leave a note Kenneth–good job in fixing your van!
I replaced my thermostat today. Without this article I could/would have never even attempted it. This is an excellent tutorial and I thank you for taking the time to put this together.
You are so welcome. Good job Christopher! Thanks for taking time to share about your successful repair.
Thank you so much for the excellent instructions. I had to replace my water inlet on my 05 Sienna and probably would not have attempted it without your help. I tried to do it without removing the starter or battery but couldn’t get it out, Removing the battery and starter while taking an extra 15 minutes made it 10x easier to get the job done.
This was excellent! thank you so much for taking the time to do this, I had to replace my water inlet and probably would not have attempted it with out your detailed instructions. The tips, especially the duct tape on the nut was very helpful.
Thank you for your feedback Scott and good work on your repair! It sure feels good when you’ve fixed your vehicle yourself.
Great write up. The pictures made it very easy to understand where all the bolts were. We have a 2004 xle 161k miles. I did not have to remove the battery or starter. While I could see why someone would for just plain easier access I did not find it too hard to just work around them. In and out in about an hour. Thanks again😎
Thanks for the comments and the feedback–that may save some other fellow repairers some time.
These instructions are better than YouTube, Chilton’s, and the service manual COMBINED! You are an excellent technical writer. I can’t thank you enough for making this available!
Thank you very much Loren, that was a great compliment. I hope you were able to get your thermostat replaced.
Im pretty handy so having this made life easier. Thank you for this step by step process.
Perfect job aide, completed the job without any problems. Also, the electrical tape was an excellent tip, not sure how I would have gotten the nuts on. Thank you….
Thanks for sharing Bob. I dropped one of those nuts when removing them so I wanted to save you guys the hassle of searching for them like I did. Good work on replacing your thermostat!
Amazing write-up doesn’t even come close to covering this page. Did mine last night in about 3 hours as others have said with no major issues. They do sell funnels with super long necks that will allow you to pour directly into the radiator cap area; bought mine as a three-pack of different sizes. Your hard work and attention to every minor detail is greatly appreciated.
Well thank you Eric, I appreciate the feedback. Good job on the repair! I will look for the funnels you describe and link them–thanks for sharing.
John,
One more quick tip. I found it helpful to remove the plastic engine cowling by removing the three nuts on the front of the cowling and pulling the cowling up to pop the rear clips off of the fuel rail. This isn’t strictly necessary, but is quick and simple and allows for a better view and lighting.
Thanks,
James
Hi John,
Thanks for the reply. I did find the video on the Toyota Highlander. Unfortunately, like all of the other solutions that I found on-line, it did not work for me.
I was able to fix the problem. The solution is a little unique and long winded, but sharing it may help others avoid a lot of frustration and money.
I purchase the 2004 Sienna new and after about 5 years, the JBL subwoofer failed. The foam edge completely disintegrated. I live in Phoenix and our high summer temperatures may have contributed to its early demise.
In any case, it was out of warranty and Toyota wanted north of $300 for a replacement.
It’s my wife’s car and she mostly listens to talk radio so I disconnected the subwoofer because it rattled horribly. My wife was fine with the sound system without the subwoofer so I forgot about replacing it. Since that time, I have replaced the battery three times (they only last a few years here) and I have never had a problem with the radio.
After finishing the thermostat replacement and finding that I was getting no sound from the radio, I removed it, checked all of the connections and harnesses. I had given up and reconciled myself to finding a replacement radio on-line.
It then occurred to me that unlike replacing the battery, which only takes a few minutes, replacing the thermostat took several hours. My guess is that there is a capacitor that provides power to maintain radio settings for a short time, but this job exceeded it’s storage capacity. Maybe the radio was performing a startup diagnostic and was encountering an open circuit. I hooked the subwoofer back up and viola, music. I was then able to disconnect the rattling subwoffer once again. Problem solved!
Thanks again for your awesome instructions and your indulgence.
James
Ahhh, there was more to the story! I’m glad you were able to get it working! No thanks to the (so-called) professionals!?!?! Your persistence payed off. Thanks for sharing how you were able to resolve the issue.
Great write up! Studied the steps for a couple of days and did the repair today on my 06 Sienna – took about 2.5, maybe 3 hours with clean up. Great detailed instructions and I was well prepared going into it. Biggest problem I ran into was the spring hose clamp. Thanks for saving me big $$ with this tutorial.
Thanks for the feedback Paul. Good work on replacing your Sienna’s thermostat!
John
Thanks to your very detailed instructions and thorough photo log, I was easily able to replace the thermostat on my 2004 Sienna.
There is enough room to pull the inlet pipe out of the way to allow the thermostat to be removed and replaced without removing the air cleaner bracket or the starter; however, you do have to remove both of these if you need or want to remove and replace the inlet pipe itself.
Curiously, after reinstalling the battery and starting the van, I had no sound from my radio (factory installed JBL Synthesis sound system). The radio turns on and I can change modes and stations from both the radio itself and from the steering wheel controls, but there is no response when I attempt to change the volume from either of these locations. All three radio fuses are good. I have also confirmed with Toyota that this stsytem does not have a lockout or reset code. I’ve seen a number of similar complaints about this exact situation online for both Toyotas and other makes, but no solutions that have worked for me. Any ideas?
Thanks again!
Thank you for the feedback and question. I have never heard of your radio issue as it didn’t happen to me, when I performed that repair, and that is very mysterious. I did some searching on this issue and found one possible solution for someone who had a similar issue– Turn off the radio, disconnect the negative terminal from your battery and leave it disconnected, pump your breaks 10 times (which attempts to turn on the brake lights each time) to ensure there is no electrical charge in the 12-volt system, reconnect the battery, start the car, now try your radio. Try this and let me know if it works for you.
Hey John, thanks for the information, however, I don’t see why we need to remove the starter, it seems the inlet pipe can be pulled out just fine without the starter being removed? Also, If I may suggest, would torque the inlet nuts, and starter bolts accordingly to get the same tightness.
Frank
Thanks for the feedback Frank. If you can do the job without removing the starter then I guess that would be the way to go. I was simply following the official Toyota shop manual for this repair and it’s been quite a while ago since I did it. If you are able to do this repair without removing the starter please take some pictures, check back in, and I’ll update the article. People go both ways on torquing bolts like these but if it makes you feel better then go ahead. The water pipe is plastic so be careful for sure not to over tighten it.
Best thermostat replacement tutorial! Nothing comes close! Thank you for taking the time to complete and for posting.
Thanks for the feedback and for taking the time to leave a message.
John,
I would suggest you update the headline for this post as it does not apply to ALL 2004-2010 Siennas. I followed your very helpful instructions all the way through Step 8 only to realize my inlet pipe was not there! Perplexed, I looked for an engine number and found it, 2GR-FE, and did a Google search where I discovered the inlet pipe and thermostat for my 2007 Sienna are actually on the passenger side of the engine, just above the serpentine belt.
I found another post that explained how to release the tensioner pulley and then the idler pulley, and that made room to remove two 10mm bolts from the inlet pipe to access the thermostat. That link is here:
http://www.toyotanation.com/forum/122-2nd-generation-2008-2013/828482-diy-coolant-change-part-locations-comments-oh-thermostat-replacement.html
Anyhow, now that I replaced the thermostat, I am still having the same problem described by TXM on 1/27/16 where he said the engine warms up, and yet the heat is not coming from the heater core inside the car unless you run it at a high RPM.
To confirm this, after installing the new thermostat, and running the engine for 10 minutes, the temperature gauge showed around the mid point. But the heater core was not getting any hot water, which I confirmed by touching both of the hoses going into the heater core under the right side of the heater box under the dashboard. Both were cold to the touch. To get the hot water flowing, I accelerated to 2500 rpm and held it there for about a minute. Lo and behold, when I felt the pipes again, they were finally getting the hot water. And I finally felt heat blowing through the vents on the dash.
So it appears the thermostat is working, the engine is getting hot, but when I idle the car to warm it up (as I like to do on a cold winter’s morning!) it doesn’t blow hot. Only after getting out on the road and raising the RPM’s to a higher range will the hot water flow to the heater core.
What might be the next step to get this problem fixed? What is the connection between the engine’s RPM’s and whatever valve lets hot water flow to the heater core? Is that something that might be going bad?
FYI, I have a 2007 Sienna LE with 145,000 miles and I live in Indiana, so we don’t have extreme cold here. I don’t suspect any clogging of the radiator as the fluid I drained looked very clean.
Thanks in advance for whatever advice you might have for me!
Bob, thank you for taking the time to share the incompatibility of my article with some Sienna engines. I will do some research to learn which years/models this article will cover and update it. As for your heater issue–I began my radiator replacement saga with heater issues as mine was blowing cold air and I discovered that it was low on coolant and that was the problem–the heater core was being starved of antifreeze. I also believe there is a valve that controls whether antifreeze flows through the heater core, which is controlled by the thermostat of the cabin climate control system. If that valve is sticking or something is prohibiting it from opening all the way that could keep the fluid from flowing through the heater core. You could also have corrosion in your heater core as well, both of which would restrict the flow and could be the reason why at idle you don’t get heat. If you called up a Toyota dealer they may be helpful in troubleshooting your van over the phone. Sorry I can’t be of more help. Thanks again for pointing out the corrections I need to make on this article.
John, Thank you so much for this write-up!! This is excellent with both your own pics and OEM diagrams!
Anthony, you are so welcome, glad to have been able to help.
I just replaced the thermostat on my 2004 Sienna LX, and probably would not have attempted the fix had I not found your helpful photos and instructions. You go into every detail, nut, and bolt. Thank you so much!
Thanks for taking the time to share, I’m glad I was able to help.
John,
Just wanted to say thanks again for your time. The heater has been blowing hot air since my last correspondence. I did notice the coolant level drop again in the reservoir so I’ve got a leak somewhere that I need to find.
Thanks for your online contributions.
-txm
Hey txm, thanks for checking back in! I want to mention that the coolant overflow tank level will vary based on whether the vehicle is hot or not so make sure you compare levels when the vehicle is completely cool, or while it is hot and running. When it is cool the level will be lower than when it is hot and the coolant has expanded.
John,
I appreciate you relaying that information.
From everything I read, the thermostat actually controls the flow of coolant through the radiator, not just the fan as suggested by the dealer. Is that your understanding?
I’ll start researching water pumps now.
Thanks John.
-txm
I should also note that this morning while driving to work at highway speeds the cabin air output with the heater on was 138F and around 120F when I would slow down or stop.
Also, the IR temperature reading at the engine block never got above 117F.
Here’s a summary of what my dealer contact had to say when I shared with him the information you shared:
Let me know if this helps.
John,
The coolant reservoir was low. Topping it off did not resolve the issue.
Last night ran some basic tests under the hood.
Parked vehicle outside to cool down for 2.75 hours.
Marked reservoir coolant level
Outside air temp at time of tests: 23F
Noted engine block temp while off with IR thermometer (~70F)
Started engine, vehicle in park on level driveway
Opened radiator cap – no fluid movement
Noted following parameters at 1-3 minute increments
1m after engine start [ENGINE BLOCK 74.5F]
2m [ENGINE BLOCK 77F]
3m [ENGINE BLOCK 78F]
4m [ENGINE BLOCK 81F]
5m [ENGINE BLOCK 83.5F] [ENGINE TEMP GAUGE 3/17 NOTCHES]
7m [ENGINE BLOCK 87F] [ENGINE TEMP GAUGE 4/17 NOTCHES]
9m [ENGINE BLOCK 92.5] [CABIN AIR OUTPUT WITH HEAT ON 66.5F] [ENGINE TEMP GAUGE 5/17 NOTCHES]
11m [ENGINE BLOCK 102F] [CABIN AIR 59F] [ENGINE TEMP GAUGE 7/17 NOTCHES]
14m [ENGINE BLOCK 109F] [CABIN AIR 55.5F] [ENGINE TEMP GAUGE 8/17 NOTCHES]
17m [ENGINE BLOCK 117F] [CABIN AIR 54] [ENGINE TEMP GAUGE 9/17 NOTCHES]
After a 15 minute drive to work at highway speeds this morning the coolant level in the reservoir was a hair under the level marked last night prior to the tests. I estimate the amount to be equal to less than 1C of coolant and cannot guarantee whether that amount was being circulated or was possibly the result of a leak somewhere. After arriving to work and with the engine still running this morning I also grabbed both of the hoses leading to the radiator. One was pretty much cold to the touch and the other was bordering on hot.
Based on what I read online last night I’m not sure what, if anything, can be concluded from the tests and their results.
Do you have any input?
Thanks,
-txm
Thanks for all the details. Let me check in with my Toyota Dealer connection and see if I can get any insight from them to share. I’ll check back in and let you know what I hear from them.
I appreciate you going out of your way to look into this!
-txm
You are welcome. I like figuring things out, and who knows, it may be my problem some day down the line and if we figure it out–I’ll know how to solve it when that day comes 🙂
John,
I’ll be replacing it regardless then, thanks. I presume you meant starter and not alternator base on your guide.
Maybe I was premature in stating that the engine wasn’t warming up. Just not getting warm air in the cabin. Interestingly, I recently had a radiator hose replaced due to leaking coolant. I have not checked the coolant level as of late and will be doing that tonight. Perhaps my issue is similar to yours in that my coolant level is low.
Thanks for the continued support and quick responses.
-txm
Yes, I meant starter, sorry for that mistake–I already corrected the comment so any other readers won’t be confused.
The issue is totally different based on what you just shared. I was going on what you said, “the engine was not warming up.” If you watch your temp gauge and it shows the engine warming up to normal temperature up but your heater in the cabin blows cold air you could be in the same boat as me OR your heater core could be bad. So check your coolant level–that could be the whole issue.
John,
Thanks for the notes. I did see a couple of similar methods of testing outlined on other websites.
In my case, it’s winter in Minnesota and if I start the van and let it run with the heat on it never heats up. But, if I drive it and get it over a certain RPM or speed it will blow hot air in the cabin. So, it is a possible case of a stuck open thermostat if I understand correctly, never allowing the engine to warm up. Any thoughts on that?
The bad part of all this is that the same amount of work needs to be done for testing the thermostat as is does to replace it. So, I’ll likely source and purchase all of the parts and materials with the intention of returning them if the thermostat tests good after removing it. That is, unless it is recommended to replace it anyway at that point since everything it disassembled.
Thanks,
-txm
It would make most sense to go ahead and replaced it. Testing the old thermostat will tell you if you have solved the problem or not. I would DEFINITELY replace it after you have gone to all the work to remove your starter and the water inlet pipe… I wrote this article because I wasn’t getting any heat in the cabin but then discovered the corrosion on my radiator and then found that my antifreeze level was low enough to starve the heater core of hot water. Have you checked your antifreeze level? That wouldn’t cause your engine not to heat up though, I don’t think anyway. I’m not sure where that temperature sensor is in the water system–hopefully on the engine side of the thermostat–otherwise your engine could overheat and you would never know about it till the engine was ruined, all because of a bad thermostat.
John,
Thank you for the clarification. I’ll likely go ahead with the repair this coming weekend.
-txm
One thing I might mention (and I’d encourage you to research this more) is that if you really want to know whether your thermostat is sticking you can take it out and put it in a pan of water on the stove and using a thermometer check the temperature it “pops” open at. If it doesn’t open then you know you are on the right track. If it does open then you may have other issues because your thermostat is working fine. If it is not the thermostat then you want to keep tracking down the issue. There are fan fuses, relays, and then the radiator could be bad too. Let me know how it goes though!
John,
Is this repair procedure valid for 2008 Siennas or only 2004-2007. I see 2004-2010 and 2004-2007 listed on this page. I have a 2008 with a possible thermostat stuck open and will be using this procedure as a guide if it applies to my model year.
Thanks!
Thanks for the question. Yes, the model runs from 2004 through 2010 and I didn’t realize that when I had written some of my articles and went back and updated them but you found the ones I missed. Your 2008 will be the same as my ’04. Thanks for pointing that out and let me know if you run into any other questions!
Absolutely the best post I have ever come across. I was truly hoping for a video but your step by step photos helped me do this job right!! Can not thank you enough! 🙂
Krish, you are so welcome. Thanks for taking the time to say thanks–I’m glad to be of help. You know, a video is often nice but when I’m doing it myself I prefer the step-by-step approach and often I have to go back and follow my own tutorials when I have to do the repair a second time!
Thanks for the post. It has been very helpful.
Not to sound stupid, at what point during re-assembly did you add in the coolant prior to starting the car with the new t-stat assembly?
Tim, great question and thank you so much for taking the time to post it. I created this sub-article from the main repair I did, replacing the radiator, and I accidentally left out that step. I have added that step, check out the new Step 20 for when and how to add coolant. Let me know if there’s anything else I can do. –John
Thank you so much for the post. Really helped to be able to ‘walk through’ the install on your site before jumping in to the actual thermostat replacement. My water inlet tube (thermostat housing) broke at the radiator hose link (hate that Toyota made that a plastic part!!!!) and it really helped to see all that I’d have to take out of the engine bay before I could get to the housing bolts. Thanks again!
Thanks for the comment Dave–I’m glad I was able to help. How did the water inlet pipe break?
All I can say is thank you! I needed to replace the Water Inlet Pipe on my wife's 2004 Sienna. Your step by step instructions were spot on. Had not one single problem taking anything off or putting anything back on. I also went ahead and replaced the thermostat since I was right there. Thanks for the info on the Jiggle Valve. Would have never thought of it. Took me about 3 hours and van is running smoothly. Thanks to folks like yourself for taking the time and putting up these instructions. Paid $60.09 for the OEM parts and saved probably $600.00 or so from having to go to the dealer or local mechanic.
Thank you!!!!
Bill
Bill, you are so welcome! I'm glad my tutorial helped you get the job done and save a lot of money! Thank you for sharing. –John