Don’t pay someone $30-40 to change your air filter when you get your oil changed–you can do it yourself for under $15 in parts! Here’s how…
How to Change the Air Filter on a 2004-2010 Toyota Sienna
Equipment:
- 2004-2010 Toyota Sienna
- Fram Extra Guard Air Filter, Part Number CA9360
- 10mm socket with extension or 10mm speed wrench (Highly rated 170-Piece Tool Set on Amazon.com
)
I took my Sienna into Jiffy Lube and they do a good job of checking your air filters and my engine and cabin air filters were dirty but I didn’t want to pay what they were asking to change them since I can get the filter for less than half that price on amazon.com (engine air filter can be found here for $10.49 as of 9/9/13) and it’s pretty easy to do, I opted out. You can read about how to change the cabin air filter in my post here. Follow along to learn how easy it is to change your Toyota Sienna’s air filter…
Step 1: Pop the hood on your van.
This lever can be found below and left of your steering column.
 |
| Hood latch being pulled. |
Step 2: Release the retainer latch of your hood and lift up the hood.
This keeps your hood from flipping up and smashing your windshield if you were to accidentally to pull the hood release while going down to the road. I saw a video of this actually happening and I would not recommend it!
 |
| The hood retainer lever is circled in red. This is just above and to the right of the Toyota logo on the front of the van. Put your fingertips under this and lift the lever and simultaneously lift the hood and it will lift up. |
Step 3: Hold the hood open by inserting the support rod into the slot.

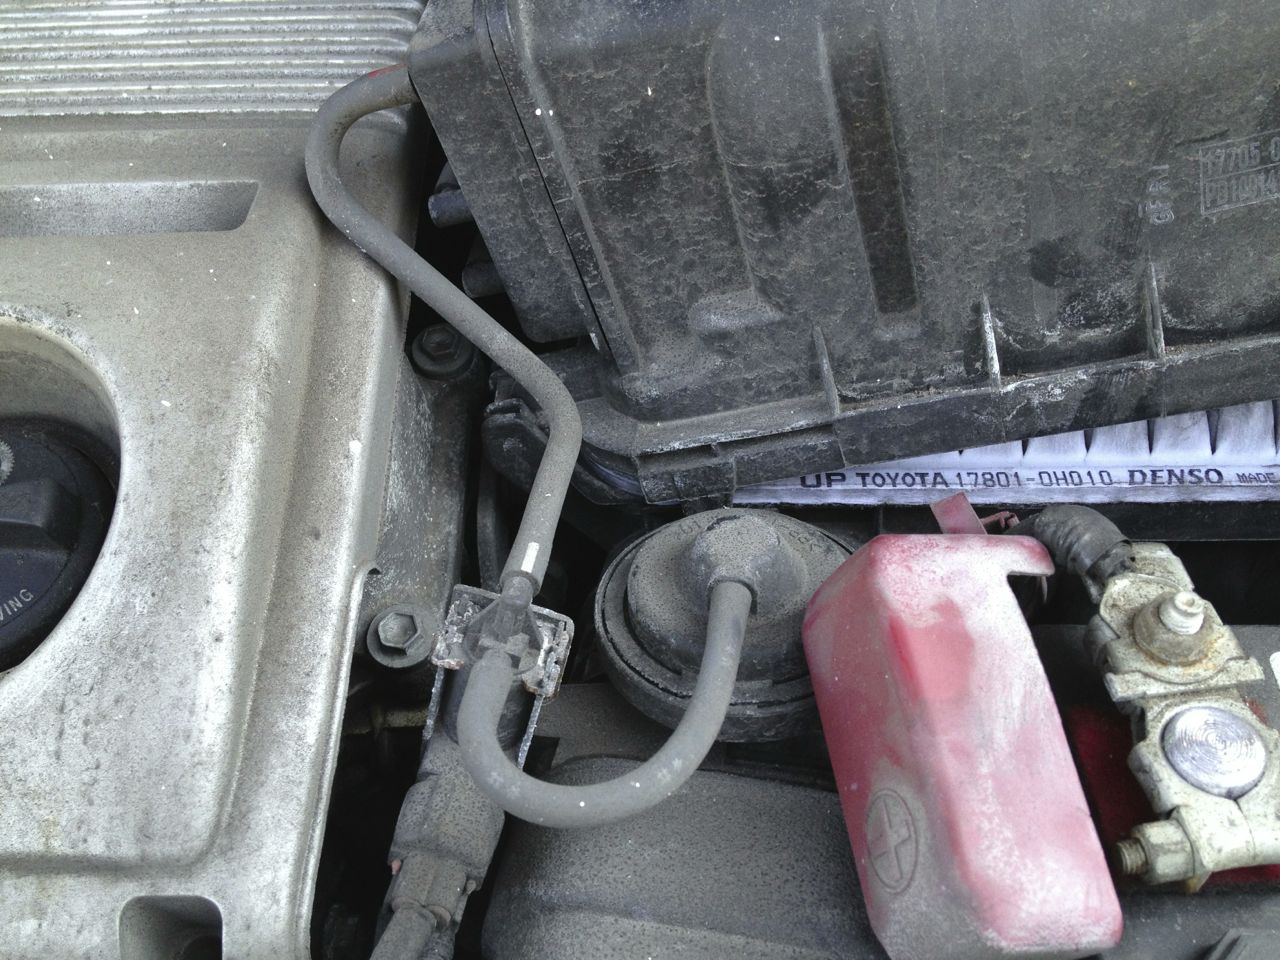
Step 4: Locate the black plastic air cleaner assembly where the air filter is located.
It is on the back side of your battery if you are facing the front end.
 |
| Air cleaner assembly on a 2004 Toyota Sienna |
Step 5: Using a 10 mm socket loosen both bolts on the air filter assembly box.
Luckily the Toyota engineers were smart in that they made the bolts “retained” so you don’t have to worry about loosing them. They will slide out the end if you aren’t a little careful though. The back one is tricky since you can’t see it but it is located in the same place as the front one on the back side. One thing to note is that they shouldn’t be on there all that tight–they are just hand tight. You will be removing the two bolts marked (c) in the diagram below:
 |
| The air cleaner assembly diagram from the shop manual with the two lid bolts marked (c) |
 |
| My 10mm wrench on the front bolt |
 |
| My 10 mm wrench on the back bolt |
Step 6: Lift up the lid of the air filter assembly box and slip out the filter.
You’re going to leave all the hoses and wiring harnesses connected. Lift up the right side and dislodge the hinges on the left side and you will be able to slide the filter out. You don’t need to worry too much about debris falling out into the box because the direction of air flow is up. Depending on how bad things are you may consider vacuuming out the box but in the least pick out the large debris (leaves, etc). Any sand or heavy small debris will be fine down there because it cannot be drawn up through the filter.
 |
| Lifting up the lid of the air cleaner box |
 |
| Removing the air filter |
It was pretty dirty!
 |
| The bottom side of my old dirty filter |
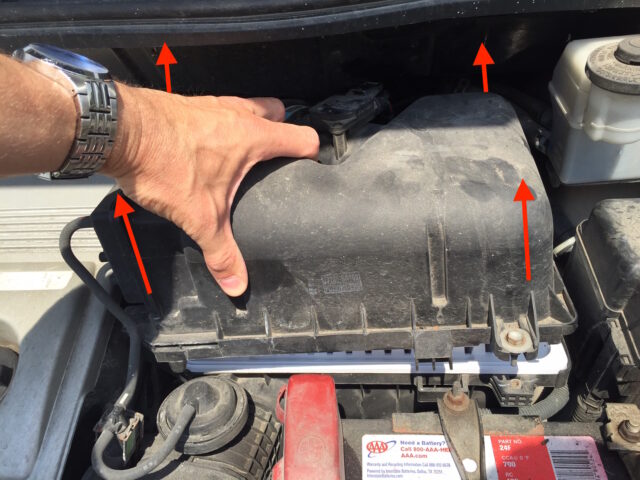
Step 7: Install the new air filter.
There is a top, bottom, and front to the air filter so be careful to set the filter into the box properly. One corner of the filter is square and the other three are rounded. The square corner goes on the front driver’s side. I had a hard time this last time getting the back edge of the filter up where it belongs because the lid of doesn’t want to get out of the way because of all the hoses connected to it. You’ll need to play around with it for a bit. I’ve found that the best way to hold the top cover up and out of the way is to hold it in the following way:
Here is a close up of the underneath and front of vehicle edge of the filter:
 |
| The side of the filter closest to the camera goes down and the top of the filter goes towards the front of the vehicle |
 |
| FRAM Extra Guard CA9360 Engine Air Filter for 2004 Toyota Sienna XLE |
 |
| Fram Extra Guard CA9360 Engine Air Filter CA9360 upside down. The side closest to the camera goes toward the front of the vehicle. |
Step 8: Place the top back on the air filter box and reinstall the two bolts.
Make sure everything is aligned correctly. As you can see from the picture below, at this point, the hinges on the left are unhooked (and this made it easier for me to install the new filter):
 |
| New filter installed, but the air cleaner cover is not installed |
It always takes me a bit of messing around to get the cover back on correctly. The left hinges need to fit under a slot on the lower case:
 |
| Installing the cover requires hooking the hinges into the slots on the left side of the body of the air cleaner assembly. |
Also, the notch on the front right needs to set down in it’s hole, and the bolts need to line up. Below is what it looks like when everything is lined up and the bolts are back in. You can barely see the white basket in the seams.
 |
| Air cleaner box lid reinstalled |
Now you’ve saved yourself $15-$20!
Many of My Other Toyota Sienna Posts:
- How to Change the Air Conditioner Display on a 2004 Toyota Sienna From Metric to English
- How to Replace the Front Struts on a FWD 2004 Toyota Sienna
- How to Change the Air Filter on a 2004 Toyota Sienna
- 2004 Toyota Sienna XLE DVD Entertainment System Does Not Display Video After Turning Vehicle Back On
- How to Fix Sienna Dome Lights Randomly Coming On And Alarm Going Off
- How to Replace the Rear Liftgate Shocks on a 2004 Toyota Sienna
- How to Change the Cabin Air Filter on a 2004 Toyota Sienna
- How to Program the Door Lock Transmitter on a 2003 Toyota Sienna
- How to Replace the Power Sliding Door Cables on a 2004-2007 Toyota Sienna XLE
- How to Prolong the Life of Your Toyota Sienna Sliding Door Cables
- How to Replace the Stereo on a 2004-2010 Toyota Sienna
- How to Fix The Spring on the Cassette Door on a 2004-2010 Toyota Sienna Stereo
- How to Program a Keyless Entry Remote for a 2004-2010 Toyota Sienna
- How to set the Time/Clock on a 2004-2010 Toyota Sienna
- Horn Won’t Work-How to Troubleshoot The Horn on a 2004-2007 Toyota Sienna
- How to Remove the Front Bumper on a 2004-2007 Toyota Sienna
- How to Replace the Starter on a 2004-2007 Toyota Sienna
- How to Replace the Thermostat on a 2004-2007 Toyota Sienna
- How to Replace the Radiator on a 2004-2007 Toyota Sienna
Amazon Associate Disclosure: As an Amazon Associate I earn from qualifying purchases. This means if you click on an affiliate link and purchase the item, I will receive an affiliate commission. The price of the item is the same whether it is an affiliate link or not. Regardless, I only recommend products or services I believe will add value to Share Your Repair readers. By using the affiliate links, you are helping support Share Your Repair, and I genuinely appreciate your support.
Thanks…I had forgot about the “square” corner, fit right in…think that’s why I had trouble last time.