My Remington MB-300 trimmer would not hold enough charge to do a single trim on my goatee so it was time to take it apart and see what I could do. The trimmer still cuts good when it’s plugged in so I thought there was a good chance I could breath some life back into it. The case was not nearly as straight-forward as to how to open it as was my electric razor I repaired a while back:How to Replace the Batteries in a Braun 4775 Electric RazorNow that I’ve done it once, it’s easy, and with my help you can easily do it too, with a little basic soldering experience that is. Here is how to replace the batteries and get your Remington beard trimmer holding a charge again like new:
How to Replace the Batteries in a Remington MB-300 Beard Trimmer
Hardware:
- Remington Model MB-300, Type A, PS06B-R0301000U, Beard Trimmer (obsolete, the MB-200 is still available here
)
- Uniden 2.4V Nickel-Cadmium Rechargeable Battery Pack
(but any 2.4 volt 2-cell NiCad battery pack that is the same physical size as 2 AA’s will work)
- 3M Adhesive Transfer Tape 468MP
(optional)
- Foam Double-Stick Tape
- Helping Hand Magnifier Tool
(for holding the circuit board while you are soldering)
- Small-shafted phillips-head screwdriver, like those in this Precision Screwdriver Set
- Soldering Iron (I used a high-powered “gun” type like this
)
- Solder
- Needle Nose Pliers
- Flush Cutter Wire Nipper
Step 1: Remove the 4 recessed phillips-head case screws.
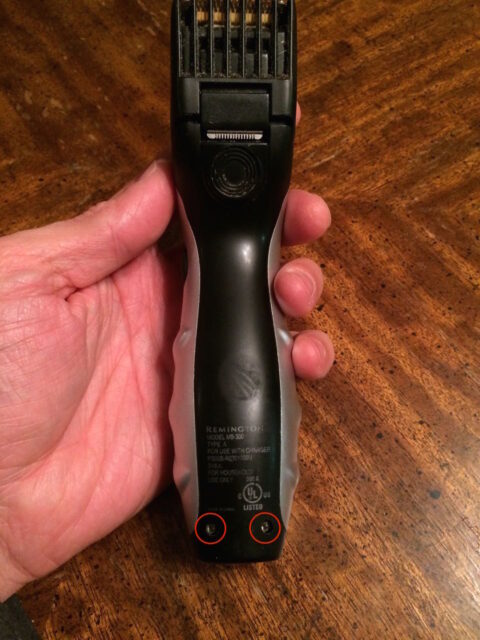 |
| Lower two screws |
And if you slip off the depth gauge, there two on the front:
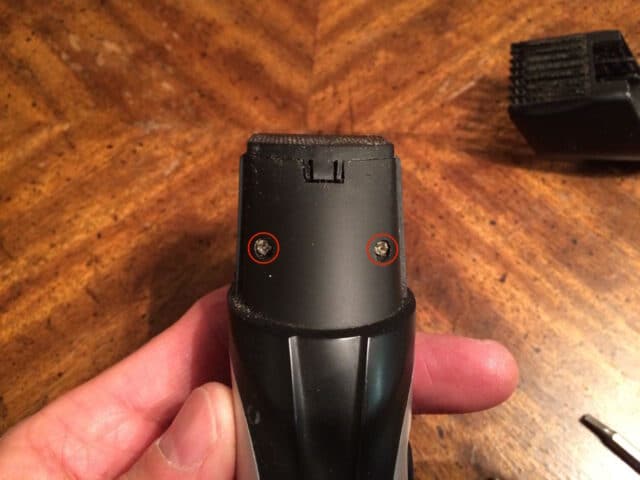 |
| Front two screws |
Step 2: Pry off the silver plastic side panels.
They are tucked under on the end that is closest to the charger plug and they snap in at 4 other points, and they have adhesive on them too, but they aren’t that difficult to remove. Here’s a picture of them off to give you an idea as to what you are working with:
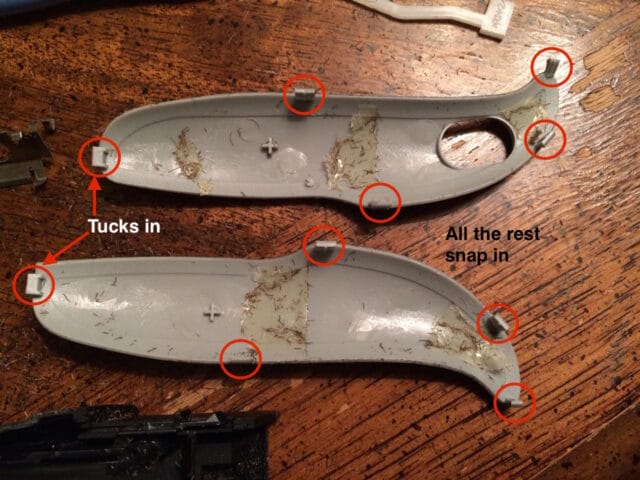 |
| Grey plastic side panels removed |
Pry on the end closes to the trimmer and work your way around:
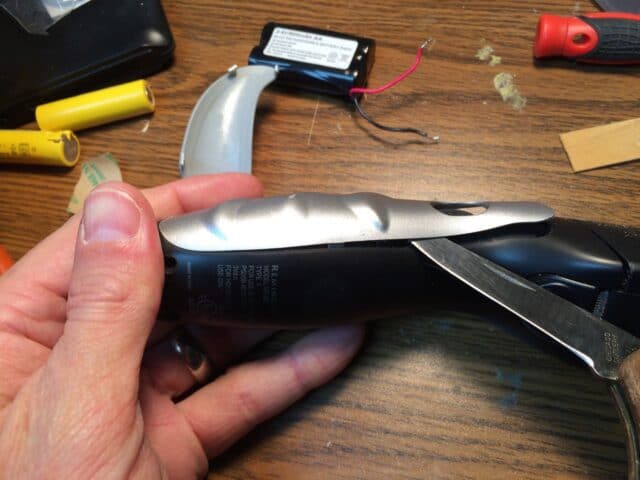 |
| Prying off the silver side pieces |
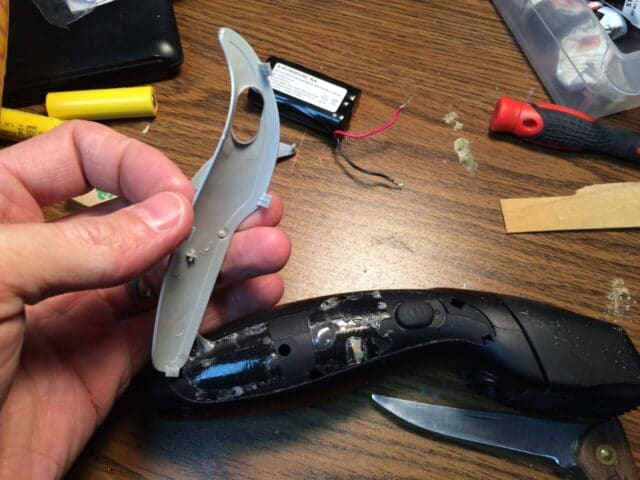 |
| One side removed |
Repeat for the other side, again starting on the trimmer end.
Step 3: Remove the trimmer blades.
They are hinged on the end opposite the blades. Push up on the trimmer blades:
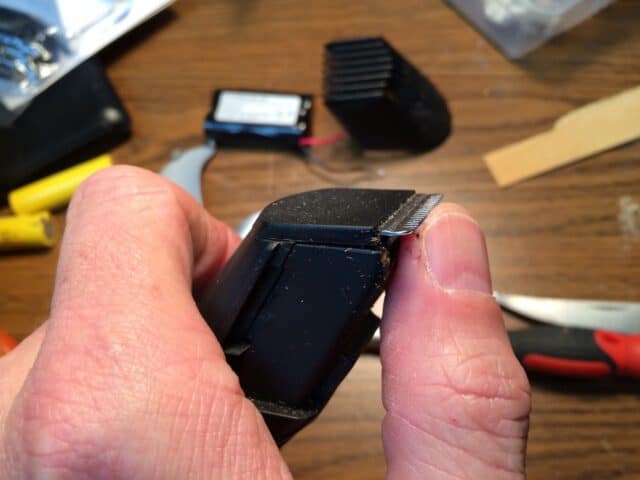 |
| Press on the trimmer blades like this |
They will unlatch:
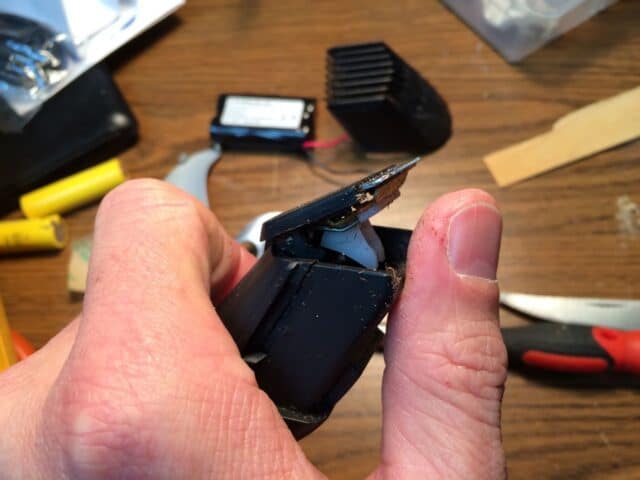 |
| The trimmer blades unlatched |
If you continue to open the trimmer blade assembly it will release:
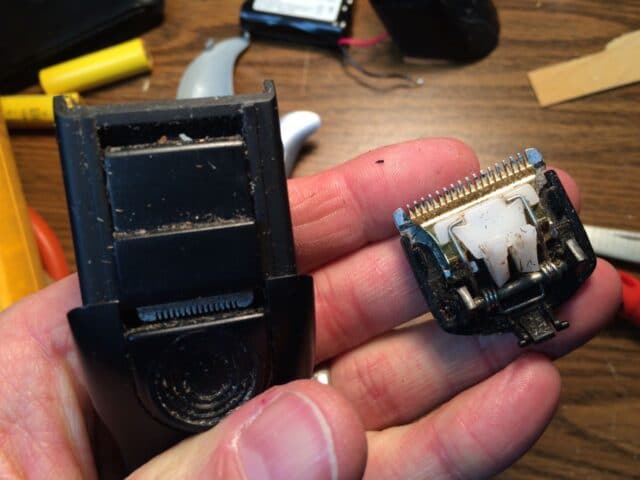 |
| Trimmer blade assemble released from its hinges |
Step 4: Remove the metal bracket that snaps onto the end of the trimmer.
The metal bracket surrounds where the trimmer shaft sticks out. I used my pocket knife to remove it. If you pry like this it will pop out:
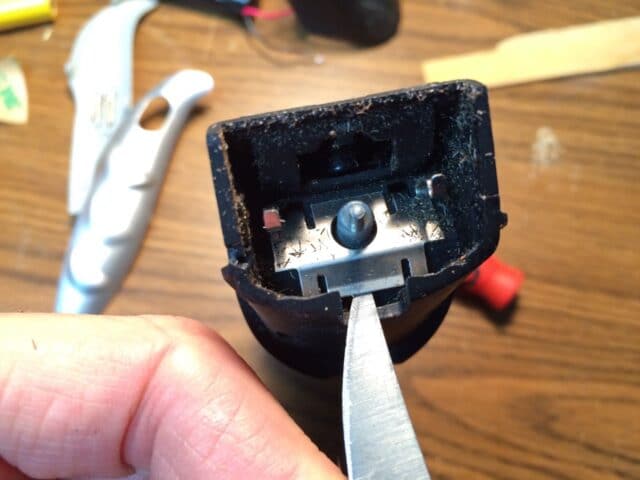 |
| Prying out the metal bracket that surrounds the trimmer shaft |
This is what it looks like when it’s out:
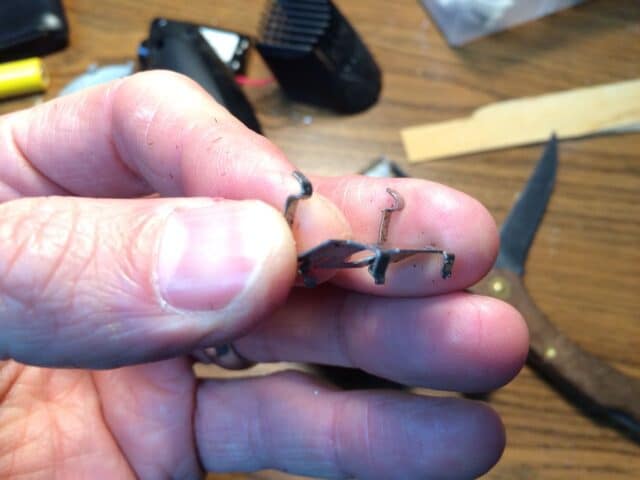 |
| Metal bracket removed |
Step 5: Remove the top of the case.
You shouldn’t need any tools to get the two halves to separate. The circuit board and all the insides will stay with the bottom half.
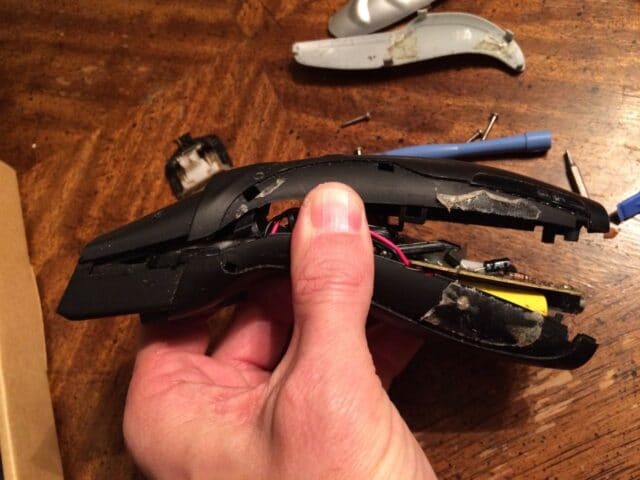 |
| Removing the top of the case |
Step 6: Remove the white plastic switch bridge.
The long white plastic piece in the red rectangle below slides straight up and off the external switch and the switch on the circuit board:
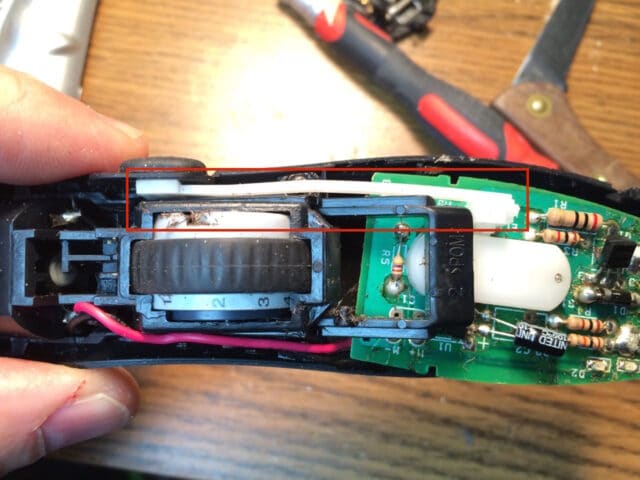 |
| Top case off, the white switch bridge in the red box |
This is what it looks like off:
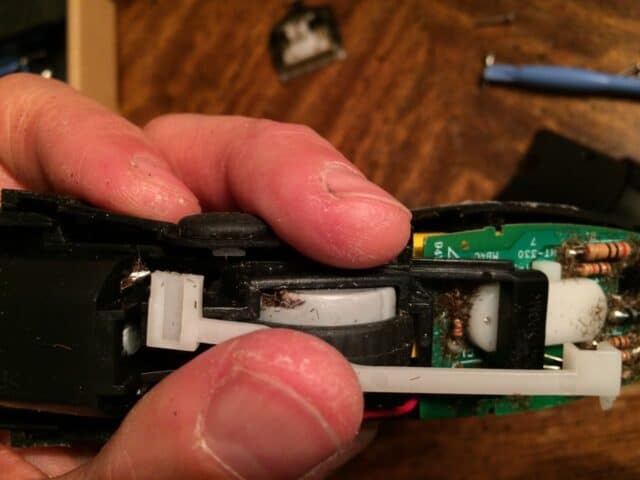 |
| The white plastic switch “bridge” that runs from the external switch to the switch on the circuit board removed |
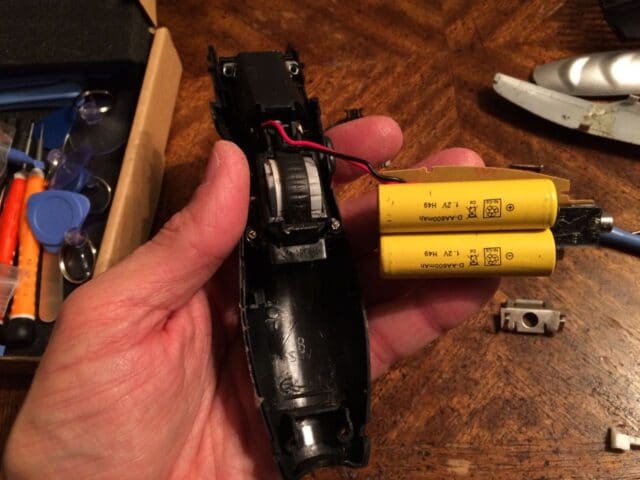
Step 7: Remove the circuit board from the lower case.
There’s nothing holding it in place except that it sets down into the case and the case fits into a couple notches in the circuit board.
 |
| Add caption |
The trimmer is powered by a 2-cell NiCad battery pack that is spot welded together in series and then further spot-welded to tabs that connect it to the mother board. If you could just solder the ends of these batteries I would just use some of the AA NiCad batteries I have left over from my posting on How to Replace the Batteries in a Braun 4775 Electric Razor but that won’t work in this case–the solder just will not stick to the chrome battery ends, even if you sand the chrome finish off (I’ve tried). We are going to have to completely remove these batteries.
Step 8: Remove the batteries.
Using a needle nose pliers peel the metal tabs off the batteries and remove the batteries from the circuit board. The batteries are physically connected on one end to the circuit board and are “adhered” by double-stick foam tape, which you can see here:
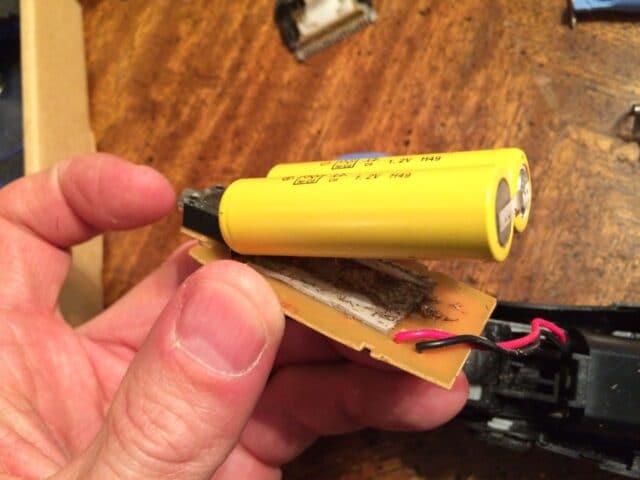 |
| Batteries pried up and off the foam tape |
Do not worry about damaging the metal tabs that connected to the battery because we are actually going to break them off at the surface of the circuit board anyway. Here’s what it will look like when they are removed:
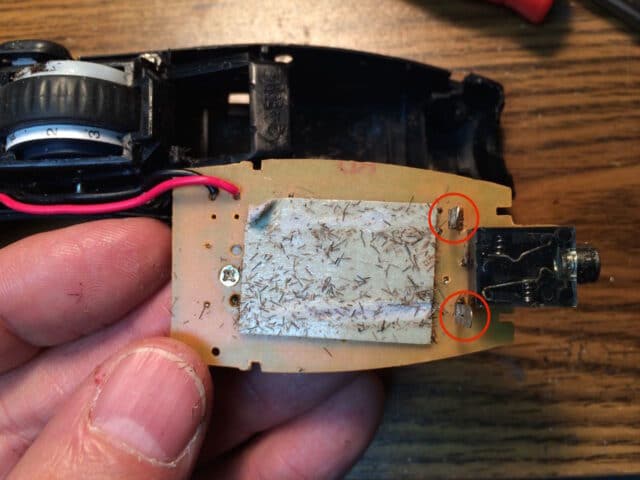 |
| Batteries removed and the battery terminals remaining |
Step 9: Remove the double-stick foam tape and using a wire nippers clip off the battery terminal “tabs.”
We are going to put down new adhesive and are going to completely bypass the metal tabs in connecting the new battery pack.
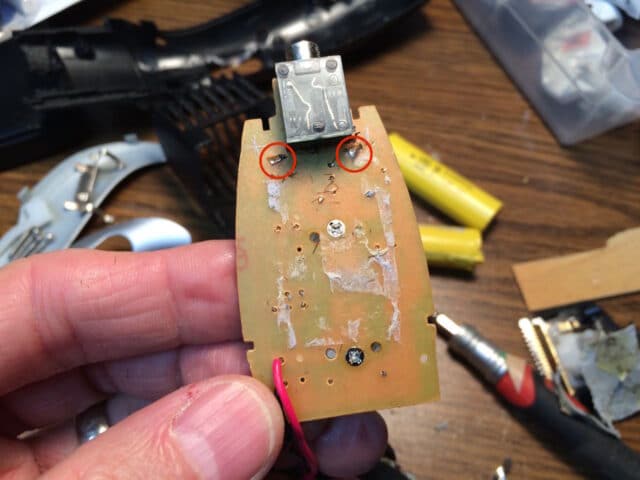 |
| Foam tape removed and battery terminals clipped off |
I actually cleaned all the whiskers the circuit board too (with a little brush):
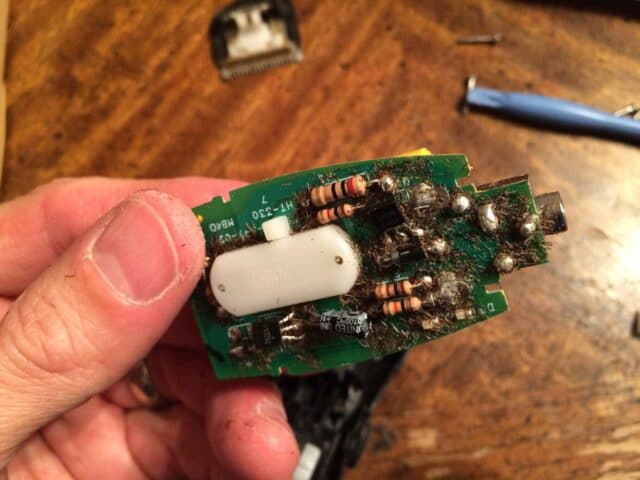 |
| Whisker overload |
Step 10: Prepare the replacement battery pack.
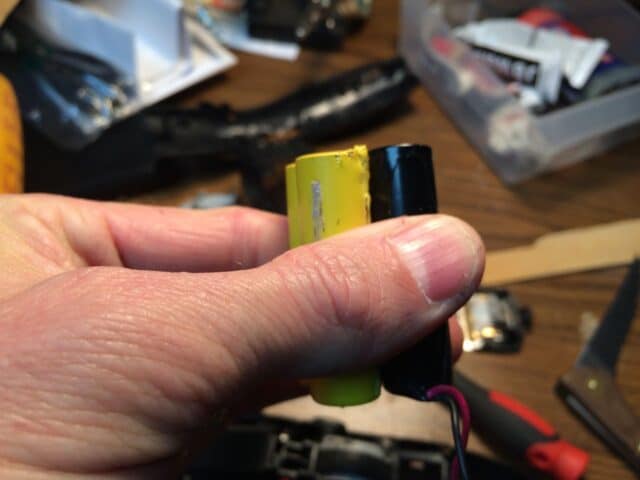 |
| My replacement 2.4 V battery pack is the same size |
You will need to clip off the connector on the end of the wires BUT MAKE SURE NOT TO CLIP BOTH WIRES SIMULTANEOUSLY! By clipping them both at the same time you would be shorting the battery with the metal jaws of the clippers and this could be dangerous. Separate the two wires by cutting in-between them and then cut one wire at a time. Cut the connector off as closely to the connector as possible so you have the longest wires to work with. I’m actually going to be borrowing a NiCad battery I installed in a hand-held bug zapper I repaired in this post: How to Replace the Rechargeable Battery in a Portable Handheld Electric Bug Zapper/Swatter. It stopped working for some reason but the battery is still good so I saved the insides:
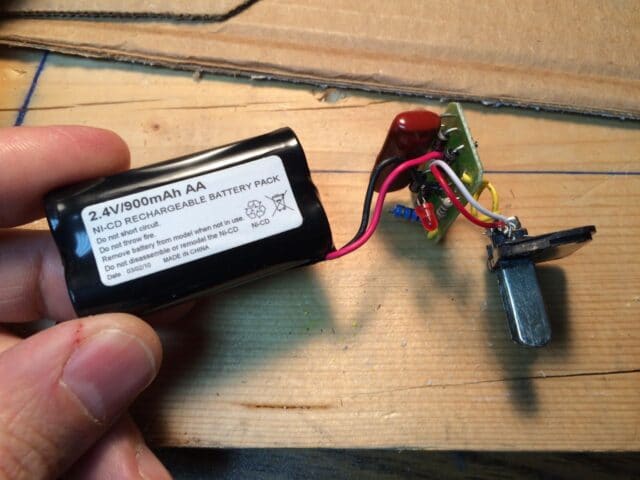 |
| The electrical guts from a broken bug zapper |
Your “prepped” battery should look like this:
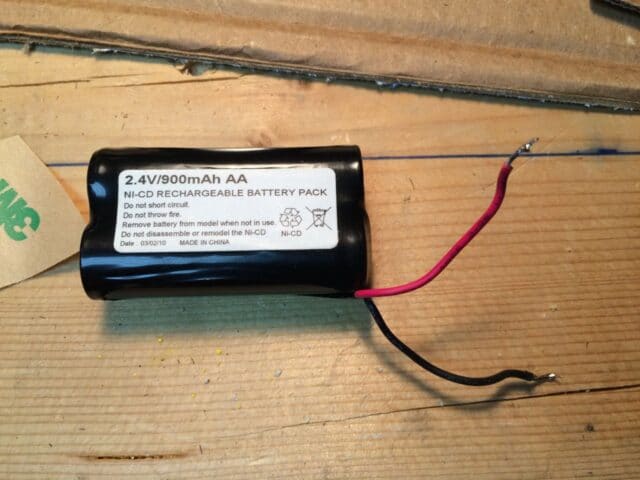 |
| 2.4 Volt NiCad battery with the connector removed |
Step 11: Tin the end of the battery wires.
Strip a small amount of insulation off each wire of the battery and then I would suggest “tinning” the ends of the battery wires before going further. Tinning is the process of melting solder onto and into the wires (if it is braided). This preps the wire and makes soldering them to something go faster.
Step 12: Locate the positive and negative battery connections on the circuit board.
I’ve done this for you already. On the battery side you can see them labeled, with the negative on the right and positive on the left:
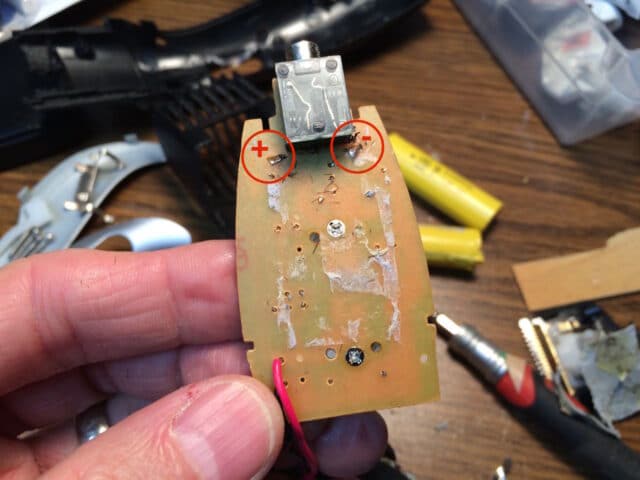 |
| Positive and Negative battery terminals labeled |
This is how I determined this visually, although you could have put a voltmeter on there to determine it too, when the battery was still on it:
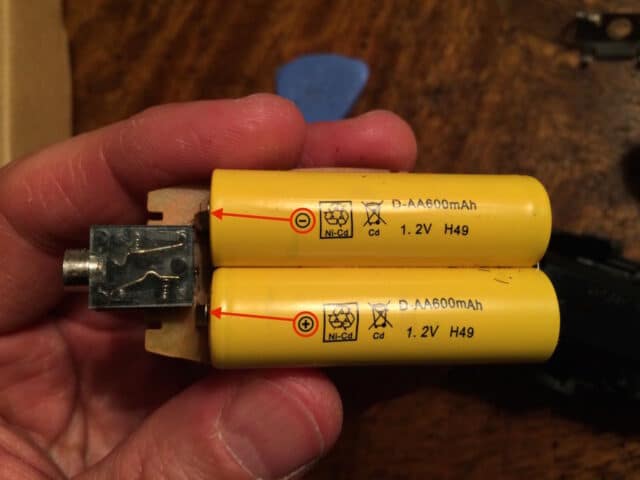 |
| Battery voltage on terminals determined by the labels on the batteries |
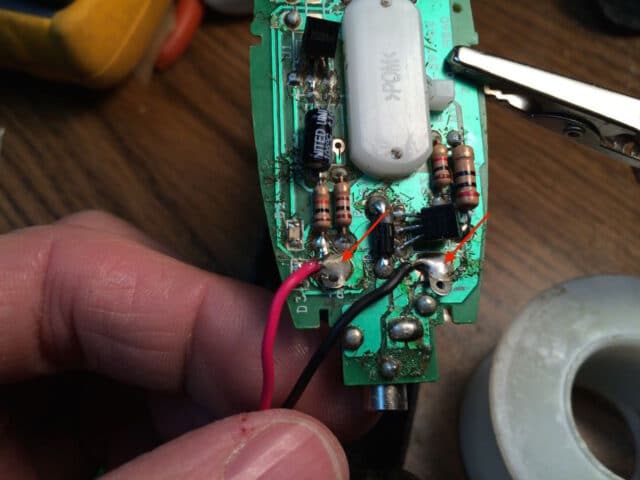
Step 13: Solder the replacement battery to the circuit board.
Locate these terminals on the opposite side of the circuit board and carefully solder the battery wires to them. I used a handy tool I own called a “Helping Hand Magnifier Tool” to hold the circuit board still while soldering:
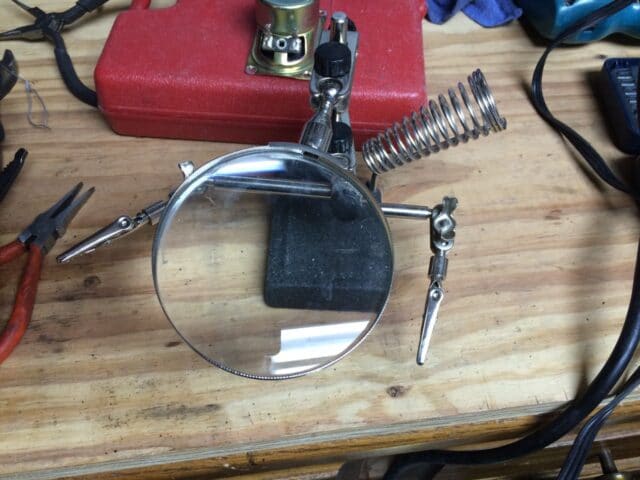 |
| Helping Hands, magnifier, and soldering iron holder |
Black is negative (-) and red is positive (+).
 |
| New Battery soldered on! |
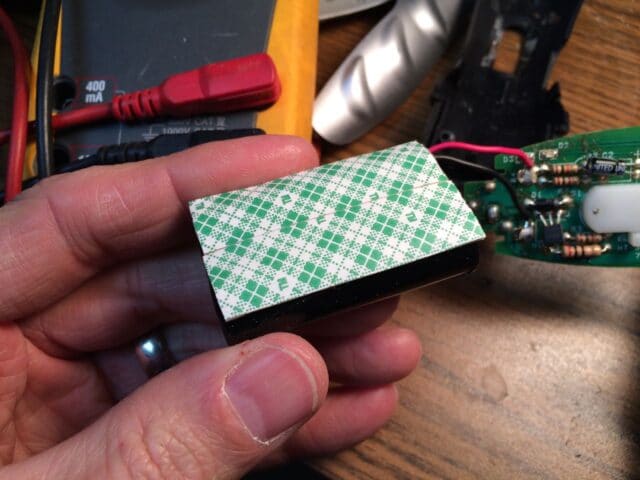
Step 14: Put some double-sided foam tape on the new battery and stick it to the back side of the circuit board.
Foam tape cut to size and applied to the battery:
 |
| Double-sided foam tape on back of battery |
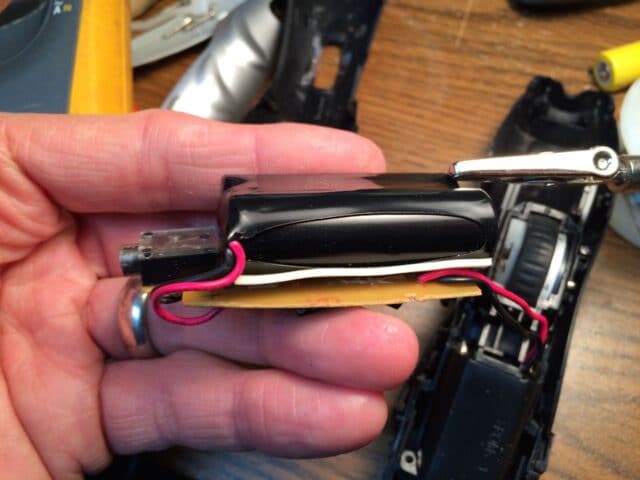
Run the battery wires around the side and stick the battery on the circuit board as close to the black square power jack as possible and “centered” on the circuit board:
 |
| New battery stuck in place |
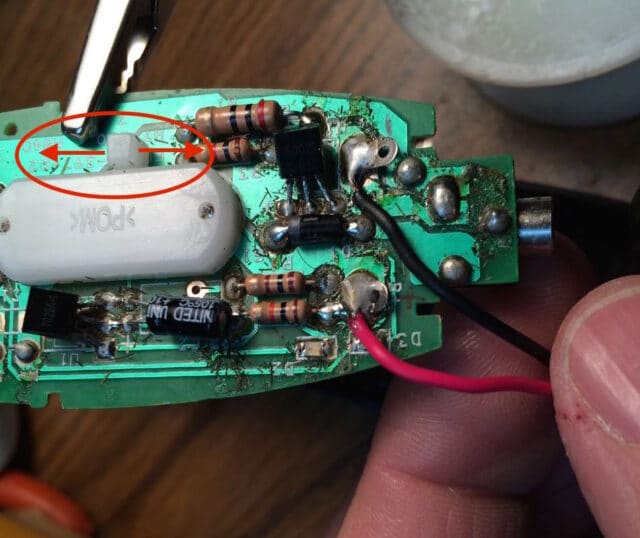
At this point you can actually “test” the new battery by manually flipping the switch on the circuit board:
 |
| Switch location on circuit board |
Step 15: Reinstall the circuit board and new battery back into the lower case.
You’ll need to route the new wires around the side of the circuit board so they don’t interfere with reassembling the case.
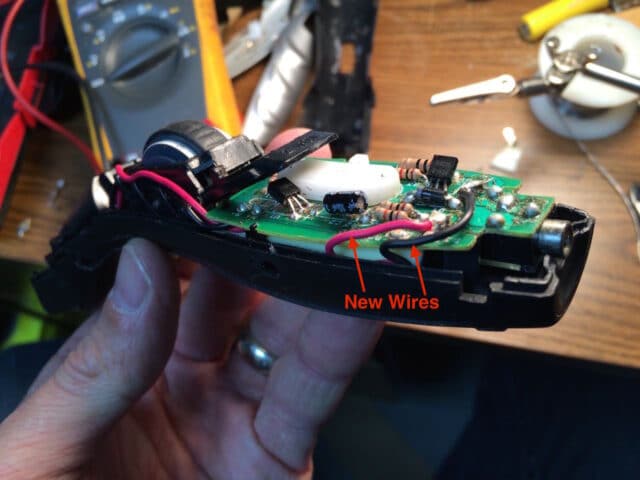 |
| Circuit board and new battery reinstalled into lower case (with new battery wires running around the side) |
Also note that there are two notches in the circuit board that the black lower plastic case fits into:
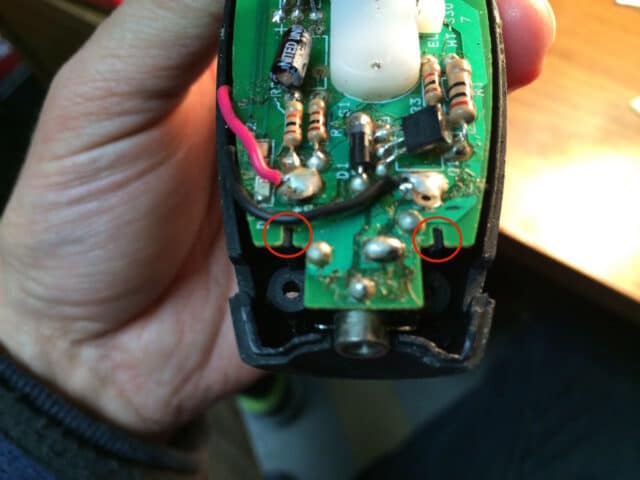 |
| Notches in circuit board |
Step 16: Reinstall the white plastic switch bridge.
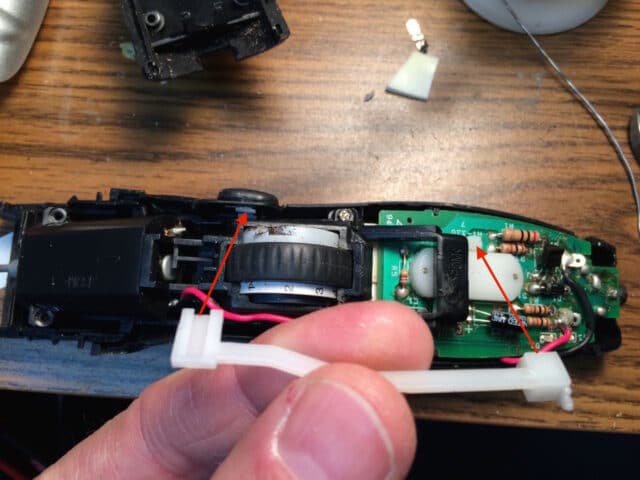 |
| Reinstalling the white plastic switch piece |
To get the left end of the switch piece to slide on to the external switch you may need to press on the outside of the switch like this:
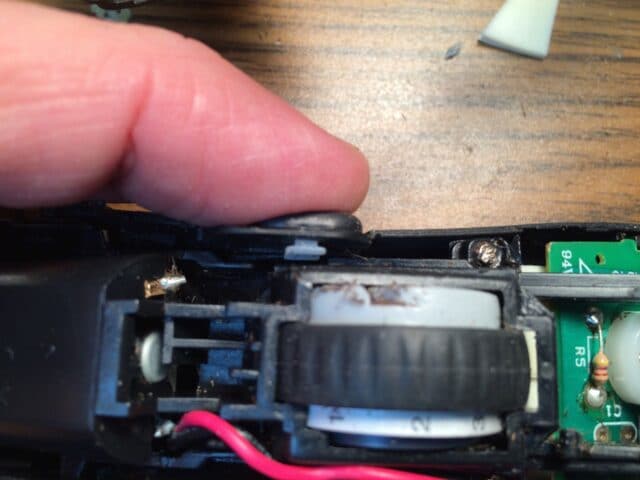 |
| Pressing down on the switch to give yourself room to install the white plastic switch “bridge” |
And here it is reinstalled:
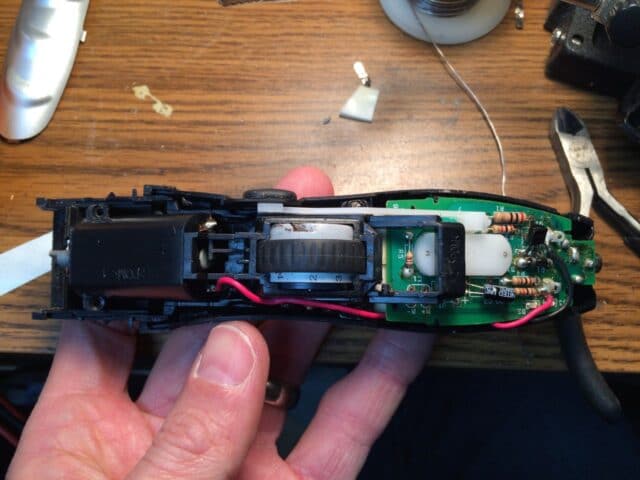 |
| Switch bridge reinstalled |
One other thing you should do at this point is make sure the other two wires are in their place. There is a “channel” made in the lower black plastic case for them to sit down into. I have arrows pointing to the two tabs that the wires must be pressed down into:
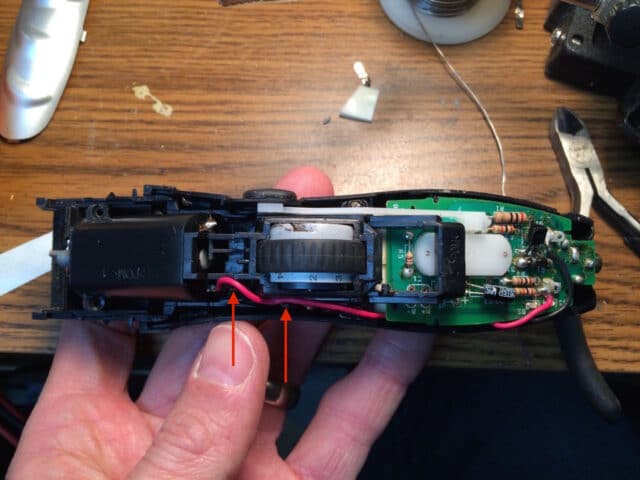 |
| Location of “tabs” that create a channel for the original wires to run into |
Step 17: Reinstall the top of the case and reinstall the 4 screws.
Be careful to not pinch your new battery wiring. By installing the screws now you make it easier to put the silver sides on (and you want the case held together when you do).
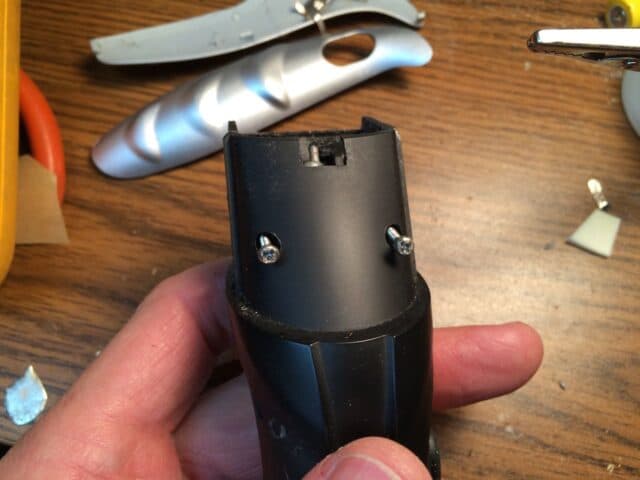 |
| Reinstalling the upper screws |
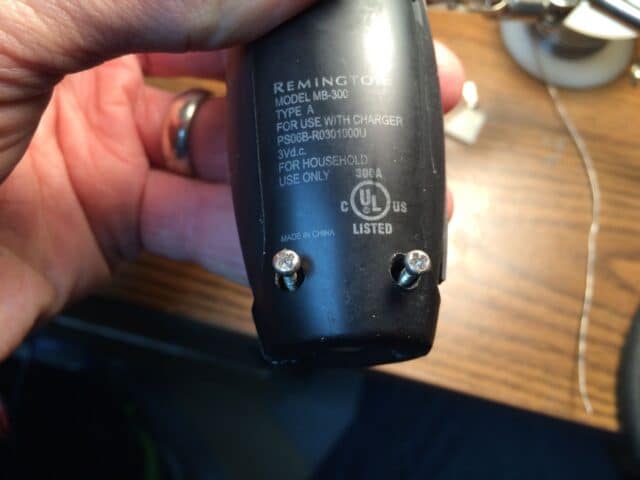 |
| Reinstalling the lower screws |
Step 18: Reinstall the metal “clip” at the trimmer end.
It was necessary for me to bend this clip so it snapped on a little tighter. On the other hand, I didn’t take this trimmer apart in the correct way when I first took it apart (which you are learning from me the correct way, now that I know) so it may not be necessary for you. Here’s how to bend the clip to make it install tighter (you’ll need to repeat on the other side since there are 4 tabs that lock it in place):
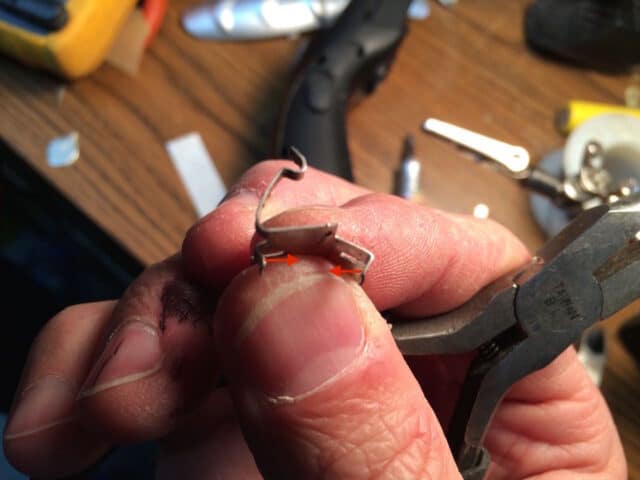 |
| How to bend the metal clip so it fits tighter |
You can just press the clip straight down to snap it in place. This is what it should look like:
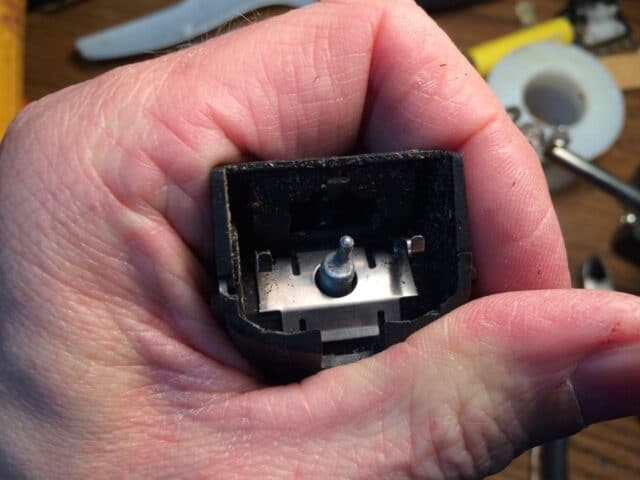 |
| Metal clip reinstalled |
Step 19: Reinstall the trimmer blade assembly.
There are little “ramps” for sliding the two sides of the hinges in place if you put the hinge end in first as seen below:
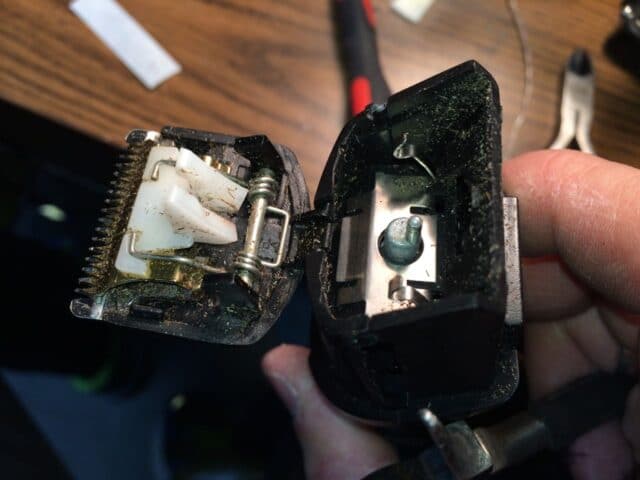 |
| Reassembling the trimmer blade assembly |
You may need to bend the two “latches” on the metal clip to make the trimmer assembly snap into place tighter. Bend them both slightly in the direction shown below:
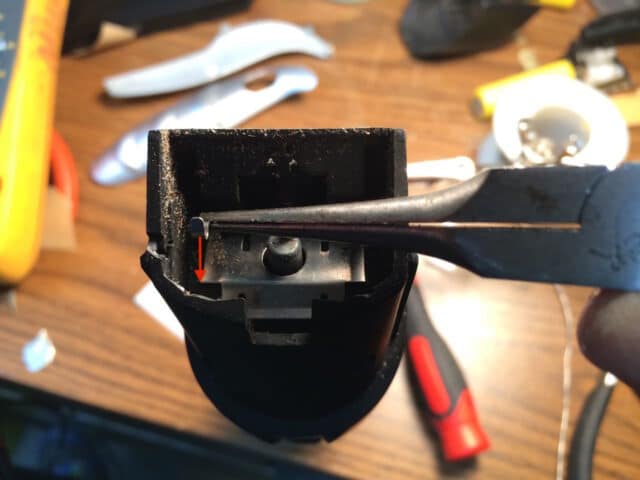 |
| Bending the metal tabs so that the trimmer assembly snaps in place tighter |
Step 20: Reinstall the silver side pieces.
I already had some double-sided adhesive that was almost an exact replacement for what was originally used (linked above in the parts list). The double-sided adhesive is probably optional. Cut pieces to approximately fit the area where the plastic piece goes as shown below:
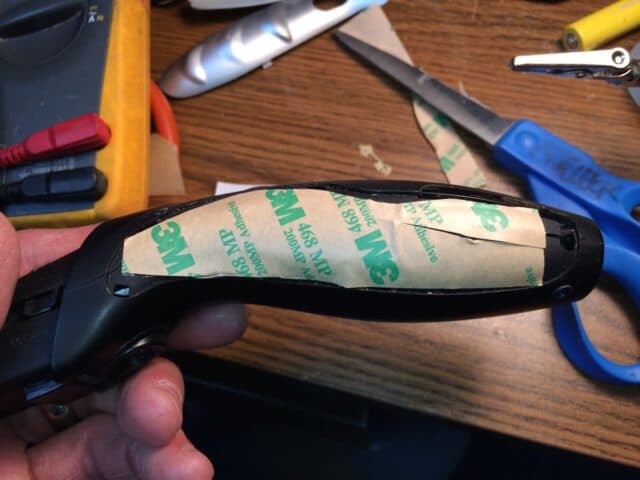 |
| Adhesive applied to the area where the silver panel goes |
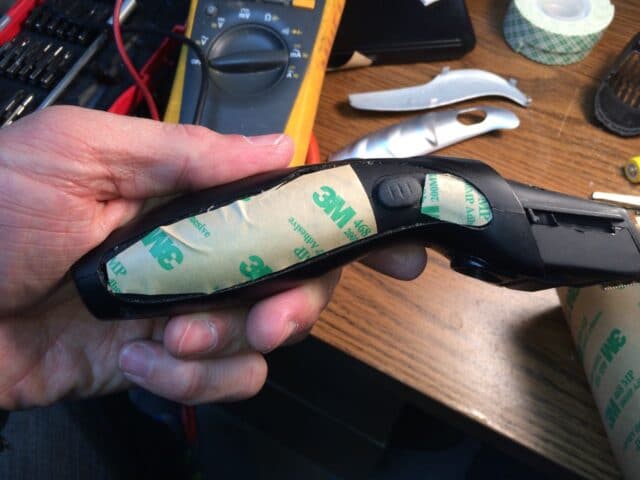 |
| The other side–make sure to go around the switch |
Peel off the backing on each side before you apply the silver plastic panel, of course:
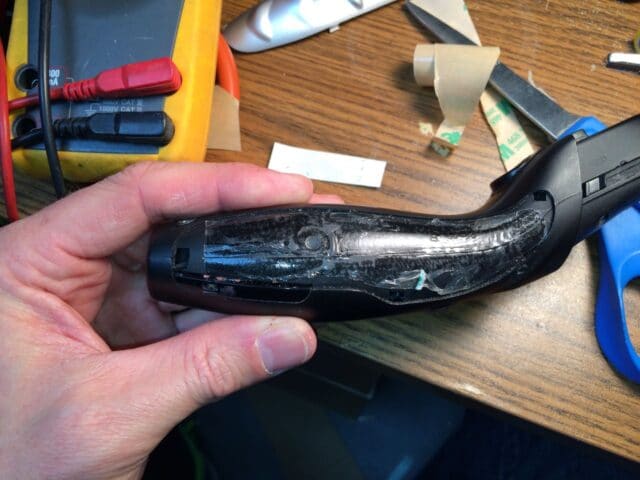 |
| Adhesive applied, ready to install the panel |
Insert the tab end first and then snap down:
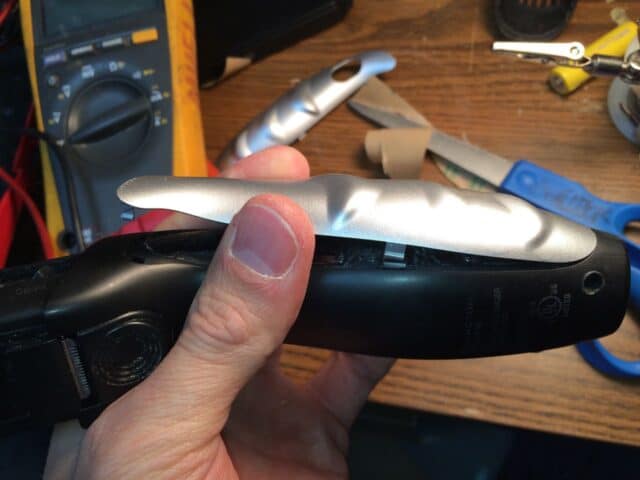 |
| Reinstalling the silver side piece |
And repeat for the other side:
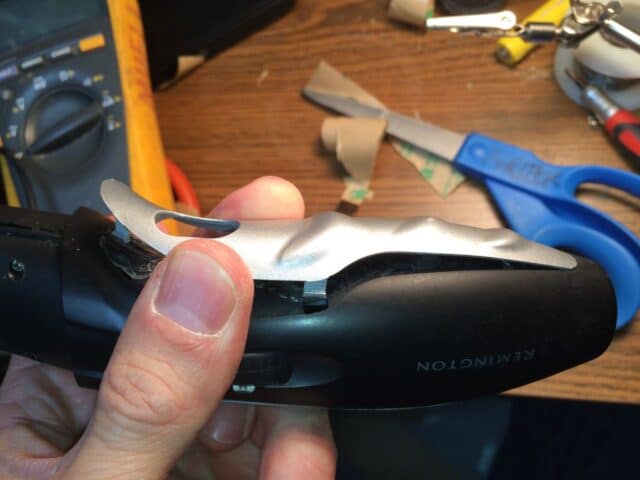 |
| Snapping in the other side |
Step 21: Reinstall the trimmer guard.
Now you are done!
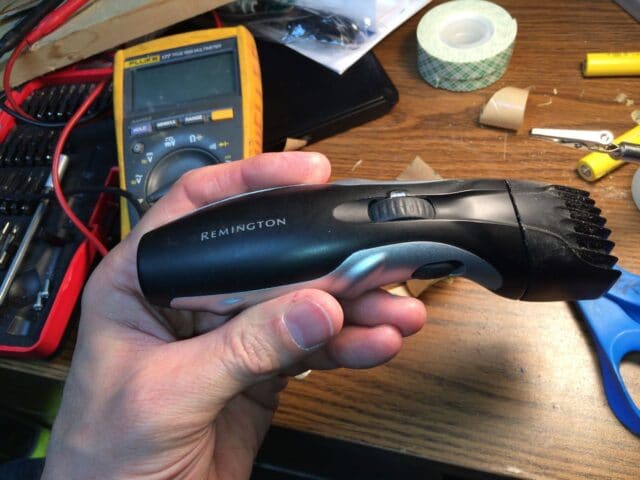 |
| Your newly repaired beard trimmer |
You’ve now breathed new life into your trimmer and it should give you years more faithful service 🙂 And you can repeat this repair again if and when these NiCad’s go bad on you.
Amazon Associate Disclosure: As an Amazon Associate I earn from qualifying purchases. This means if you click on an affiliate link and purchase the item, I will receive an affiliate commission. The price of the item is the same whether it is an affiliate link or not. Regardless, I only recommend products or services I believe will add value to Share Your Repair readers. By using the affiliate links, you are helping support Share Your Repair, and I genuinely appreciate your support.

Thanks for the time taken to upload & detail your repair!
It was much easier to follow than some Youtube videos I found.
I have the Remington MB320 which has 2 batteries spot welded together: HFR Ni-MH 1511 AAA730. 1.2v. R2U
I was surprised to see that the batteries were NiMH and not Nickel Cadmium as the manual states it should be charged for 16 hours!
I have never noticed a low charge indicator or a full charge indicator which is disappointing.
I opened up the unit thinking that the batteries were starting to die but actually I now think that it was clogged up with shavings – totally my fault!
It seems the unit is designed to make it difficult to get to the batteries to change them. They are the last thing to come out after spending ages looking for invisible clips. Remington could easily have had removable batteries, giving their clients the option of using others and having a spare pair ready to swap in if the unit ran out of power half way through a beard trim!
I really think as consumers we should pressurise manufacturers more to make it easy to repair/upgrade their products. It would be great to get some 3d files to be able to print out replacement parts. Often its just a plastic part worth less than a £ or € which prevents operation and the manufacturer has ran out of spares!
Thank you so much for sharing this tutorial! This helped me a lot when replacing the battery of my remington. 🙂
My AAA NiMH batteries failed after five years of use.
I’ve now fitted a AAA battery holder:
https://www.amazon.co.uk/Battery-Holder-150mm-Wires-Leads/dp/B00UNH5OME
And a couple of these:
https://www.amazon.co.uk/AmazonBasics-Capacity-Pre-Charged-Rechargeable-Batteries-Black/dp/B00HZV9YE0/
The wires from the battery holder are twisted with the wires from the terminals and no soldering was required. The exposed wires are insulated with electrical tape.
I needed to remove the sponge padding from beneath the batteries, but it’s pretty much an exact fit.
I can now easily swap out batteries in a matter of minutes.
My 14 year old shaver is running like new again.
Mine also had two AAA NiMH cells. The casing had some foam padding, looks like it was originally made for AA size cells.
I replaced the AAA with two AA NiMH cells from Aliexpress (total 3€ for both cells). They fit perfectly. These cells came with solder leads, which made soldering easy.
Works like a charm.
Thanks again John – I know how hard it can be to take pics etc for these when you’re also just trying to figure out how to get the job done – the effort is appreciated.
To add to my earlier comment…My MB320C has two x BYD H-AAA 730BS cells. These are NiMH. Presumably (they don’t say) 730 mAh apiece. Whilst going to these huge 2000 mAh cells sounds nice, it’s debateable value given the lower capacity is adequate in terms of runtime and the larger cells are close to the price of a new trimmer (they’re also harder to find – at least at the moment).
FWIW, just watched a video of a guy changing the battery in a different model. He used normal Ikea AA 900 mAh cells which he reckons hold charge better (similar to Eneloop?) and he was able to solder wires on to them to join the two cells and provide the leads to the board – clearly makes the repair a bit more tricky however. I have some Eneloops to hand so may just give that a whirl.
Replacing batteries with the same chemistry is important, increasing the mAh is increasing the capacity of the battery and when I replace batteries I always try to buy the highest capacity I can find (within price reason). Adding capacity beyond your need is a waste of money but usually we aren’t talking a big price difference. I’ve used rechargeable Nicad batteries which were supposed to be for solar lights in a different razor which used Nicads and they worked fine. The reason you want to stick with the same chemistry is because they charge differently and require a different charging circuit.
Thanks for this. I’d actually got mine apart before finding your instructions (d’oh!) For those debating AAA vs AA, it John’s pictures and instructions clearly state AA so I’m not sure what the confusion is. As another commenter reported, the MB320C comes with AAA cells, but I’m going to try to fit some AAs. Thanks to those who posted up with links and other feedback as this also adds value to John’s excellent write-up.
Thanks for the note Stuart. The community feedback does help verify and improve these repairs!
Thank you very much for the detailed instructions how to take the beard trimmer apart. The photos showing how everything is held together made disassembly really easy for me.
You’re welcome Harold!
Hi Ron,
There’s no need to solder if you fit a AAA battery holder (99p on eBay from China). You can twist the wires together and cover the connection with insulation tape. This allows standard rechargeable batteries to be fitted and easily replaced. I’m using Amazon Basics because they’re the ‘low self discharge’ type.
Just in case anyone comes across this. The cheapest way to get replacement batteries is from RS Components. You need to get 2 batteries with tags and need to solder the tags to make the pack. But well worth the saving. The batteries are £3 (1700mAh AA NiMH) each, so if you can collect it is just £6. Hope this helps someone.
I know this is quite old, but I wanted to say thanks so much for the guide! Saved something from landfill which is so important.
Anyway, I just wanted to update some people on my experience of the AA Ni-MH battery thing. Well my shaver was actually the MB 320C, and it contained x2 AAA Ni-MH batteries, which had a thick foam pad and wires coming out of it rather than the chrome tabs shown in Step 8. I used this 2000mAh Ni-MH battery: https://www.amazon.co.uk/dp/B00EF3S0NC/ref=cm_sw_em_r_mt_dp_rfrqFb86PC673.
And simply soldered the wires together and tucked them around and under. A tight fit, but it works great!
Thanks again.
Thanks for sharing Greg.
Hi Alcap,
I thought I’d provide an update. My beard trimmer now requires its first recharge since I fitted the new 2x 800mAh AAA batteries back at the start of August. I’ve used it twice a week since then, so I’m getting approximately 25 shaves per charge – although I do also use it for tidying up my hair after cutting it with one of these: https://www.babyliss.co.uk/super-crew-cut-hair-clipper-7565U.html#start=3
I used 2x nimh aaa 800 mah ‘stay charged’ batteries about 6 years ago and they have worked brilliantly. Unfortunately, they’re now dying and I must have damaged the screw heads last time I replaced the batteries.
Oh well. I got around two years from the factory fitted batteries and six years from my DIY replacements.
I’d definitely recommend nimh aaa over nicad.
Thanks for sharing that tip! I’ll have to try NiMh batteries next time. I’ve already replaced my NiCad’s at least once.
Any particular reason to use AAA NiMh and not AA NiMh batteries (for a higher capacity)?
I’m almost certain Grimer meant to say AA batteries.
There isn’t space for AA batteries. I had planned to fit a black AAA battery holder so that they could be easily swapped in future, but there wasn’t even space for that.
I used the eneloop style batteries.
https://www.amazon.com/Panasonic-BK-4MCCA4BA-Pre-Charged-Rechargeable-Batteries/dp/B00JHKSMJK
I did actually managed to get my shaver open again and replaced the batteries. It is working brilliantly again.
Thanks for the quick response guys. And thanks John for publishing this excellent how-to. This is indeed a great all-purpose shaver, my particular version is silver and 11 years old. I took it apart and it appears to have a AA-sized NiCd battery pack, so I’m going to try replacing it with a 2.4V AA-sized NiMh battery pack. I’ll report back… Thanks again, Al
There isn’t space for AA batteries in the shaver.
Hi guys, I can confirm that the AA NiMh batteries will fit inside the shaver. I used a 2000mAh AA NiMh replacement battery pack made specifically for shavers. Instead of wires, the battery pack has metal tabs that can be soldered directly to the shaver’s terminal tabs (without having to clip them off the circuit board, as you show in step 9). In order not to tear the terminal tabs, make sure to carefully pry them from the exiting battery pack with a small flat head screwdriver. Once I affixed the new battery pack to the cicuit board with mounting tape, I bent the battery’s tabs down over the shaver’s tabs and then soldered them together. It’s a tight fit so make sure to not use too much solder because it will protrude and interfere with the circuit board mouning tabs when you insert it all back in place. Here’s the battery pack I used:
https://www.amazon.com/gp/product/B01MQK5CX3/
Replacing the old 600mAh NiCd battery with this 2000mAh NiMh battery should give me years of use and plenty of power in between charges. Thanks again for the helpful info! Al
Hi Alcap,
Thanks for following up. I guess I didn’t try hard enough!
Is that battery pack 2x 2000 mAh AA batteries or 2x 1000 mAh batteries? The two AAA batteries I used total 1600 mAh. I use the trimmer twice a week and I haven’t had to recharge the device since I fitted the new batteries about 3 weeks ago – it still buzzes away with gusto.
Next time the batteries need doing, I’ll cetainly try to up my soldering game and fit some AA batteries instead.
One thing that occured to me this time, is that perhaps it would be easier to solder wires to the AA batteries and then join those wires to the wires attached the terminals on the circuit board – possibly by twisting the wires together. It would be much less fiddly and swapping out batteries in future would just require the wires to be ‘unjoined’ and a new pair of batteries with wires could be twisted on. Anyway, just a though – my current batteries will probably last another five years.
Hi Grimer, that’s 2000 mAh each, connected in series. I’m not too knowledgable about battery stuff, but I believe connecting in series doubles the voltage to 2.4V while the amp hours remain 2000mAh total for both AA batteries. This may be overkill for me considering I don’t use it daily either, but I do rely on this shaver to keep my beard in shape, so it will be nice getting to use it again without having to keep it plugged it. I like your thinking on how to make replacing the batteries a bit easier, hopefully we’ll both get many years of use before having to do it again. If and when I need to, I’ll just remove the solder from the tab connections and re-solder the new battery. Honestly the hardest part will be making sure not to strip those cheap tiny screws! One of the 4 screws broke off at the head so I have one hole that’s useless, but the case still holds together with all the tabs and side panels locked in. A note on the fit, I got a bit lucky as I mounted and soldered the batteries before checking fit. You just need to make sure the AA batteries are centered side to side and pushed up close against the terminal tabs on the back of the circuit board. Thanks again for the help guys, take care, Al
thanks John very helpful, I’m going to use two AAA NiMH cells.
I’d be interested in how that goes for you Al. NiCad is a different technology than NiMH and the way the electronics charge the NiCads is different from NiMH so the batteries may not fully charge as I believe they take longer. Please check back in and let us know how it went.
Thanks for an extremely useful article.
Thanks Mark, were you able to refurbish your Makita battery?