If you need to replace your starter, follow along and I’ll show you how… It is not that difficult and I had to remove the starter when I replaced the thermostat on my 2004-2010 Toyota Sienna and have written an article specifically for replacing the starter. This post is part of a larger tutorial I wrote: How to Replace the Radiator on a 2004-2007 Toyota Sienna
Even if you have never done auto repair work before, you can perform this repair with my help.
How to Replace the Starter on a 2004-2010 Toyota Sienna
Parts Needed:
Tools Needed:
- Socket ratchet with the following sockets: 14mm, 12mm, and 10mm, (if you don’t have a good socket set, pick up a 99 Piece Stanley Socket Set
, which should take care of about all you need)
- Vehicle Ramps
- Corded work light
Encouragement from fellow repairers…
Here is some fantastic feedback I’ve received from people who have used this tutorial to replace their Sienna’s starter:
This article absolutely saved me and my car yesterday! … Your clear directions and photos were easy to follow and we got the starter replaced without breaking anything. We also really appreciated that you included how to put everything back together. My first time really working on a car and I’ll definitely come back to this site if I ever need anything again! Thank you!! –Jenny M.
I just went through these instructions and they are great, thank you! I’m not a professional mechanic my any means but it took me about 1.5 hours without rushing, the new starter fired up the very first time with no problems… Thank you again! –Ken
This was a fantastic resource! It made the job super easy. It took me about 2 hours, which included the trip to the autopart store to buy the new starter. Thank you so much! –Dustin
YOU SAVED ME $500! Your step by step how to replace my 2005 Toyota Sienna starter motor was on of the best tutorials I have ever used. It was perfect with easy to understand language and photos including how to put everything back again. I received a $600 “discounted” quote from a dealer… but completed the entire job… for less than $125. Keep up the great work. My sincere thanks!! –Archie
Worked great! Thanks for the instructions – way better than a video… –Joe
I am not a mechanic but was able to follow your instructions and pictures to get my starter replaced. Videos are great but the photos and step by step instructions are better. Thank you. You saved me several hundred dollars. –Mickey Knoxville, TN
Probably saved me over $500! Thank you for the clear directions and great pictures. REALLY appreciated the time you took which saved me! –Todd M
Repair Outline
Below is a list of the detailed steps I’ve outlined for you to follow to replace your Toyota Sienna Starter. Click on the step links throughout the article to jump to that step.
- Step 1: Drive your van up on ramps
- Step 2: Remove the Air Cleaner Inlet
- Step 3: Remove the air cleaner assembly top cover
- Step 4: Remove the air cleaner assembly lower box
- Step 5: Remove the battery
- Step 6: Remove the air cleaner bracket
- Step 7: Remove air cleaner inlet number 1
- Step 8: Remove the old starter
- Step 9: Install the NEW starter
- Step 10: Reinstall air cleaner inlet number 1
- Step 11: Reinstall the air cleaner bracket
- Step 12: Reinstall the air cleaner (lower) case
- Step 13: Reinstall the upper air cleaner case
- Step 14: Reinstall air cleaner inlet number 2
- Step 15: Reinstall the Battery
- Step 16: Test your new starter
Repair Steps
Step 1: Drive your van up on ramps.
Note: Ramps are not required for a starter replacement but I did this repair as part of a larger repair (replacing the radiator) and it does make it nicer to have the van closer up to you if you are tall like me. I purchased these ramps, which are a pretty good deal and they stack up for easy storage.
 |
| Toyota Sienna up on ramps |
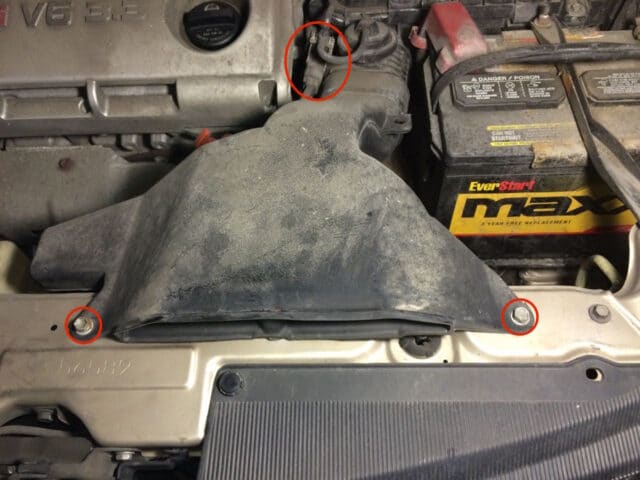
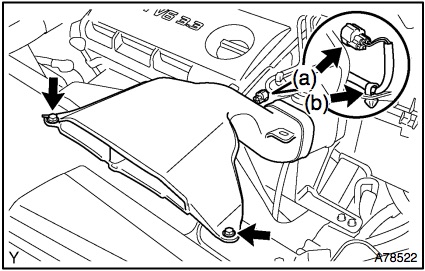
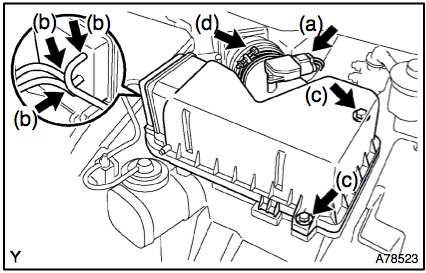
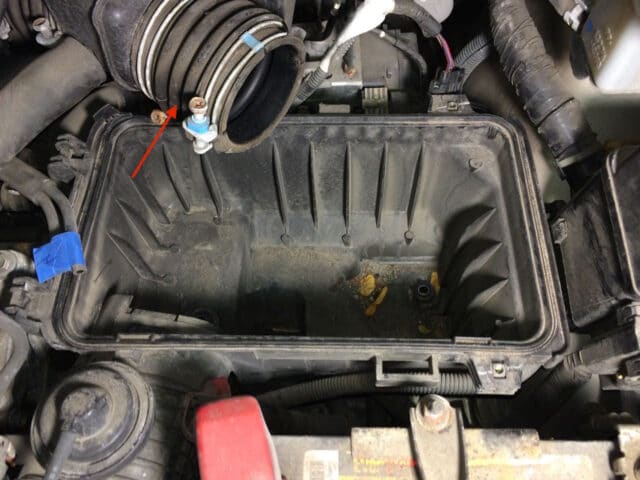
Step 2: Remove the Air Cleaner Inlet.
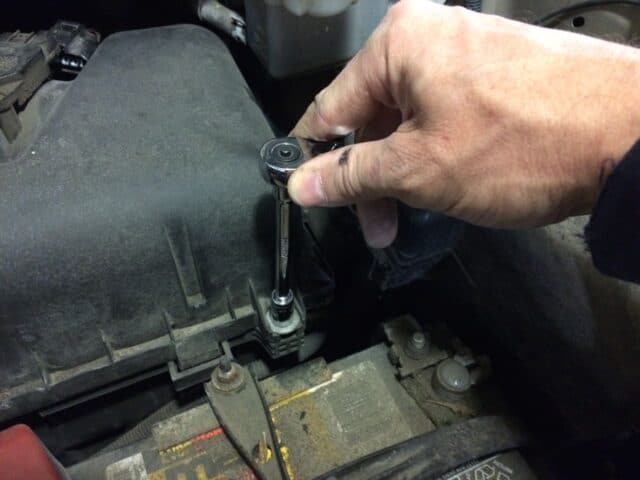
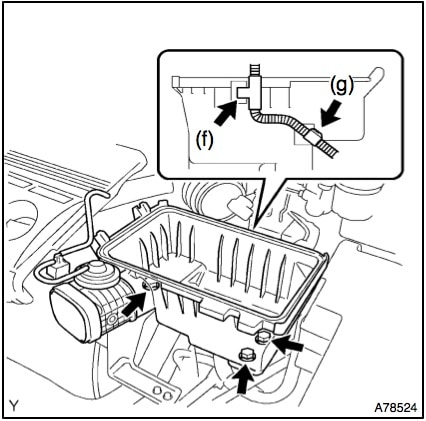
You will need to disconnect one wiring connector (VSV connector), free the wire harness clamp, and then remove the 2 bolts on the front edge of the inlet housing. Here’s what the air cleaner inlet looks like and the locations of the steps:
 |
| Air cleaner inlet |
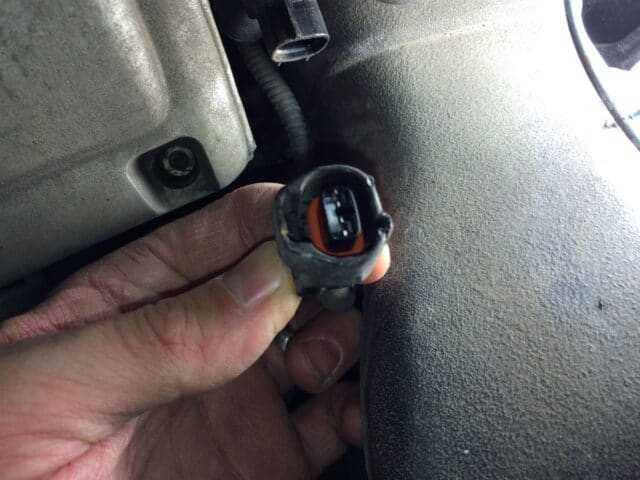
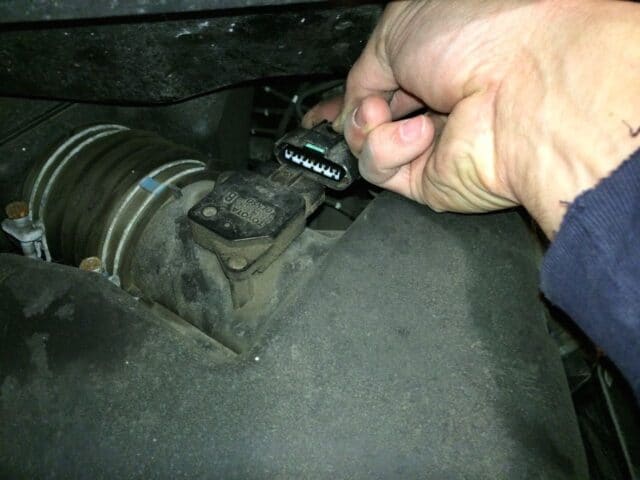
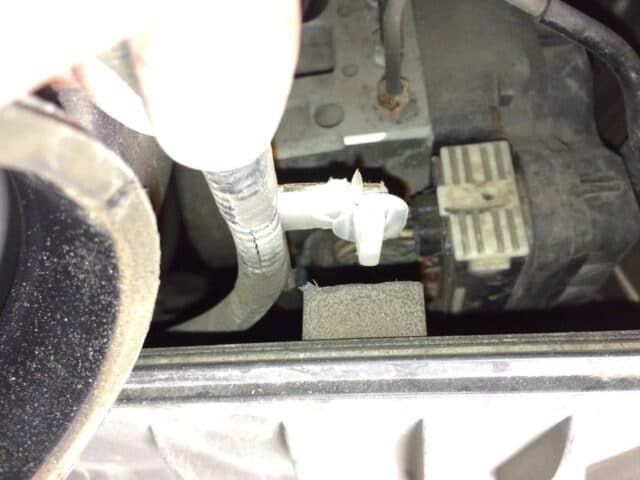
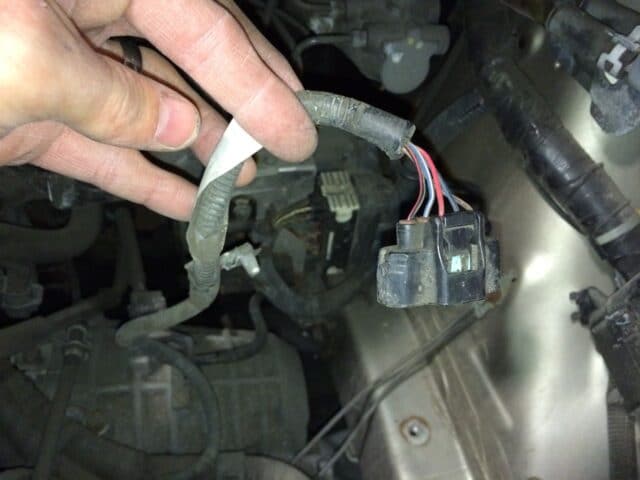
The VSV connector has a tab on the bottom of the connector that you must press in while you pull the connector free. I was not able to pull it free with my fingers so I used a screwdriver and twisted as seen below, prying the connector loose while pressing the tab:
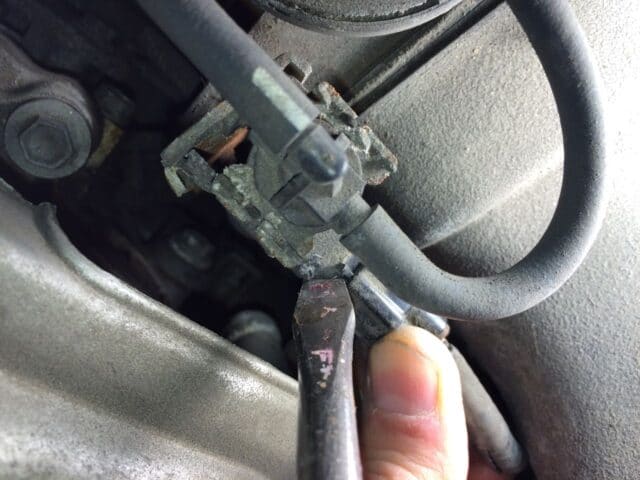 |
| Prying VSV connector free while pressing the tab with my fingers |
 |
| VSV connector and clip details |
This is what the connector looks like when you get it disconnected:
 |
| VSV Connector Removed |
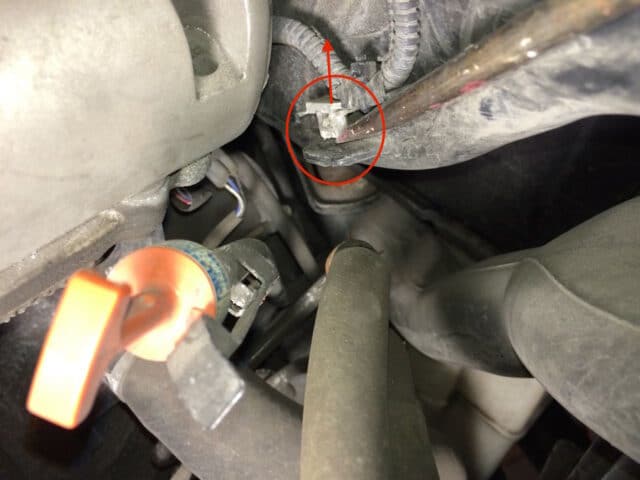
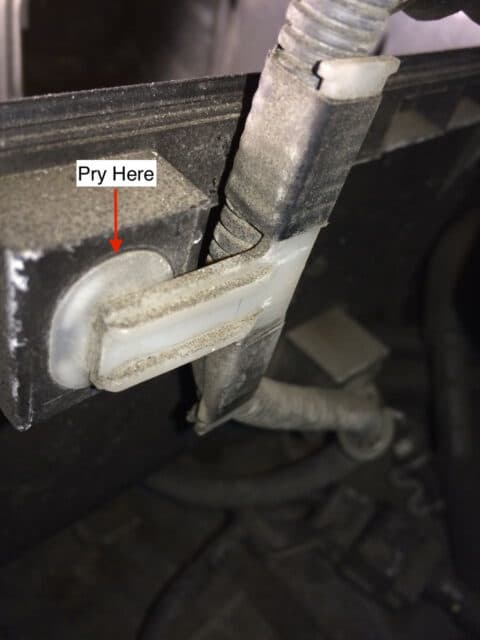
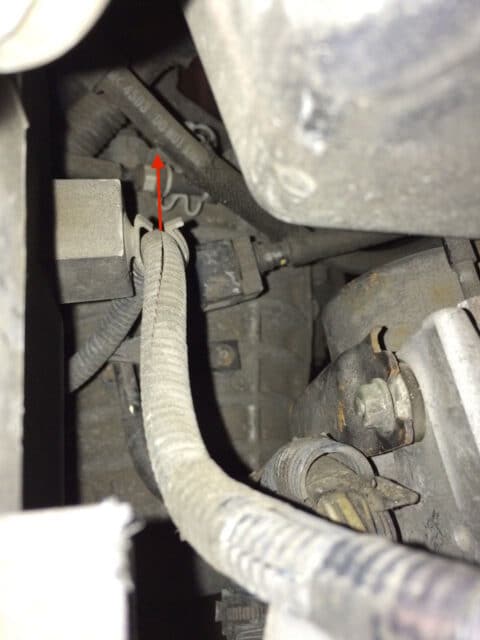
Pry the wire harness clamp free in the direction of the arrow with a large flat-head screwdriver:
 |
| Wire harness clamp on air cleaner inlet |
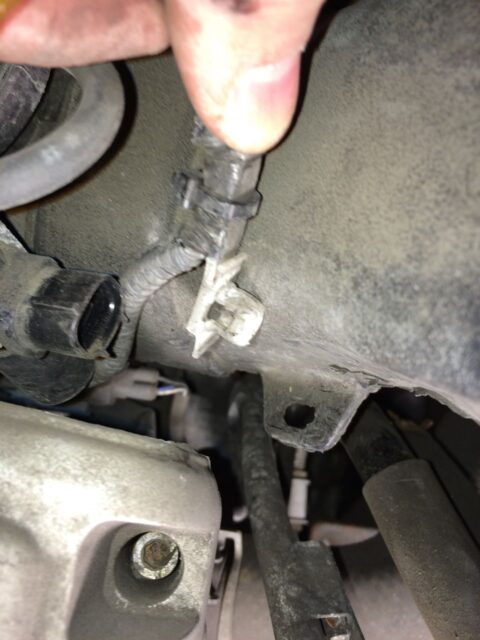 |
| Here the wire harness clamp is free |
Now remove the two 10mm bolts from the front edge of the air cleaner inlet housing:
 |
| Removing the first of 2 air cleaner inlet bolts – 10mm socket |
Now you can remove the air cleaner inlet. Lift the front edge up and pull it towards you while moving it back and forth (left/right) to disconnect it from the air cleaner assembly. This is what it will look like when you get it removed:
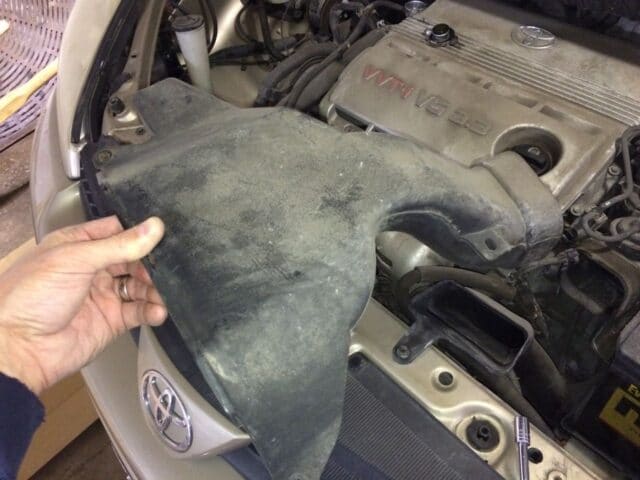 |
| Air cleaner inlet removed |
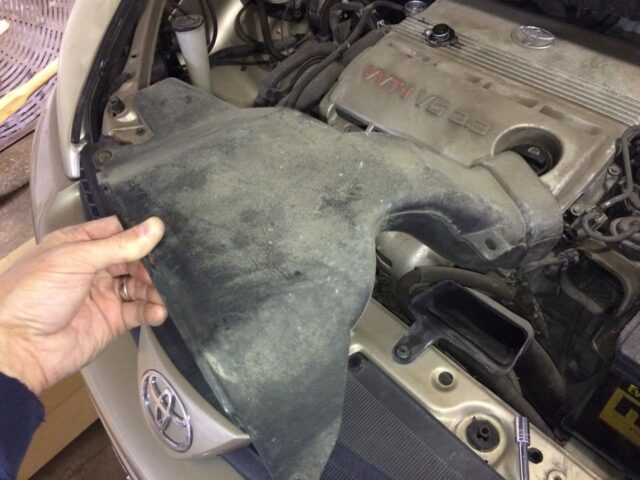
Step 3: Remove the air cleaner assembly top cover.
This will involve disconnecting the mass air flow meter connector, disconnecting 3 vacuum hoses, loosening the two air cleaner cap bolts, and then removing the cover.
 |
| Overview of all the steps to removing the air cleaner assembly top cover |
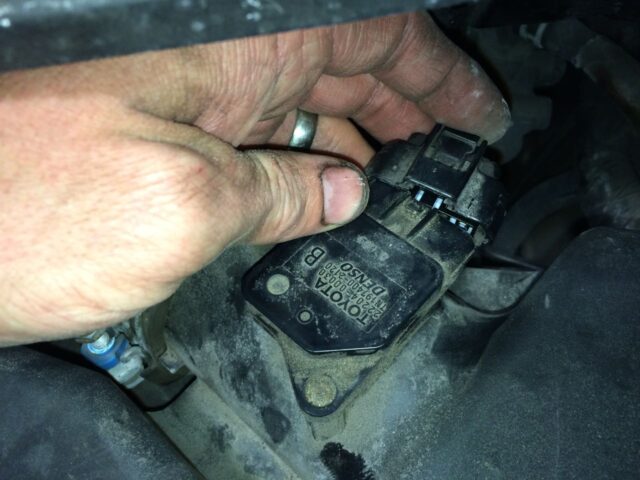
Press the tab down and pull the mass air flow meter connector out:
 |
| Disconnecting the mass air flow meter connector |
 |
| Mass air flow meter connector removed |
 |
| Air cleaner assembly details |
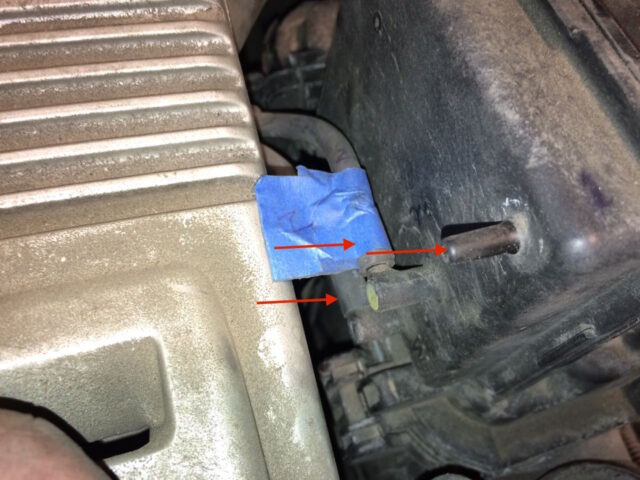
Pull off the three vacuum hoses. They should come off easily by hand.
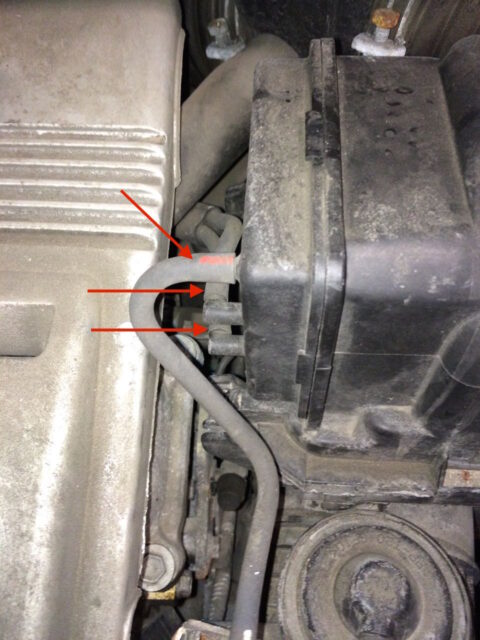 |
| Air Cleaner vacuum hoses |
I labeled mine with tape before I removed them so that I was certain as to which one goes back on which nipple:
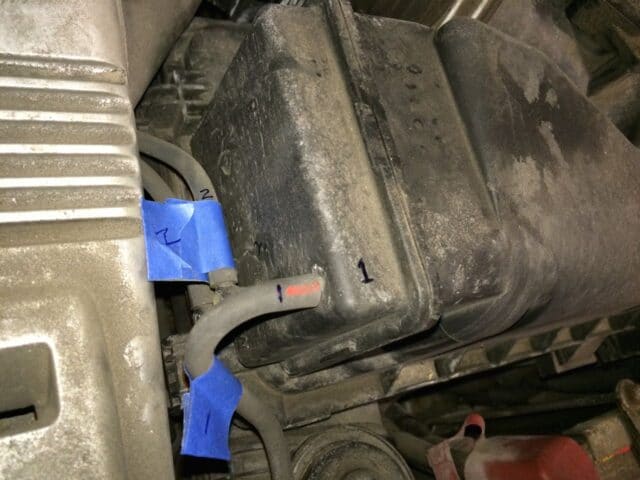 |
| Vacuum Hoses Labeled |
Loosen the two air cleaner cap bolts. They are retained by the cleaner cap so they will not come out. They are pretty long so you’ll have to ratchet for a while. They have a 10mm hex head on them. You’ll need a socket extension to reach the back one.
 |
| Removing the front air cleaner cap bolt |
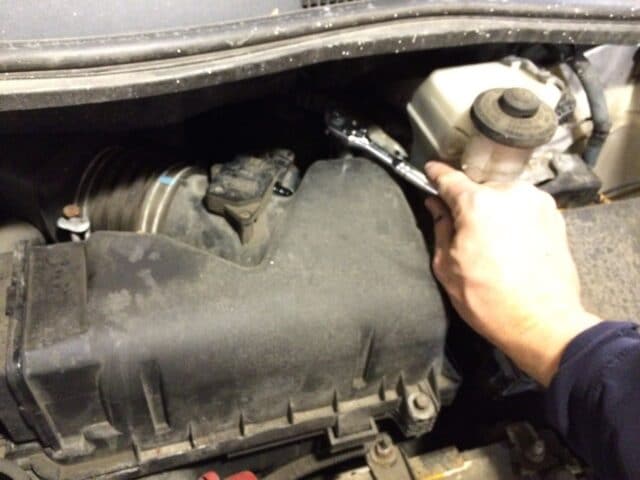 |
| Loosening the back air cleaner cap bolt |
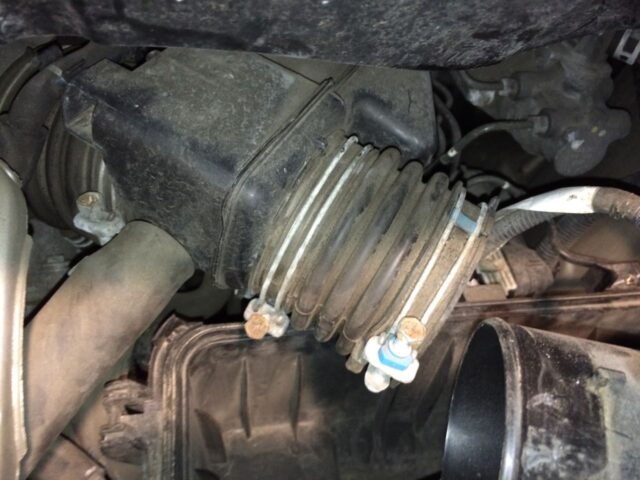
Loosen one or both of the air cleaner hose clamps. I tried loosening the back one and I couldn’t get the hose to come off so I loosened the closer one and then with the aid of a flat head screwdriver was able to get it to slide off:
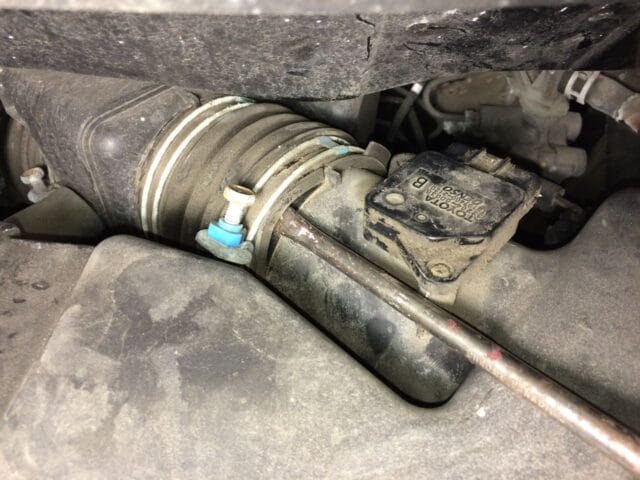 |
| Prying the air cleaner hose off |
Note that there is a lip on the end of the air cleaner cover pipe that wants to keep the hose on there:
 |
| The air cleaner upper assembly is freed from the hose |
Then remove the air cleaner cap:
 |
| Air cleaner cap removed with the filter in it |
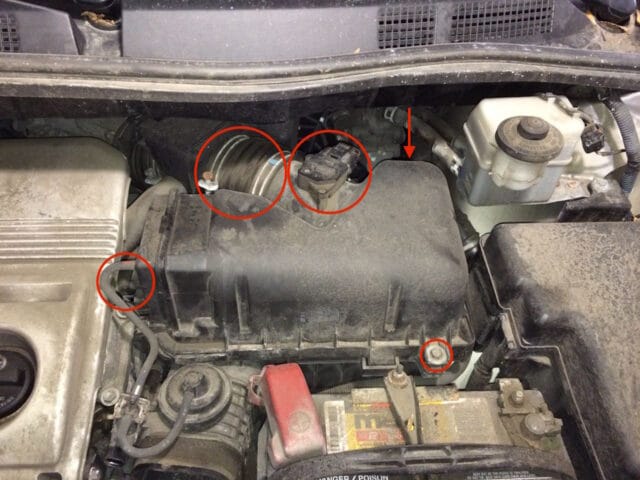
Step 4: Remove the air cleaner assembly lower box.
There’s a wiring harness snapped into the back of it and then that same wire is clipped into another harness in the back. Once you have the wiring harness removed you can remove the 3 bolts and the box.
 |
| Wiring clip details |
The wire harness clamp is pictured below. I was able to take a flathead screwdriver and pry it out of its place.
 |
| Air cleaner wiring harness |
This is what it looks like removed:
 |
| Air cleaner wiring harness clamp removed |
Then release the wiring cable from the clamp:
 |
| Air cleaner box wiring camp removal: Pull the wires out of the clamp in the direction of the arrow |
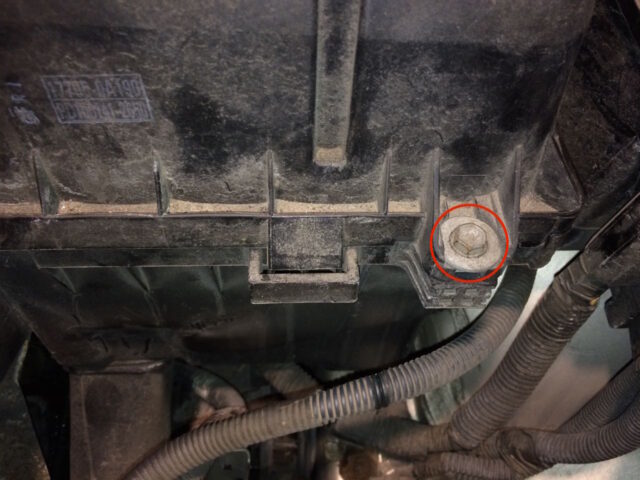
Remove the 3 air cleaner box bolts:
 |
| Air cleaner box bolt locations |
Remove the air cleaner box. It simply slips out of the lower air pipe it is connected to. If you didn’t completely remove the hose that was connected to the cover it will be in the way:
 |
| The upper hose is in the way of removing the air cleaner box |
Completely remove the upper hose and then take out the box. It will lift straight up and out. I was careful to put the mass air flow meter cable up and out of the way so I didn’t accidentally cover it up when I was re-assembling things later:
 |
| Put the mass air flow meter cable up and out of the way |
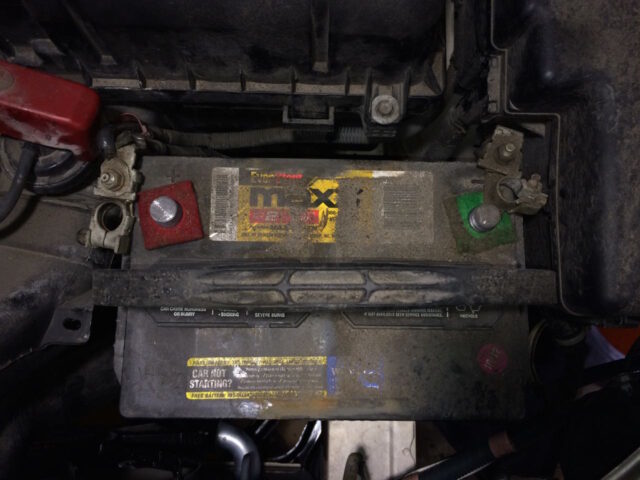
Step 5: Remove the battery.
First remove the bolt on the bracket that is closest to the front of the vehicle. It is a 10mm hex head. You shouldn’t need to loosen the back one.
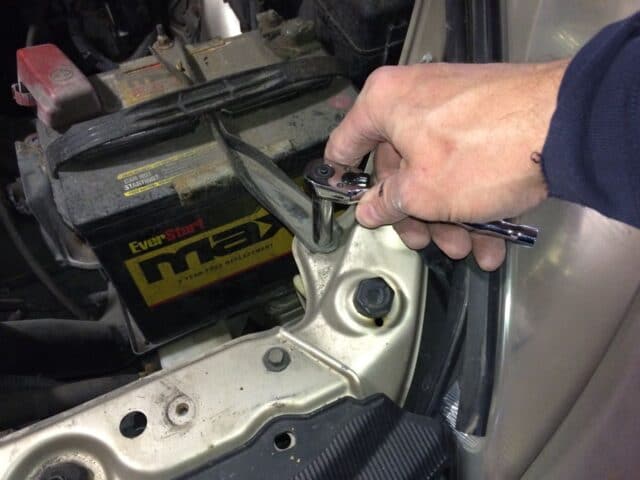 |
| Removing the front bolt of the battery bracket |
Once you have removed the front bolt put it back in its place so you don’t lose it. If you lift up on the battery bracket’s end that you just unbolted then the rod that hooks into the base of the battery pan will come out and you can remove the battery bracket:
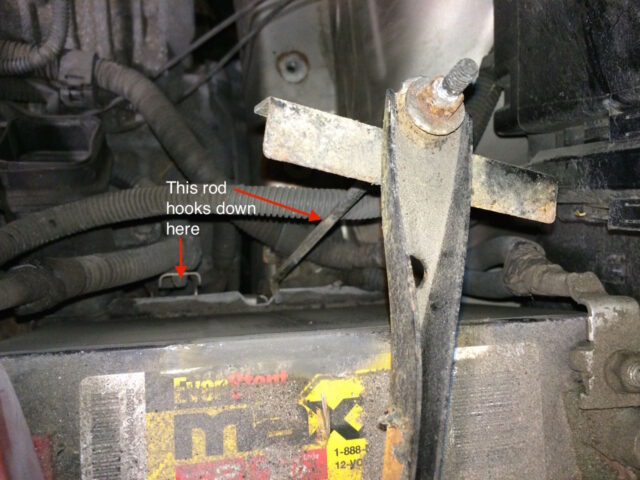 |
| Removing the battery bracket |
Loosen the bolts on the positive and negative battery terminals. Here’s the nut you loosen on the positive terminal:
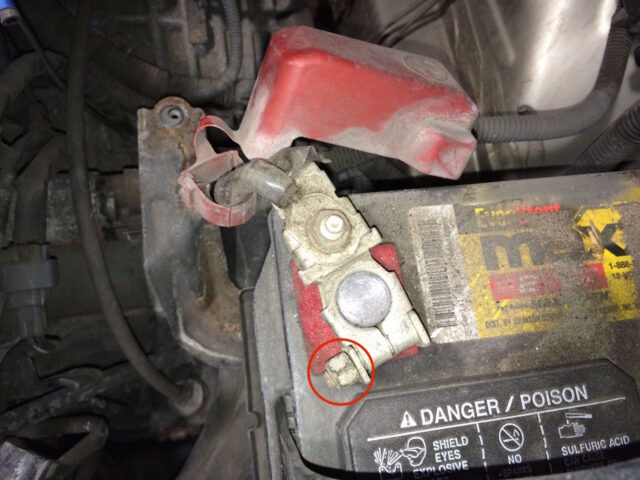 |
| Positive terminal nut location |
And the negative terminal:
 |
| Postive terminal nut location |
Lift the battery cable connectors off the posts of the battery and the lift the battery out of the van. The pan that the battery sits on will lift right out:
 |
| Removing the battery pan–it comes right out after you remove the battery |
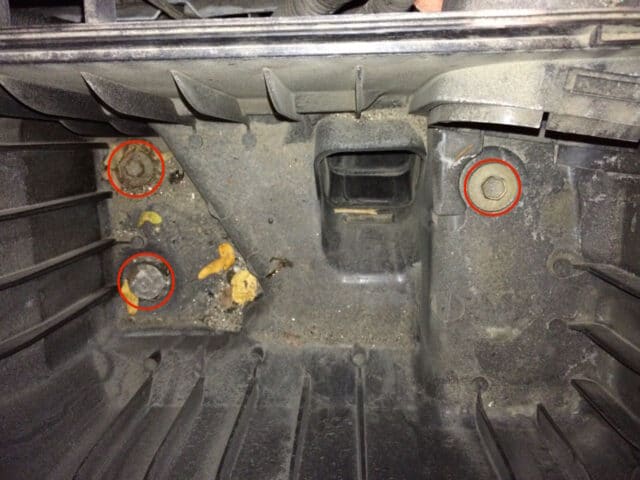
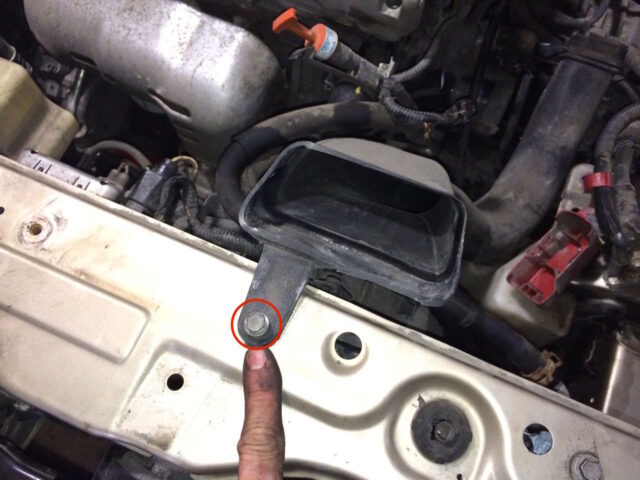
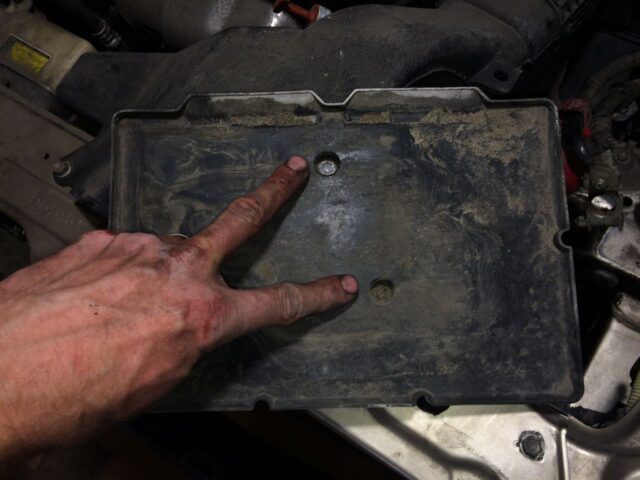
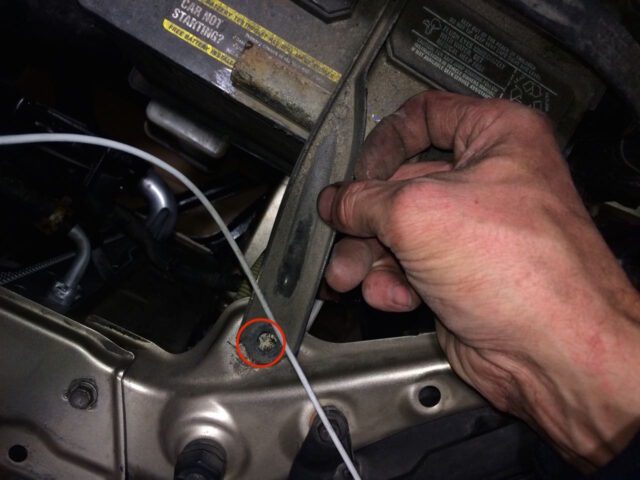
Step 6: Remove the air cleaner bracket.
Remove the two bolts from the air cleaner bracket and set it aside (put the bolts back in their holes for safe keeping):
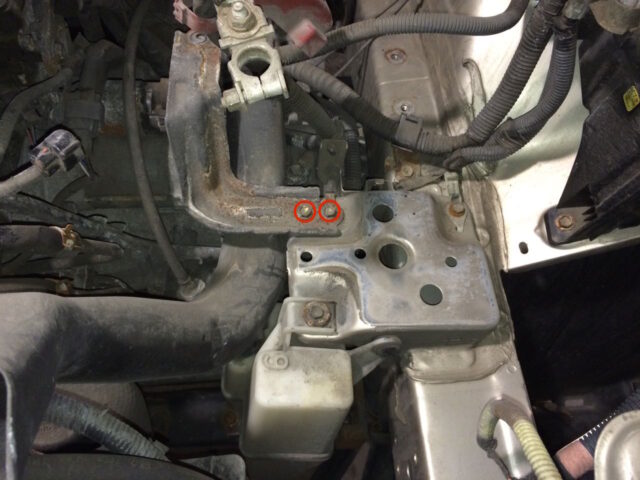 |
| Air cleaner bracket bolt locations |
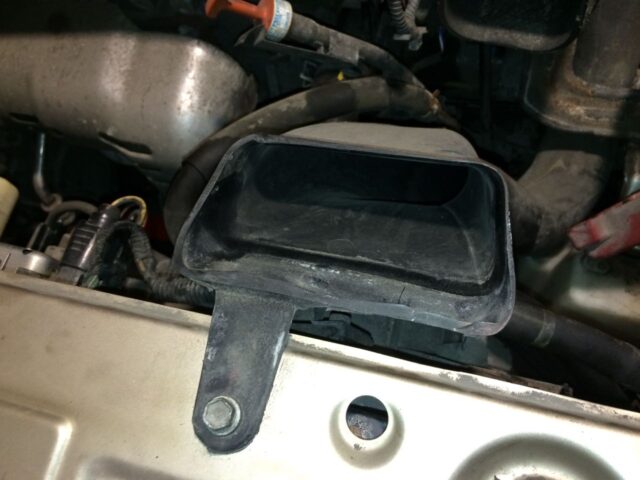
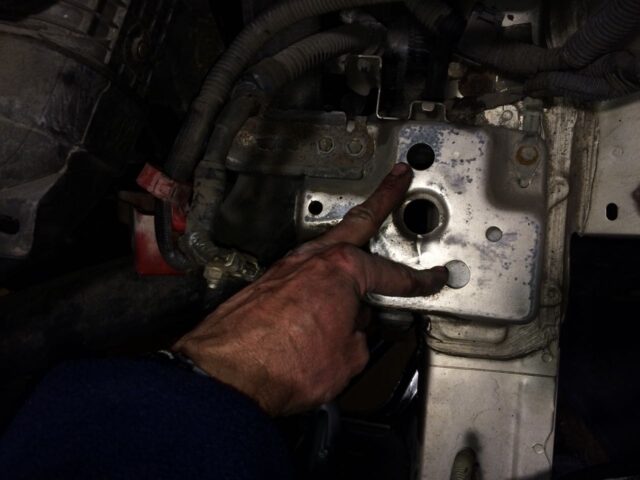
Step 7: Remove air cleaner inlet number 1.
There is one bolt on the front end of it that you must remove:
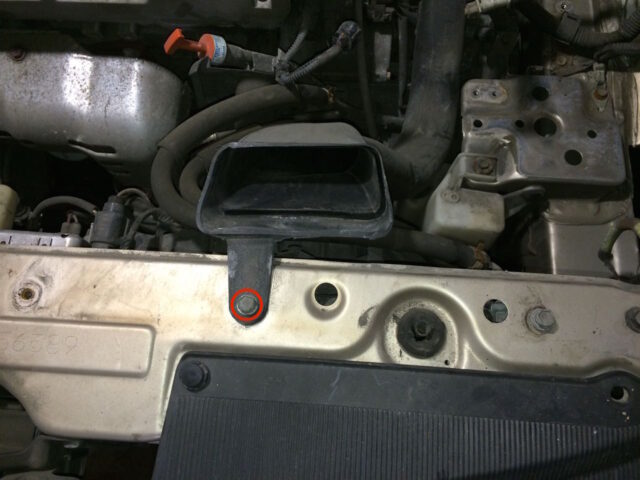 |
| Air cleaner inlet number 1 bolt location |
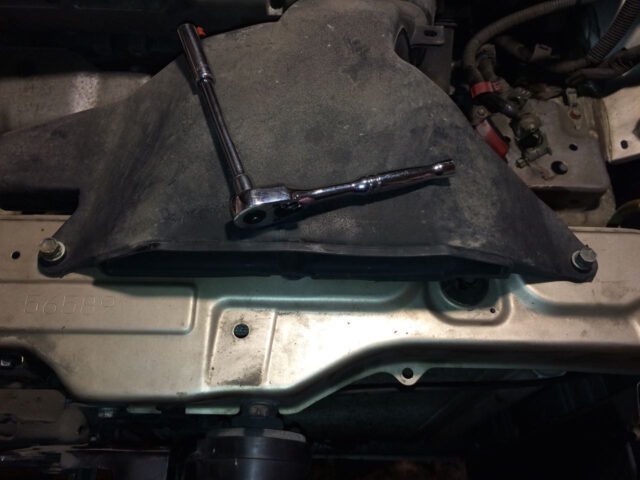
After that bolt is removed you can lift the inlet right out. The inlet does slip into a white box but it comes right out easily.
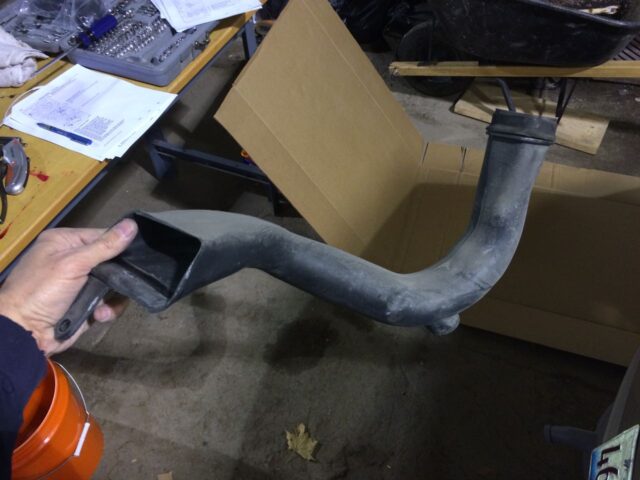 |
| Air cleaner inlet number 1 removed |
| Gaping hole in engine bay |
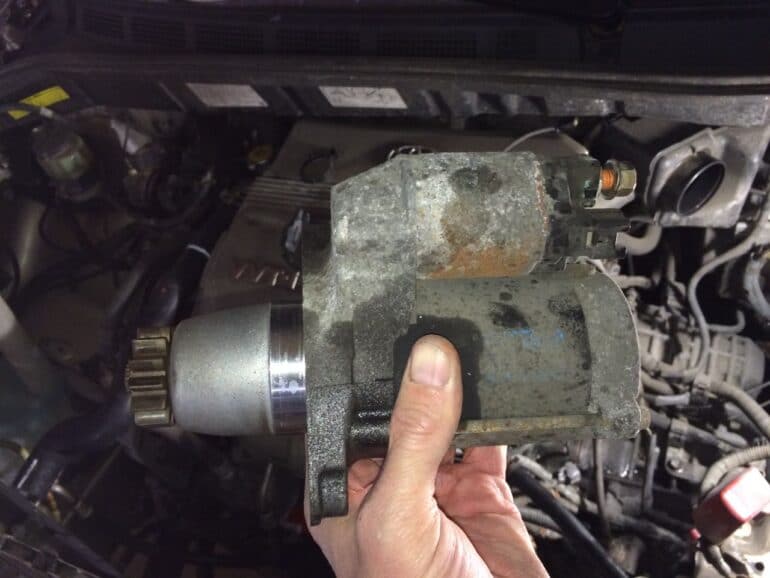
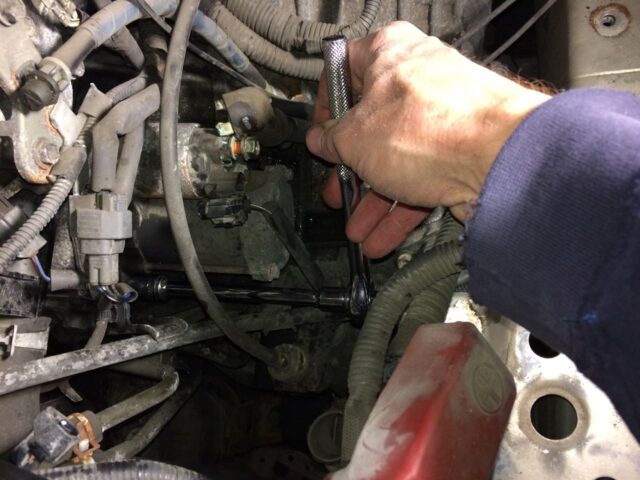
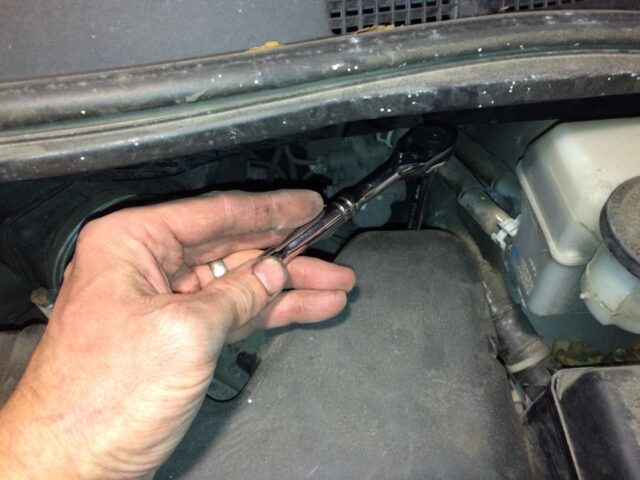
Step 8: Remove the old starter.
Here’s a view of the starter, looking over the driver’s side quarter panel:
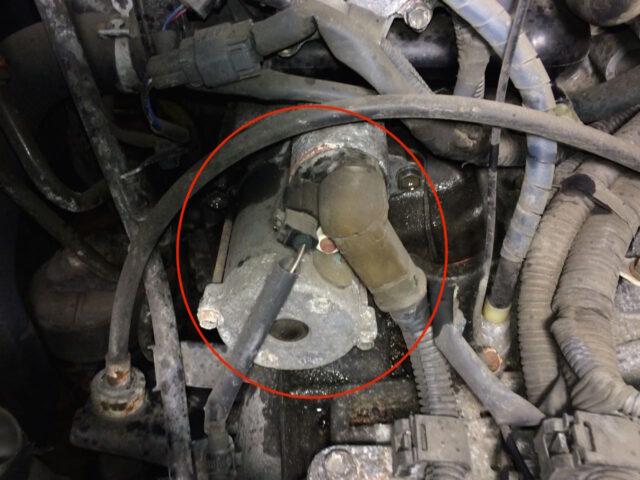
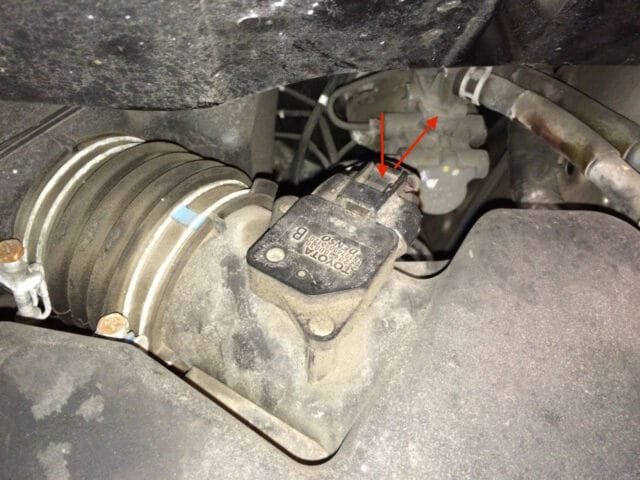
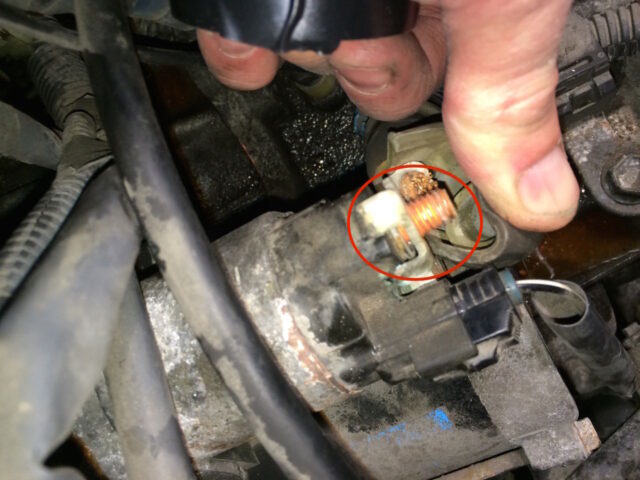
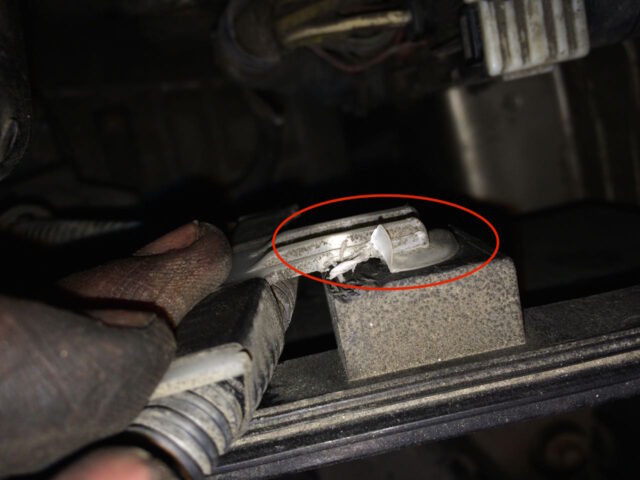
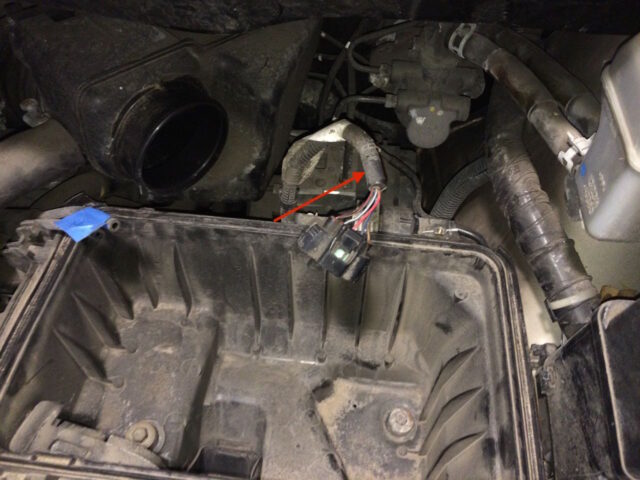
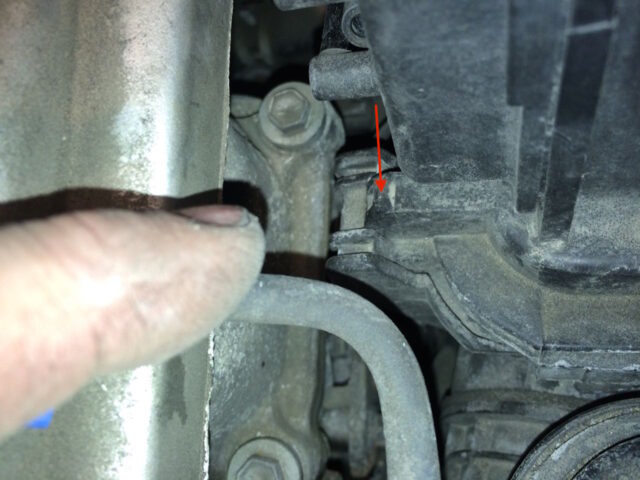
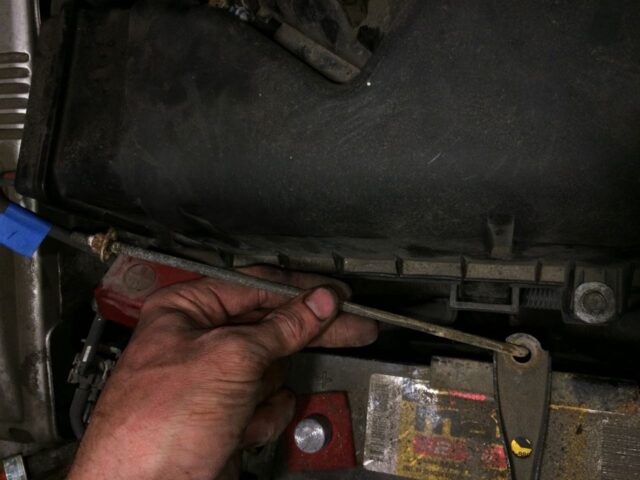
Disconnect the starter wiring connector (circled on left below) and pull back the rubber shielding from the positive wire to reveal the bolt holding it on (like I’m doing below) and remove the 12mm hex-head nut, remove the positive wire, and then put the nut back on the terminal after you remove the wire:
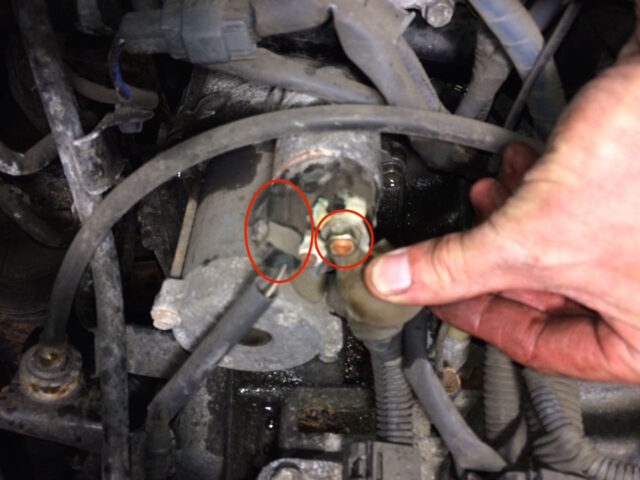 |
| Starter wiring connector and positive wire (I apologize for the blurry picture but it does the job) |
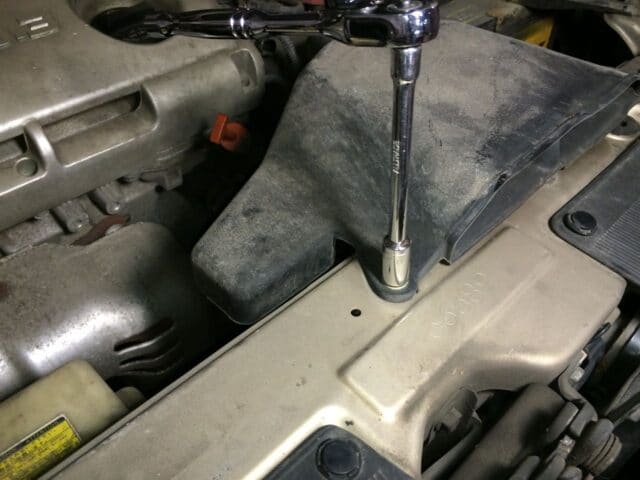
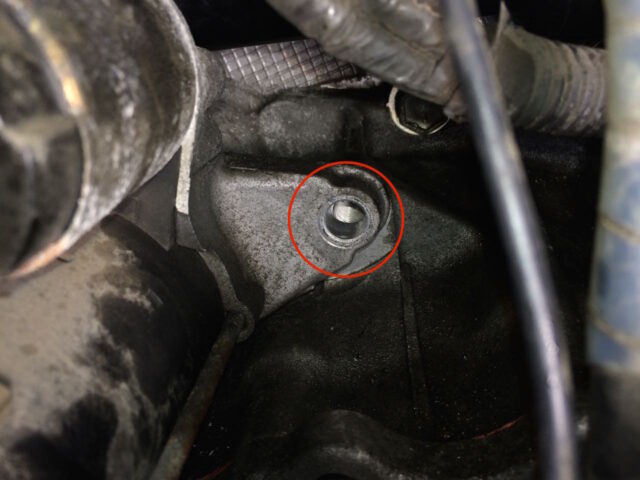
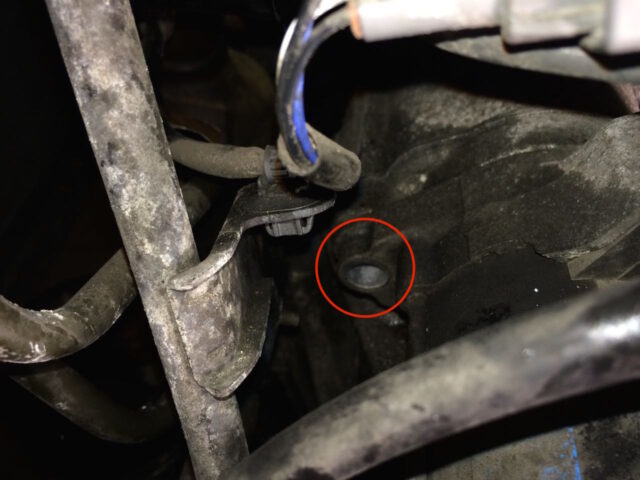
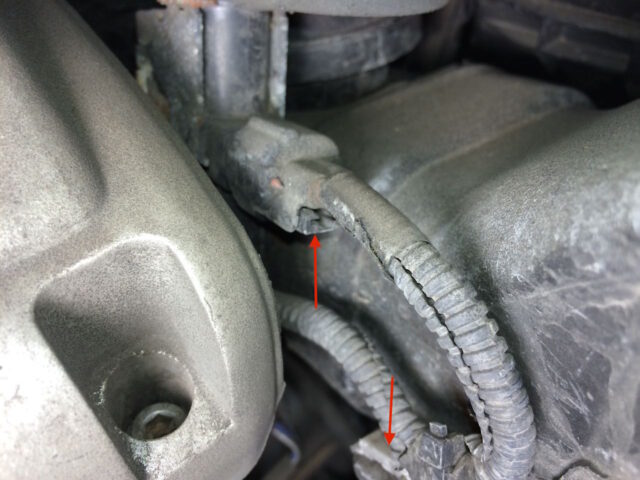
Remove the two 14mm hex-head starter bolts. You will need an extension on your socket to reach them. There is one in the front:
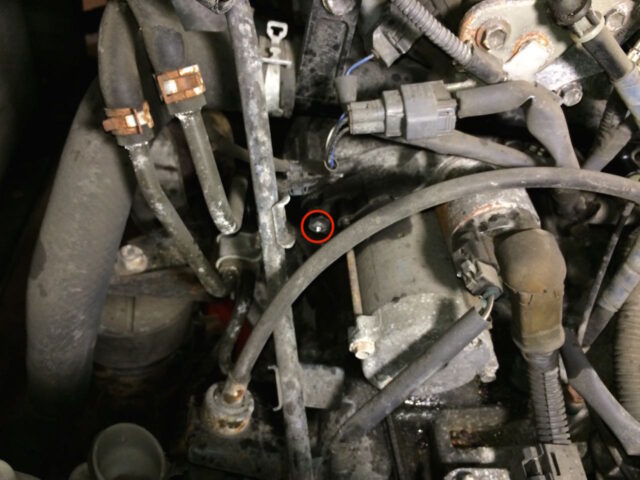 |
| Front Starter Bolt |
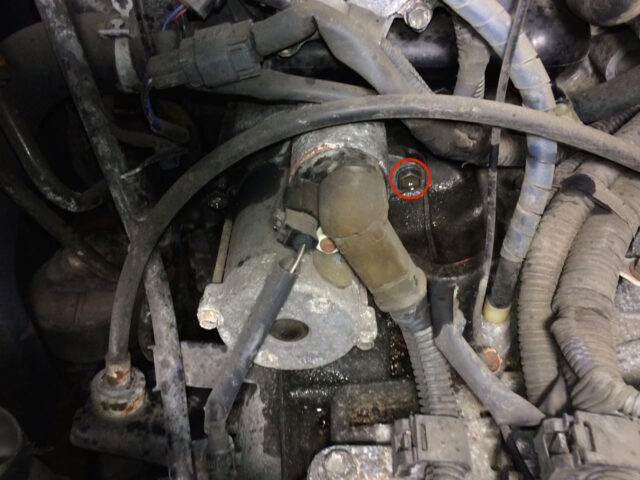 |
| Back Starter Bolt |
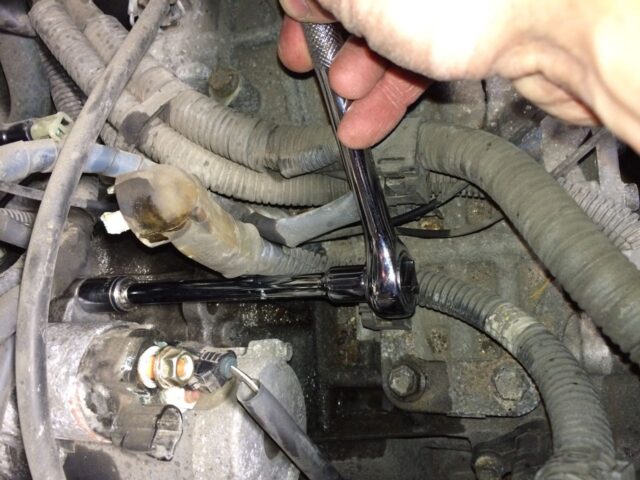 |
| Removing the back starter bolt |
 |
| Removing the front starter bolt |
The old starter removed:
 |
| Starter Removed |
Step 9: Install the NEW starter.
Put the new starter in place, line up the holes, and reinstall the two 12mm hex-head bolts.
 |
| Back starter bolt hole lined up |
 |
| Front starter bolt hole |
Reconnect the starter wiring connector:
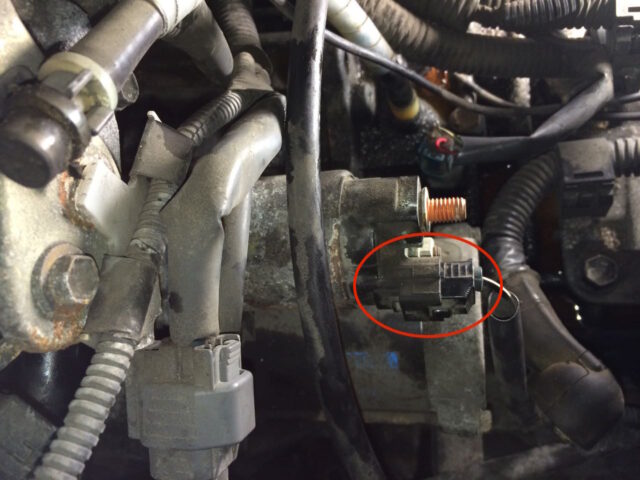 |
| Starter wiring connector reinstalled |
Reinstall the positive wire to the bolt and reinstall the 12mm nut on it:
 |
| Reinstalling the positive wire connection to the starter |
Don’t forget to move the rubber shielding back over the bolt once you have the nut back on there.
Step 10: Reinstall air cleaner inlet number 1.
This is what that looks like:
 |
| Reinstalling air cleaner inlet number 1 |
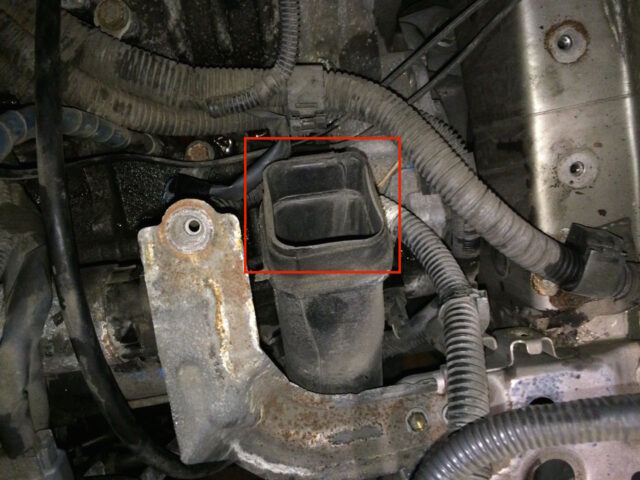
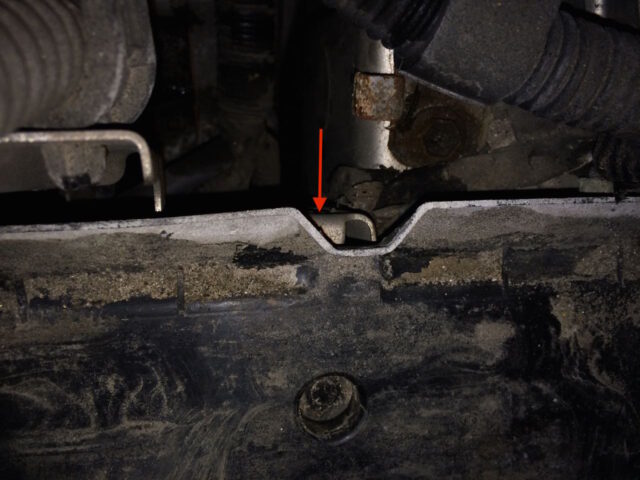
There is an opening in the bottom of the air cleaner inlet number 1:
 |
| Opening on the bottom of air cleaner inlet 1, which fits onto the tank shown below |
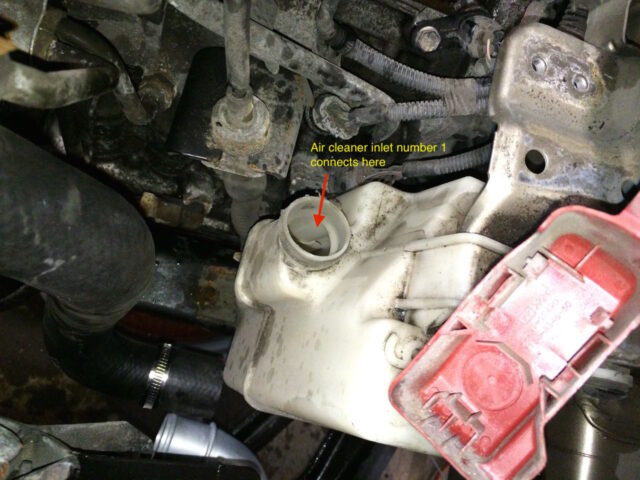 |
| Tank that air cleaner inlet number 1 connects to |
Reinstall the one bolt on the flange of air cleaner inlet number 1:
 |
| Bolt location on air cleaner inlet number 1 |
Step 11: Reinstall the air cleaner bracket.
This is what that looks like:
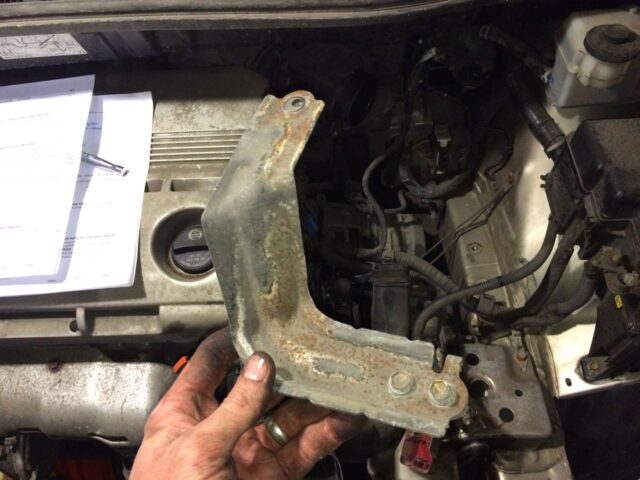 |
| Air cleaner bracket |
It bolts to the holes circled below, right where the battery mounting pan sits:
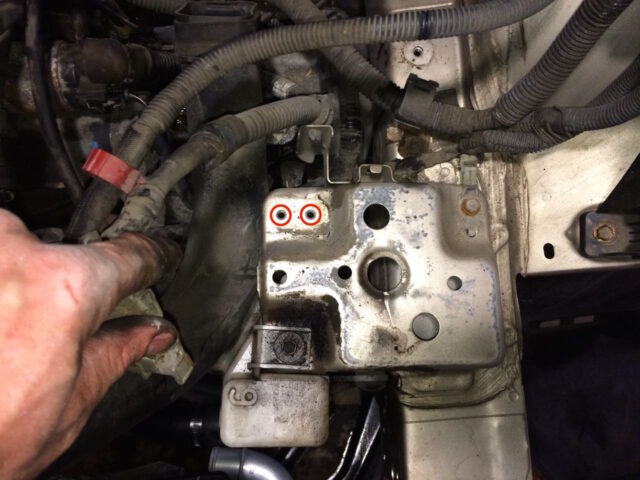 |
| Air cleaner bracket bolt hole locations |
Here it is reinstalled:
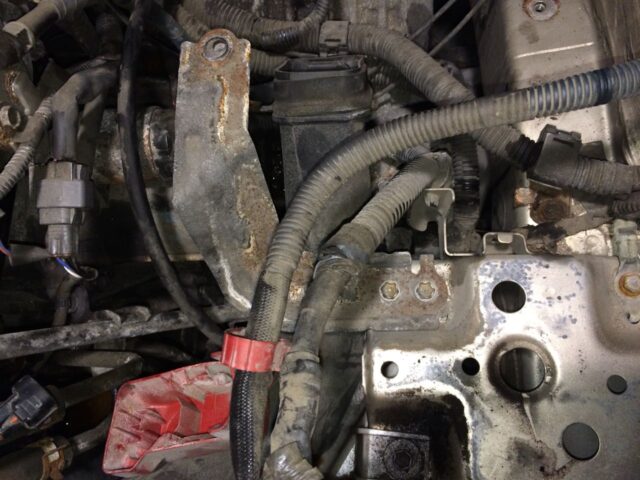 |
| Air cleaner bracket reinstalled |
Step 12: Reinstall the air cleaner (lower) case.
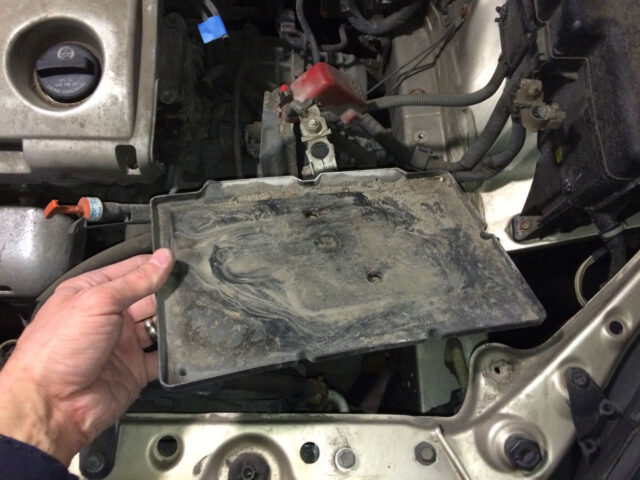
If there was any sand or leaves in it, make sure to clean it out while you have it out of the vehicle and before you reinstall it:
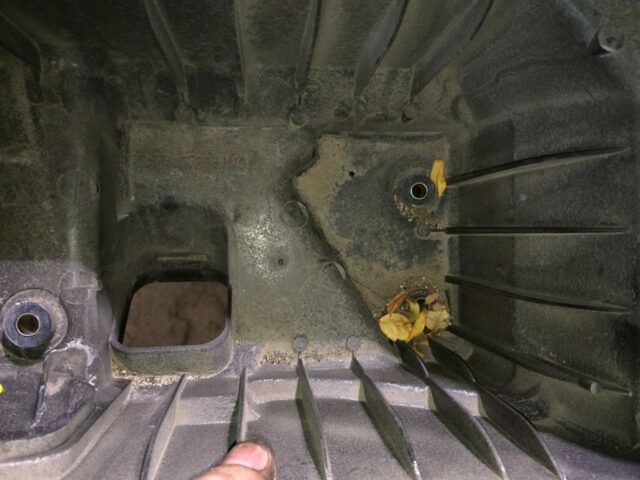 |
| Clean out your air cleaner lower box before reinstalling |
The square hole in the air cleaner case sits down over the end of the air cleaner inlet number one:
 |
| End of air cleaner inlet number 1, where the air cleaner box connects |
Before setting the box down on the inlet make sure your 3 vacuum hoses and the wiring bracket for the VSV connector are out of the way (and you don’t trap them down below). There are three 10mm head bolts you will need to reinstall:
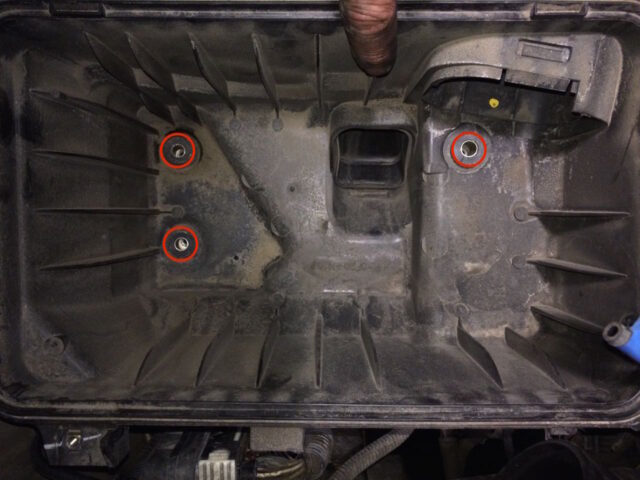 |
| Bolt locations of the lower air cleaner box |
Clip the wiring harness on the back of the box:
 |
| Slip wiring harness into the clip on the back of the air cleaner box |
Then connect the clip up higher on the air cleaner box:
 |
| Snap clip into the upper edge of the air cleaner box |
This is what the wiring harness should look like then:
 |
| Wiring harness in place on back of air cleaner box |
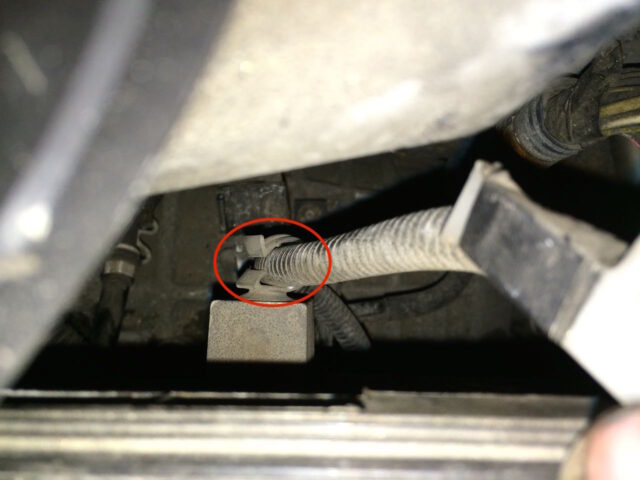
Reconnect the VSV connector:
 |
| VSV connector (upper left arrow) and the wiring harness clip |
Step 13: Reinstall the upper air cleaner case.
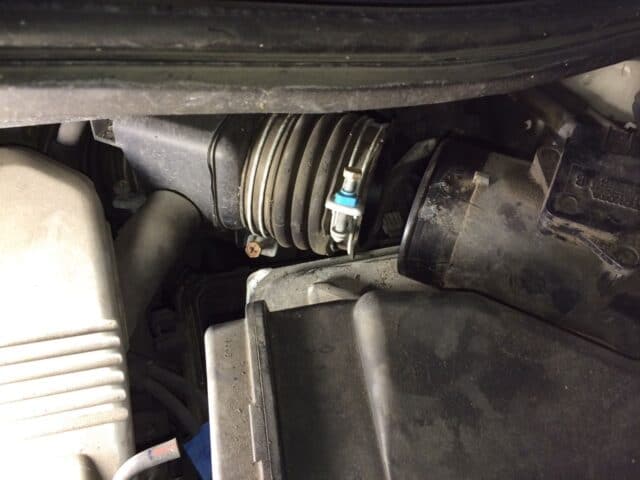
First reinstall the hose if you removed it like I did:
 |
| Air cleaner inlet hose reinstalled |
Make sure to tighten up the hose clamp. Now reinstall the air cleaner cap. First you’ll want to connect it to the hose pictured above, then you’ll want to install your new air filter. To reinstall the cap you’ll tuck the two fingers that stick out of the left side of the cap into their slots on the lower case:
 |
| One of the two fingers that stick out of the cap and tuck into the “catches” on the bottom |
I have written a specific post on: How to Change the Engine Air Filter on a 2004-2007 Toyota Sienna.
Reconnect the mass air flow sensor wiring connector:
 |
| Reconnecting the mass air flow sensor wiring connector |
Reconnect the three vacuum hoses on the left side of the cap:
 |
| Here I have 2 of 3 of the vacuum hoses reconnected |
Tighten the front and rear bolts of the air cleaner cap (10mm socket):
 |
| Front bolt of air cleaner cap |
Tightening the back bolt:
 |
| Tightening the back bolt of the air cleaner cap |
Step 14: Reinstall air cleaner inlet number 2.
This is what it looks like (from when I removed it):
 |
| Air cleaner inlet number 2 for reinstallation |
It slips over the opening on the front of the air cleaner box:
 |
| This is where the air cleaner number 2 connects to the air cleaner assembly |
The the bottom of air cleaner inlet number 2 connects here:
 |
| Air cleaner number 2 sits down over the end of air cleaner inlet number 1 |
Reinstall the two 10mm bolts:
 |
| Air cleaner inlet number 2 ready to be bolted down |
Now you can reconnect the VSV wire harness in place to this air cleaner inlet number 2 as it snaps to this piece. Refer to the last picture of Step 12 for this. I originally had this step out of place but user Todd M helped me with some great feedback.
Step 15: Reinstall the Battery.
First locate the plastic battery pan. Note that it has some “buttons” that protrude down.
 |
| Battery Pan “buttons” |
These buttons fit into the following location:
 |
| Location of where the battery pan sits, down into those holes |
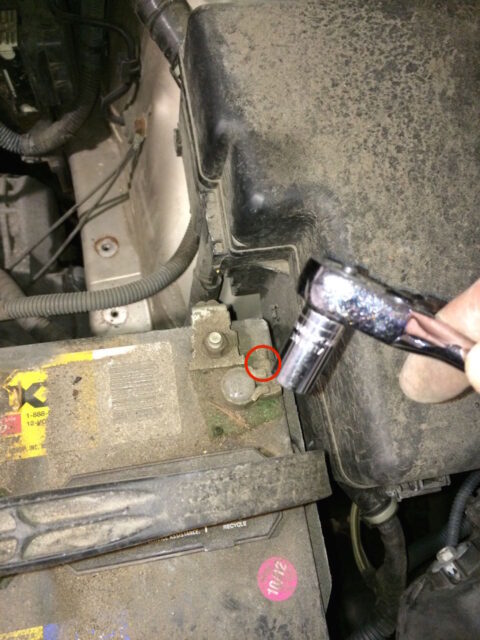
One thing to note is that at the back of the battery pan there is a “hook” where the rod hooks on that clamps the battery down in place. The hole where the rod hooks into is located here:
 |
| Battery mounting hook on the back of the battery pan |
Put the battery back in the van. You’ll need to hold the battery cables out of the way to be able to put it in place. Note that the positive goes on the passenger side and the negative on the driver side:
 |
| Battery back in place |
Now bolt the battery down. First slip the rod through the top bracket:
 |
| Slip the hook end of the rod through the top bracket and push it all the way on |
Now hook the end of the rod on the hook I pointed out above on the back of the battery pan:
 |
| Battery rod “hooked” on the back of the pan |
Keeping pressure “up” on the rod that is hooked on the battery pan, stretch the mounting bracket across the battery and bolt in place (10mm hex head):
 |
| Bolting down the battery bracket |
Reconnect the terminals of the battery. If you made it this far I think you can do that on your own 🙂
Step 16: Test your new starter.
The starter is a pretty simple part so you shouldn’t have any problems with it working. You are good to go now!
All My Toyota Sienna Posts
Amazon Associate Disclosure: As an Amazon Associate I earn from qualifying purchases. This means if you click on an affiliate link and purchase the item, I will receive an affiliate commission. The price of the item is the same whether it is an affiliate link or not. Regardless, I only recommend products or services I believe will add value to Share Your Repair readers. By using the affiliate links, you are helping support Share Your Repair, and I genuinely appreciate your support.
I wanted to let you know that the starter did finally loosen and come out.
Using the 2×4 and my 3 lb sledgehammer I just kept pounding away & the gap widened a bit more, but the stubborn starter still wouldn’t wiggle out. So I used a small tire iron ( because it would fit in the space) and tried to pry the starter up, and it moved up! Because I still couldn’t move it by hand, I went back to banging it with the 2×4 and the 3lb sledge, and that was enough to get it to move down. By alternating use of the 2×4 and the small tire iron, I finally could wiggle it out.
Why am I giving so much detail here? I guess because I just didn’t have the strength to hit the 2×4 hard enough for it to work for me, and I wanted to help out someone else who might be wondering if they could change out a starter.
I will be 70 years old in a few weeks and wanted to share my technique with others to complement your excellent tutorial. John, thank you so much…now I am going to put it all back together.
Beverly, I love it! Thank you SO MUCH for sharing. Great job at finding what you need to do this repair, prevailing despite challenges, and getting that starter out. It is all downhill from here! –John
I also have a starter that won’t budge on my 2004 Sienna. Here’s what I’ve tried…
1. using a 2×4 and extra heavy hammer (this made some movement by one of the bolt holes that was just wide enough to get the end of a flat bar in)
2. With wd40 and the flat bar I attempted to pry across the top of the starter and did gradually widen the opening, but am still unable to move the starter by hand (or with the 2×4) to wiggle it back and forth (or up
and down) to get it out even with a good amount of wd 40 over a couple days.
3. I have been able to verify that the other bolt hole on the starter has moved out because I can slide a thin piece of plastic behind it.
If I could just get the starter to wiggle back an forth, it might come out. I’ve used wd40 throughout this process. Needles to say I’m very frustrated.
Beverly, in regard to the 2×4 trick, I’d encourage you to not be shy on putting one end of the 2×4 on the side of the starter and then hitting the other end of the 2×4 with a hammer. Give it a good hit to dislodge it.
You are amazing my friend. So glad I chose to replace my starter myself. It would have been impossible without your excellent directions. The older starter wouldn’t come off and I google searched how to get it removed if it was corroded in place. Answer – hit it with a hammer. If it still won’t come loose, hit it harder. Careful, hard swings with a hammer and a flat bar got it to come loose. It started right up and I’m off to steady state. This certainly save me money and more importantly time as my work weeks don’t allow for easy drop-offs and pick-ups. I’ll add you to my favorites. Please keep up the good work.
Corrosion happens. That reminds me of brake rotor replacement. Sometimes they corrode and stick in place. Usually I don’t hit them directly but put a 2×4 on them and then hit the 2×4 with the hammer, it’s just a tad bit more gentle I guess. Good work on fixing your Sienna!
Just finished replacing the starter and it works great! Thanks so much for the detailed write up. Note: I used a 10mm 12mm and 14mm socket, never used the 8mm.
Thanks for the feedback Perry. I went back and checked and I do see that the 8mm is never used and I missed listing the 14. I have corrected the “tools needed” list–thanks for pointing that out and good work on repairing your van!
Hello, again!
So, it’s been pouring rain, here, and I have to work outside, which slowed me down. I must admit, since I was only removing the starter to get at changing the thermostat, I wound up just wiggling the water inlet pipe around until I had enough room to pry out the old thermostat and put in the new one. If the Toyota passes inspection, I’ll probably go after the starter, and will let you know what comes of it, but right now I’m hesitant to risk breaking anything that’s currently working.
I am a smaller woman (okay, I’m short!) and my hands are small but strong, so I got away with this method…but I can’t recommend it. It was such a tight space I had to stop a couple times to free one hand or the other that had gotten trapped. I must’ve looked like something from an old Warner Bros cartoon, nearly falling head-first down into the engine of the car. Probably should have just removed the starter.
But I will definitely be using your 2×4 suggestion on the starter for my 2001 Town and Country, which is the next repair I’m tackling! (Another starter that looks like it has “bonded” way too well with it’s car…which I’m pretty sure needs a solenoid replaced…yes, I am blessed with two semi-functional minivans “of a certain age.”) 🙂
Meanwhile, the rest of that thermostat repair went GREAT! Thanks so much for these tutorials!!!
Yours,
Nancy
Hi, I don’t have a website, hope that’s okay.
Thank you for these sites of yours…they’re amazing, and are helping me save my car!
I have been following your instructions (need to replace thermostat) and ran into a problem with the starter.
I removed the bolts and disconnected the wires, but the body of the starter is stuck tight. I’ve been advised to try “hitting it with a hammer,” but don’t know where to strike nor whether it’s wise to apply a steel hammer to what looks like an oxidized aluminum starter.
I’ve searched online, but all sites show the starter simply sliding out at this point, and mine has no interest in following that plan.
Help?
Even if you have no suggestions to offer on this particular issue, thanks again for your sites.
-Nancy
Nancy, thank you for your feedback. I think I can help you. What I would do to dislodge your stuck starter is take a block of wood (for example, a piece of 2×4) and place one end of it on the side of the main body of the starter, and then tap the block of wood with a hammer. This will not damage the starter and will help break it free. Let us know how it goes for you.
Probably saved me over $500! Thank you for the clear directions and great pictures. REALLY appreciated the time you took which saved me! One possible correction – Under Step 12, the VSV wire harness clip can’t be re-installed until Step 14 when air cleaner inlet #2 is put back. The air cleaner inlet #2 has the hole into which the VSV wire harness clip is inserted. Thanks again, I really appreciate you!
Oh wonderful to hear Todd–good job on fixing it yourself and THANK YOU for the correction for the steps. I haven’t followed these instructions myself, yet, so I haven’t tested them so I appreciate the tip about the one step being out of place. I just figure out the repair and take a lot of pictures and then try to re-write the repair from the pictures but I can get things mixed up. I’ll make an adjustment to the tutorial.
Thank you so much! I was able to remove the old and install the new starter in 45 minutes because of your tutorial. You saved me so much money!! You certainly enhance confidence within an independent woman, that she can truly tackle car repairs! Thank you again!!!
Glad to hear you were able to fix your van! Good job Dianna!!
I am not a mechanic but was able to follow your instructions and pictures to get my starter replaced. Videos are great but the photos and step by step instructions are better. Thank you. You saved me several hundred dollars. Mickey. Knoxville, TN
John, This was so simple and took me about 2hrs, not rushing and including going to the auto part store. Thanks so much for posting this. This was better than the videos I was looking at. I like the step by step with pictures. It allowed me to scroll along or go back if needed. Saved me a lot of time and money, and it was fun getting back into automotive work. Thanks again for posting this.
This was a fantastic resource! It made the job super easy. It took me about 2 hours, which included the trip to the autopart store to buy the new starter. Thank you so much!
Thanks for the feedback Dustin, glad to hear you were able to repair your van.
Worked great! Thanks for the instructions – way better than a video…
Thanks for the feedback Joe and good job on fixing your Sienna!
I just went through these instructions and they are great, thank you! I’m not a professional mechanic my any means but it took me about 1.5 hours without rushing, the new starter fired up the very first time with no problems. Only thing I noticed is that I think you say to re-insert the VSV connector twice, at the end of step #10 and then at the end of step #12 again, I panicked thinking I had buried a connector and would need to disassemble everything again but I figured it out.
Thank you again!
Thanks Ken for alerting me of the duplicate step–I have corrected the tutorial–input like yours will help the next person out. Good work on repairing your van!
Thanks for putting this together. Last time I changed a starter was 19 years ago in a 78 Mercury Cougar. The steps worked out great… I had some trouble removing the VSV connector, but other than that it was smooth sailing. Thanks again!
That VSV connector is a tight one and I had to use a screw driver to get mine off. I’m glad you were able to replace another starter–I bet there was a lot more room around the engine of that ’78 Cougar than your Sienna! Mike, thanks for taking the time to share.
Wow! Thanks for taking the time to put this together. Can’t imagine how long it took you to document the entire process. Followed your directions and finished changing out the starter (and replacing the air filter) in our Sienna in about an hour.
Tim, you are so welcome. Thanks for taking the time to leave a message. It does take time but I like writing the articles and it is fun to help people and interact with others who are struggling with the same issues. I’m glad to have been able to help.
This article absolutely saved me and my car yesterday! My car was having some trouble and then completely stopped starting in a lower-level parking garage in downtown Austin TX in the middle of summer. Your clear directions and photos were easy to follow and we got the starter replaced without breaking anything. We also really appreciated that you included how to put everything back together. My first time really working on a car and I’ll definitely come back to this site if I ever need anything again! Thank you!!
Jenny, thank you for taking the time to share. Your feedback makes me want to write more articles. Please come back again, I’ll have likely ran into the same problem already and hopefully can help once again.
Worked like a charm! Thanks!
Although, I didn’t have to disconnect the radiator hose. Maybe a different model?
Thanks so much for the comment Scott and thank you for pointing out that unnecessary step! I wrote the entire radiator repair first, including the thermostat replacement, which requires the removal of the starter, and then created this post by removing the rest of the article–but I missed removing that one step! Thanks for letting me know, I corrected the article.